







In het geval van het slepen van een aanhangwagen is de juiste bedrading niet alleen een kwestie van gemak, maar ook een belangrijke component op het gebied van veiligheid en wettelijke naleving. Voor de meeste mensen zijn de fijne kneepjes die gepaard gaan met het veranderen van een 5-draads aanhangwagencircuit in een 4-draads de installatie kan echt overweldigend zijn. Het maakt niet uit of u een zeer ervaren doe-het-zelf-persoon bent of net begint met het onderhoud van uw trailer, weten hoe deze systemen functioneren en hoe u ze kunt aanpassen is cruciaal voor de perfecte werking van alle verlichting en signalering. De huidige gids is bedoeld om de verwarring over de bedrading weg te nemen, en het biedt u ook eenvoudige en stapsgewijze acties om de bedrading van uw trailer succesvol om te zetten zonder de voordelen van functionaliteit of veiligheid te verliezen. Na het lezen van dit artikel heeft u het vertrouwen om dit project op zich te nemen, wat op zijn beurt een betrouwbare en soepele verbinding tussen uw auto en trailer zal creëren.
Trailerbedrading begrijpen
De bedrading van de aanhangwagen is dat systeem dat alle elektrische signalen van uw auto met de aanhangwagen verbindt en ervoor zorgt dat alle belangrijkste functies, zoals remlichten, richtingaanwijzers en looplichten, goed werken. De standaard bedrading van de aanhangwagen zendt deze signalen via een 4-pins, 5-pins, 6-pins of 7-pins connector, waarbij 4-pins connectoren veruit de meest gebruikte zijn voor basisverlichtingsbehoeften. Elk van de pinnen heeft bijvoorbeeld één specifiek doel: het aansturen van linker- of rechter richtingaanwijzers, achterlichten of aarding. Het is essentieel om strikt vast te houden aan het type en de configuratie van de connector van uw aanhangwagen tot die van uw auto om de goede werking van de verlichting te garanderen. Alles doen na het werken een test of niet.
Wat is een 5 Wire Trailer Wiring System?
Het 5-draads aanhangwagenbedradingsysteem bouwt voort op het standaard 4-draads systeem door nog één draad in te voeren, die meestal een specifieke functie vervult afhankelijk van het type aanhangwagen De vijfde draad wordt meestal toegewezen aan elektrische remmen of hulpstroom, waardoor de bruikbaarheid van de aanhangwagen toeneemt De opstelling bestaat uit draden voor
- Links draai/remlichten (Geel)
- Rechtsaf/remlichten (Groen)
- Staart-/hardlooplichten (Bruin)
- Grondverbinding (Wit)
- Hulpfunctie draad (Blauw of aangewezen kleur)
Een goede montage vereist een nauwgezette uitlijning met het bedradingssysteem van het voertuig om niet alleen de compatibiliteit maar ook de veiligheid te garanderen. Het testen van het systeem na installatie is een must om te bevestigen dat alle signalen en componenten correct werken.
Wat is een 4 Wire Trailer Wiring System?
Het belangrijkste onderscheid tussen een 5-draads en een 4-draads aanhangwagenbedradingssysteem is voornamelijk te wijten aan hun functionaliteit en het soort toepassingen waarvoor ze zijn ontworpen. Het 4-draadssysteem verbindt de remlichten en richtingaanwijzers van de aanhangwagen tot één circuit voor elke kant, waardoor de bedradingsindeling wordt vereenvoudigd en geschikt wordt gemaakt voor standaardaanhangwagens zonder onafhankelijke systemen zoals overspannings- of elektrische remmen. Het systeem heeft daarom draden voor de linkerrem en richtingaanwijzer, de rechterrem en richtingaanwijzer, de staart-/looplichten en een aardverbinding.
Aan de andere kant zorgt het 5-draadssysteem voor de scheiding van de remlichten en de werkingspaden van de richtingaanwijzers, wat gebeurt door de introductie van de vijfde draad. Dit is van cruciaal belang voor aanhangwagens uitgerust met overspanningsremmen, aangezien het het ontkoppelen van dergelijke remmen omvat bij het achteruitrijden door de vijfde draad te gebruiken om een solenoïde met omgekeerde vergrendeling te activeren. Het 5-draadssysteem biedt nauwkeurigere controle en flexibiliteit; het is dus ideaal voor ingewikkelde opstellingen van aanhangwagens.
Bovendien zijn beide systemen zo gemaakt dat de compatibiliteit van het trekkende voertuig behouden blijft; Bij het overstappen op het 5-draadssysteem vanuit de 4-draads kan het echter nodig zijn dat er een adapter of kabelboom wordt vervangen, op basis van de specifieke elektrische configuratie van het trekkende voertuig die in gebruik is. In beide systeemconfiguraties zijn een goede installatie en stevige verbindingen cruciaal bij het garanderen van prestaties en veiligheid.
Belangrijkste verschillen tussen 5-draads en 4-draadssystemen
| Feature | 5-draads systeem | 4-draads systeem |
|---|---|---|
| Rem- en richtingaanwijzers | Afzonderlijke circuits voor remlichten en richtingaanwijzers | Gecombineerde rem - en richtingaanwijzerscircuits |
| Wire Count | 5 draden totaal (inclusief hulpfunctie) | 4 draden totaal (alleen basisverlichting) |
| Complexiteit | Complexer, geschikt voor geavanceerde trailers | Eenvoudiger, ideaal voor standaard trailers |
| Applications | Aanhangwagens met overspanningsremmen, elektrische remmen of hulpsystemen | Basisaanhangwagens zonder onafhankelijke remsystemen |
| Omgekeerde Functie | Kan omgekeerde lockout-solenoïde activeren | Geen speciale omgekeerde functie |
Het omzetten van 5 Draadaanhangwagenbedrading aan 4 Draad
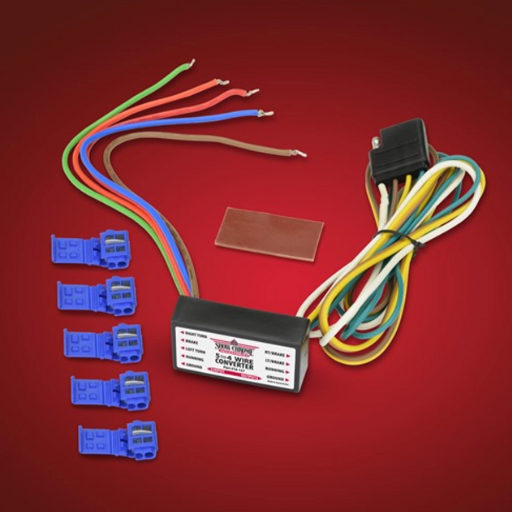
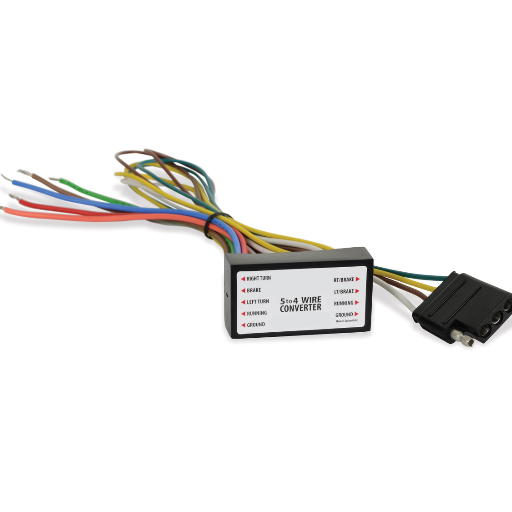
Bij het ombouwen van een 5-draads aanhangwagenbedradingssysteem naar een 4-draads exemplaar is het belangrijkste dat het 5-draads systeem remlichten en richtingaanwijzers gescheiden heeft, terwijl bij de 4-draads de combo remmen plus richtingaanwijzer moet zijn, dit kan met een aanhangwagenlichtomzetter Hier volgen de stappen
Stap 1: Verkrijg een Trailer Light Converter
Zorg voor een trailerlichtomvormer van goede kwaliteit die is gemaakt om de twee functies remlicht en richtingaanwijzer te combineren en het naast elkaar bestaan ervan te vergemakkelijken.
Stap 2: Verbind de Draden
De invoerdraden van het 5-draadssysteem moeten worden aangesloten op de lichtomvormer van de aanhangwagen. Meestal zijn er aparte draden voor linksafslaan, rechtsafslaan, remlichten en achterlichten. De rem- en richtingaanwijzersfuncties worden geconsolideerd aan de uitgangszijde van de omvormer, wat resulteert in een vierdraadsopstelling (linksafslag/remmen, rechtsafslag/remmen, achterlichten en aarde).
Stap 3: Veilige verbindingen
Isoleer en bescherm alle bedradingsaansluitingen goed om elektrische problemen te voorkomen.
Stap 4: Test het systeem
Nadat de installatie is voltooid, test u de aanhangwagenverlichting om te verifiëren dat de remlichten, richtingaanwijzers en achterlichten allemaal correct werken.
Samenvatting: Met behulp van een lichtomvormer kan de overgang van een 5-draads systeem naar een 4-draads systeem snel worden gedaan, waarbij alle benodigde verlichtingsfuncties behouden blijven.
Tools Required for Conversion
For a 5-wire to 4-wire conversion, the following tools are very frequently needed as the main ones:
Light Converter Kit
It is required to change the wiring system and to make sure that the vehicle and the trailer are compatible.
Wire Strippers and Crimpers
They are utilized for the removal of insulation from the wires and for the crimping of connectors for strong electrical connections.
Multimeter
It is very important for testing the voltage and the continuity to confirm the wiring arrangement and to spot any faults.
Electrical Tape and Heat Shrink Tubing
They are used for the insulation of connections to keep them safe from moisture and electrical shorts.
Screwdrivers and Socket Wrenches
They are used for the purpose of securing the converter and the wiring components in place during the installation process.
Wiring Diagram
It is a trustworthy reference that is especially for your vehicle and trailer configuration for precise implementation.
Step-by-Step Guide to Using a Converter
1Secure the Vehicle and Trailer
First of all, the vehicle has to be parked on a flat and stable surface where the brake parking is to be engaged. The trailer should be in such a position that easy access to the wiring connections is granted.
2Review the Wiring Diagram
Take the vehicle-specific wiring diagram as a reference to point out the right wires for the connections. Check the specifications for both the input (vehicle side) and output (trailer side).
3Bereid de draden voor
By stripping a part of the insulation from the wires, the copper strands will be exposed. The purpose of this is to ensure a good connection and also to reduce resistance in the electrical circuit.
4Connect the Converter
The matching wires on the converter have to be connected to those on the vehicle. The wiring diagram should be used to verify the connections (e.g., left turn signal, right turn signal, brake lights, and tail lights). The connections have to be secured either by using butt connectors or soldering, which would last longer.
5Secure Grounding
The ground wire from the converter will have to be connected to a clean, unpainted metal area of the vehicle’s frame. Grounding that is done securely leads to stable electrical communication.
6Test the Connections
The trailer is to be connected to the vehicle, and then every light function (turn signals, brake lights, and running lights) is tested to confirm they are working properly. A multimeter should be employed for troubleshooting if any of the lights do not turn on as they should.
7Wiring Secure
After the wiring is confirmed to be operational, it should be secured with zip ties or cable clamps to prevent stress or abrasion. Also, all wires should be routed neatly to avoid interference from moving parts.
8Final Inspection
Make a thorough inspection of the whole setup to ensure that all connections are tight, wires are protected, and there are no exposed areas that could cause shorts or damage.
Important Safety Note
If you follow these steps correctly, a converter will be used properly and a reliable connection for your trailer’s lighting system will be provided, thus keeping safety and compliance on the road.
Choosing the Right 4 Wire Trailer Harness
Selecting the right 4-wire trailer harness is extremely important in order to have the best possible performance and safety. When making your selection, start with the wiring configuration that you need for your trailer, which is usually the same as the 4-wire systems that have a connection for the left turn/brake light, right turn/brake light, and running lights, plus a ground wire. Make sure that the harness is the same type of connector as the one on your tow vehicle, for example, a flat four-pin connector, to ensure compatibility.
Think about the quality of the material and the harness’s durability since it will be functioning outdoors. Consider the weather-resistant insulation, corrosion-resistant terminals, and UV protection that all serve to prolong the system’s lifespan. Furthermore, check that the harness is rated for the right voltage and amperage so that it can carry light for the trailer without risk of overheating.
The simplicity of installation is another necessary aspect. Choose a harness that comes with detailed instructions, has pre-attached connectors, and wire long enough to reach your trailer without putting it under extra tension. Some of the models might even offer the additional features of color-coded wiring or plug-and-play designs to make the installation smoother.
In the end, if you give preference to compatibility, durability, and functionality, it will be very accurate to say that you will finally pick the most suitable 4-wire trailer harness for your needs, which will not only yield reliable performance but also ensure improved safety during operation.
Wiring Harness and Connectors
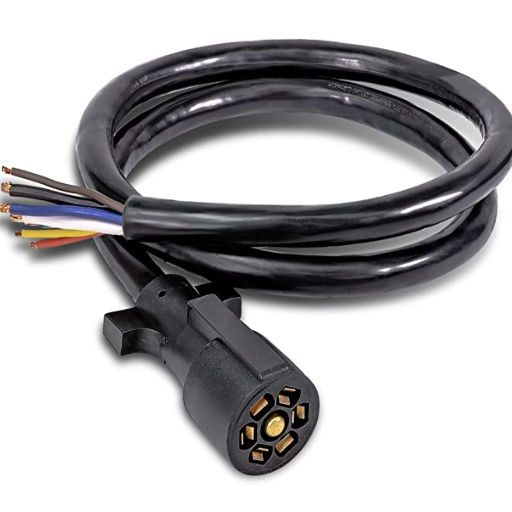
When you pick wiring harnesses and connectors, make sure that they conform to the electrical specifications of your trailer and towing vehicle. To avoid corrosion and keep the functionality of your system over a long period, look for materials that are strong and resistant to weather. Pick connectors that are appropriate for your particular wiring setup, e.g., 4-pin or 7-pin options, depending on the power and lighting requirements of the trailer. Correct installation requires tightly securing all connections and not allowing the wires to be too loose or too tight. Check the parts periodically for signs of wear or damage so as to maintain the performance and safety levels.
Types of Trailer Wiring Harnesses
Trailer wiring harnesses come in various types, each catering to different towing requirements and configurations:
4-Way Flat Connector
The 4-way flat connector is amongst the most ubiquitous types, generally applied to non-braked small trailers. This connector allows for basic light functions only—tail lights, brake lights, and the like. It is not only fastened in an uncomplicated manner but is also a good choice for light trailers since there is no need for further power connections.
5-Way Flat Connector
The 5-way flat connector is quite similar to the 4-way harness, and it has an extra wire that is often utilized for controlling a reverse lockout on surge brakes or for lighting the backup area. Accordingly, this type is good for both boat trailers and trailers that require an extra auxiliary feature on top of the standard lighting that has to be done.
6-Way Round Connector
Technically, the 6-way round harness has even more possibilities, since it supports trailer brake and auxiliary power. It is usually fitted on medium-duty trailers and is very applicable to those situations where power delivery or an auxiliary function of a certain technical specification is needed.
7-Way Round Connector
The 7-way round connector is the most versatile one, and it is thoroughly used for larger trailers or RVs. The wires for tail lights, turn signals, brake lights, electric brakes, backup lights, a 12V power supply, and a ground connection are all included. This harness is not only recommended but also necessary for trailers that need complex electrical systems or heavy-duty towing.
Understanding 4 Pin Trailer Harness Connectors
The 4-pin trailer harness connector is a standard means to connect minimal trailer lighting to a towing vehicle. The wires of this connector are four in number, and each of them has a particular function that is indispensable for the safe and legal operation of the trailer. The wires are as follows:
- Gronddraad (Wit): This wire forms the electrical ground connection, and thus, it is the origin of the electrical circuit for all other components to function properly.
- Tail Lights/Running Lights (Bruin): This wire lights up the trailer’s tail lights and side marker lights, which ultimately makes the trailer visible at night or during low-visibility conditions.
- Left Turn Signal and Brake Lights (Geel): The yellow wire is used to wire the left turn signal and brake light, and thus to provide directing and braking signals to other drivers.
- Right Turn Signal and Brake Lights (Groen): The function of this wire is the same as that of the yellow wire; it manages the right turn signal and brake light for proper signaling.
A 4-pin connector is mostly suitable for small and light trailers that do not require extra power for electric brakes or auxiliary systems. These connectors are simple to install and take care of; therefore, they are a very good choice for basic towing operations. It is very important that the installation is done correctly, which involves the steps of securing clean, corrosion-free connections and matching all the wiring to the respective terminal. Even though it is simple in construction, the 4-pin trailer harness provides the essential functionality that makes it possible for safe towing.
Common Issues with Trailer Wiring Connections
While towing, trailer wiring systems, which are necessary for safe towing, can still have problems that affect their function. The most common problems are listed below:
Corroded or Damaged Connectors
Corrosion on connectors because of moisture, dirt, and road debris exposure is often the reason for reduced conductivity, leading to intermittent or complete failure. Regular checking and the use of dielectric grease can reduce this concern.
Faulty Grounding
One of the major reasons behind non-functioning trailer lights is improper or weak grounding. A reliable ground wire or secure attachment point is required for all connections to work properly. A poor ground will cause lights to be dim or non-functional.
Broken or Frayed Wiring
Frequent usage or improper routing may cause a wire to break or be exposed. This can lead to short circuits, blown fuses, or even fire hazards. It is essential to keep all wires away from sharp edges and moving parts.
Mismatched Wire Connections
Incorrectly paired or misaligned wires during installation often result in trailer lights not working properly. Misidentifying wires and connecting them incorrectly according to the standard color codes will cause this issue.
Overloaded Circuits
Too many accessories plugged into the electrical system can lead to a power draw that is more than the system can bear, resulting in damage to the fuse or wiring harness of the tow vehicle. Therefore, it is crucial to monitor the system’s load and make sure it is not overloaded while at the same time being able to handle the amperage of all connected components.
Trailer Lighting Considerations.

The legal requirements and safety standards should be the primary considerations when it comes to trailer lighting. Federal and state laws require that all trailers be equipped with operational brake lights, turn signals, tail lights, and reflectors. A functional lighting system enhances the visibility of the vehicle and communicates with other drivers, which is particularly important when visibility is poor or when people are driving in a dangerous situation. It is necessary to check that the trailer’s lights are adequately connected and timed with those of the vehicle before it is driven. Carry out regular inspections to spot and change burnt-out bulbs, cracked lenses, or rusted contacts, thus guaranteeing no interruptions in the lighting operation and safety on the road.
Importance of Proper Trailer Lighting
Legal and Safety Requirements
The right trailer lighting is essential for both legal compliance and road safety. Trailer lighting, consisting of brake lights, turn indicators, and tail lights, plays a crucial role by informing other drivers about the movements of the vehicle, thus minimizing accidents. Poorly maintained or improperly connected trailer lights may lead to accidents, fines, or even penalties for not following the regulations. It is critical to conduct regular checks to confirm that all the lights are working as they should. This will involve checking the wiring connections, replacing bulbs that have gone out right away, and making sure the electrical system is protected from rust or any other harm. Properly functioning trailer lights mean better visibility in bad weather and at night, hence the driver’s and other road users’ safety. Making regular maintenance and keeping up with safety standards are your priorities will not only reduce the chances of accidents but also strengthen the image of a responsible vehicle operator.
Installing Lights on a 4 Wire Trailer
The process of installing lights on a 4-wire trailer is to first connect the trailer’s wiring system with that of the towing vehicle while adhering to the standard color-coding scheme for wires. A simple yet informative guide to carry out the installation is given below:
- Get the 4-Wire System: The 4-wire trailer wiring carries out four different functions: White Wire (Ground), Brown Wire (Tail lights and marker lights on the side), Yellow Wire (Lights for the left turn signal and brake light), Green Wire (Right turn signal and brake light)
- Get the Things Ready: Trailer light kit (compatible with the 4-wire system), Wire connectors or heat-shrink butt connectors, Electrical tape and zip ties, Test the light or the multimeter to find out the connections
- Lights for Trailer Are Installed: Following the manufacturer’s instructions, the tail lights and side marker lights are mounted on the trailer, taking care of visibility in being symmetrical in the area. A ground wire of white color is connected to a metal surface that is unpainted on the frame of the trailer by means of a screw that self-taps, thus forming a good ground connection.
- Trailer Is Wired: The wiring harness is opened up along the frame of the trailer, where it is held in place by zip ties, so that it does not move or get damaged. Match and join the wires in a way that for every one that is a specific function with connectors. For example, the yellow wire should go to the left side light, the green wire to the right side light, and the brown wire to both tail lights and side markers. Make certain that all the connections are solid and covered with either electrical tape or heat shrink to be immune to corrosion or short circuit.
- The Vehicle Is Connected: The harness that is coming from the trailer gets plugged into the 4-pin connector of the vehicle. By testing every single function of the wiring, like turn signals, brake lights, and tail lights, make sure that the vehicle’s wiring matches that of the trailer.
- The System Is Tested: Using a helper or a test light, verify that all lights, including brake lights, turn signals, and tail lights, are functioning correctly. Fix any faulty connections or bulb malfunctions as needed.
Your adherence to these steps makes it possible for an installation that is both safe and effective and meets the requirements set by road safety regulations. Regular testing and maintenance are necessary to keep the trailer lighting system functional over the long haul.
Maintenance Tips for Trailer Lights
Essential Maintenance Practices
Proper maintenance of trailer lights is considered an important factor for safety, compliance with regulations, and preventing potential hazards. The experts’ recommendations form the basis of the following consolidated tips:
Regular Inspections: Before and after using the trailer, inspection of the lights should be done to detect problems like dimming, flickering, or burnt bulbs. Also, wear and damage to the wiring should be checked, especially after long trips or rough terrain exposure.
Keep Connections Clean: Use electrical contact cleaner or a wire brush to clean every electrical connection so that corrosion is prevented, particularly at the plug ends and ground points. Dielectric grease should be applied to the connectors to increase conductivity and to protect them from moisture.
Protect Against Water Damage: Check that all lights and wiring are appropriately sealed and waterproofed, primarily for the trailers that are exposed to the rain a lot or that are submerged while launching the boat. Silicones should be applied to the fragile areas to make them more water-resistant.
Replace Damaged Components Promptly: Being cases of burnt bulbs, broken wires, or damaged housings, they should be replaced without delay. The use of high-quality, weather-resistant LED lights is a good option for improved life and energy efficiency.
Test System Regularly: An overall testing of the complete lighting system, including the brake lights, turn signals, and running lights, should be done regularly either by a technician or by connecting the trailer to the tow vehicle. This guarantees that all lights are functioning properly before the drive starts.
By practicing these maintenance techniques, not only will the lifespan of your trailer lights be prolonged, but also they will perform reliably, and road safety will be improved overall.
Special Considerations for Motorcycles

Motorcycle Lighting Systems
The priority when maintaining a motorcycle’s lighting systems is visibility and compliance with local regulations. Make sure that the headlights are properly aligned, so they do not impair the sight of other vehicle drivers, but at the same time, the road illumination is maximized. Turn signals and brake lights should be inspected regularly for their functionality, as they are crucial for communicating your intentions to other road users. Replace bulbs promptly with the correct models and think about using LED options for better visibility and longevity. Check all wiring connections to avoid problems caused by vibrations during rides. Routine testing and compliance with safety standards are necessary to guarantee the reliability of performance and the safety of riders.
Adapting Wiring for Motorcycle Trailers
Modifying the wiring for motorcycle trailers includes verifying the compatibility of the motorcycle’s electrical system and the trailer’s lighting. First, find out if your motorcycle has a 3-wire or a 2-wire lighting system. A 3-wire system has separate controls for brake and turn signals, while a 2-wire system merges them together. When the systems are not interoperable, apply a converter to make them work together.
Next, put in a trailer wiring harness made for motorcycles specifically, which usually has a powered relay module that protects the bike’s electrical system from becoming overloaded. Securely guide the wiring along the bike without going to places that are hot or can cause wear; organize it well with zip ties. The ground points are very important—make sure there is a very good common ground between the trailer and the bike so that there will be no flickering or malfunctioning of lights.
Before you start riding, check all the connections very well; these include brake lights, turn signals, and running lights. For more dependability, you may want to apply dielectric grease at all connection points to block corrosion. Following these procedures guarantees the safe and effective wiring setup required for motorcycle trailer towing.
Safety Tips for Motorcycle Trailer Wiring
Kritieke veiligheidsmaatregelen
In connecting motorcycle trailers, I constantly put safety first by re-checking the entire system and verifying that the ground is right. I apply dielectric grease to the connectors as a corrosion prevention measure and check all the lights, that is, brake, turn signals, and running lights, before taking off. Being very careful to follow these steps gives not only comfort but also a chance to avoid problems that might arise later while on the road.
Recommended Wiring Harnesses for Motorcycle Trailers
The selection of a wiring harness for your motorcycle trailer must hinge on the aspects of compatibility, build quality, and installation simplicity. In accordance with the evaluation of the most credible sources, below are three good picks:
Hopkins Towing Solutions Wiring Kit
The harness of this make is referred to as “plug-and-play,” and it installs easily and works perfectly. The package comes with connectors that are weatherproof and very durable, and therefore able to maintain good performance even under harsh conditions due to the built-in circuit protection.
CURT 5-Wire to 4-Wire Powered Adapter
The adapter is made for motorcycles that have different wiring setups, and it does so by connecting the two systems very well. It has a circuit trip, and the sealing design is such that the system is well protected from the elements; thus, it is indicated as a choice for long-lasting use.
Kuryakyn Trailer Wiring and Relay Harness
The wiring and relay harness of this kit is specifically for cyclists and come with isolator relays to protect against electrical overloads. It not only guarantees your bike’s electrical system to work perfectly with the brake, turn, and running lights but also maintains that performance level.
Referentiebronnen
IoT-Based Driver Information System for Monitoring Load Securing
FlexRay – A Communication Network for Automotive Control Systems
Mechatronic Systems for the Braking Mechanisms
Veelgestelde vragen (FAQ's)
Wat zijn de trailer bedradingskleuren voor de conversie van 5 naar 4 draden?
Meestal zijn bij de overgang van een 5-draads aanhangwagenbedradingssysteem naar een 4-draads systeem de kleuren van de aanhangwagenbedrading in overeenstemming met de standaard kleurcode De meest gebruikte kleuren zijn: brow voor achterlichten, geel voor linker richtingaanwijzers, groen voor rechter richtingaanwijzers en wit voor aarddraad Het is erg belangrijk om je aan deze kleurcodes te houden om problemen met de goede werking te voorkomen.
Hoe zal ik de draden splitsen, van een 5-draads naar een 4-draads systeem?
Het verbinden van draden voor een 5 4-draadsconversie begint met de identificatie van elke overeenkomstige draad. Vervolgens moeten met behulp van een draadstripper de uiteinden van de draden bloot komen te liggen, gevolgd door ze te draaien en de gedraaide verbinding vast te zetten met een draadconnector of elektrische tape. Het is belangrijk om de rode draad van de aanhangwagen correct aan te sluiten op de draad in de 4-pins stekker die voor remlichten zou moeten zijn; anders werken ze niet.
Wat is de eenvoudigste manier om een platte aanhangwagen met 4 draden aan te sluiten op een vrachtwagen?
Het aansluiten van de platte aanhangwagen met 4 draden op uw vrachtwagen kan op de eenvoudigste manier met behulp van een 4-polige stekker Zorg ervoor dat u de kleuren van de bedrading van de aanhangwagen verbindt met die van de vrachtwagen Een goede gewoonte zou zijn om naar het bedradingsschema van de vrachtwagen te verwijzen om de juiste aansluitingen voor de achterlichten, richtingaanwijzers en aarde te verifiëren.
Mag ik een diode in de bedrading gebruiken voor een kleine vrachtaanhangwagen?
Zeker, een diode zou een van de opties kunnen zijn voor de bedrading van een kleine vrachtaanhangwagen, omdat het helpt om de backfeeding van stroom te voorkomen Dit is met name het geval bij afzonderlijke richtingaanwijzers en remlichten, waardoor ze de mogelijkheid hebben om individueel te werken zonder elkaar te achtervolgen of complicaties in het bedradingssysteem te veroorzaken.
Wat zijn de juiste stappen om te volgen als de draad voor mijn aanhangwagenverlichting niet goed werkt?
Als er problemen zijn met de lichtdraad van de aanhangwagen, is de eerste stap het controleren van alle verbindingen om te zien of ze goed zijn beveiligd en gesplitst. Ga vervolgens over tot de inspectie van de bedradingskleuren van de aanhangwagen op eventuele inconsistenties en let op gebroken draden. Het uitvoeren van tests met een multimeter kan ook nuttig zijn om te bepalen of het probleem zich voordoet met de stroom of niet.
Is het mogelijk om de noodzaak van een vervangend harnas te omzeilen bij het ombouwen van 5 5-draads naar 4 4-draads?
Hoewel een vervangend harnas een goed idee is bij het ombouwen van een 5-draads naar een 4-draads systeem, is het niet verplicht Als uw huidige harnas niet in goede staat verkeert of verouderd is, dan is het het voorschrijven van het nieuwe 4-pins harnas dat de installatie eenvoudiger maakt en u betrouwbare verbindingen voor uw aanhangwagenverlichting geeft.
Wat is de typische spanning voor bedradingssystemen van aanhangwagens?
De spanning voor de bedradingssystemen van aanhangwagens is typisch 12 volt Dit is de standaard voor de meeste automotive toepassingen, inclusief lichte aanhangwagens Het is essentieel dat alle componenten die door het hele bedradingssysteem worden gebruikt deze spanning kunnen weerstaan zodat er geen elektrische storingen optreden terwijl de aanhangwagen wordt gesleept.
Hoe kan ik problemen met richtingaanwijzers op mijn trailer oplossen?
In order to troubleshoot turn signal light problems on your trailer, the first step is to check the connections for loose or corroded wires. Next, confirm that the truck’s wiring is correct by checking if the wiring colors match up. The method of testing with a multimeter to check if the turn signal lights get power when they are turned on is also useful.
Welke voordelen halen trailers uit het gebruik van een 4-polige stekker voor de bedrading van trailers?
De belangrijkste en belangrijkste voordelen van trailerbedrading met behulp van een 4-pins stekker zijn eenvoud en onderhoudsvrije installatie. Meestal dekt een 4-pins opstelling de basisfuncties die het meest essentieel zijn en omvat ook trailers die niet zwaar zijn, zoals achterlichten, linker- en rechter richtingaanwijzers en aarde. Daarom wordt deze opstelling steeds populairder bij lichte trailers, omdat het de kans op problemen tijdens het instellen verkleint en het zeer eenvoudig te installeren is.