






放置a 吊扇 光線可以增加空間的感覺和功能,也有助於解決能源問題。如果沒有適當的指導,為這樣的設備佈線可能會令人生畏,特別是如果一個人不具備所需的電氣知識。這本完整的指南將揭開整個過程的神秘面紗,並向您提供有關安全、正確地為吊扇和燈光佈線的具體逐步說明。無論您是更換舊固定裝置還是安裝全新固定裝置,本文都將為您提供自信地完成工作的所有知識。從閱讀接線圖到確保您的安裝安全合法,我們已經涵蓋了一切!
了解吊扇接線
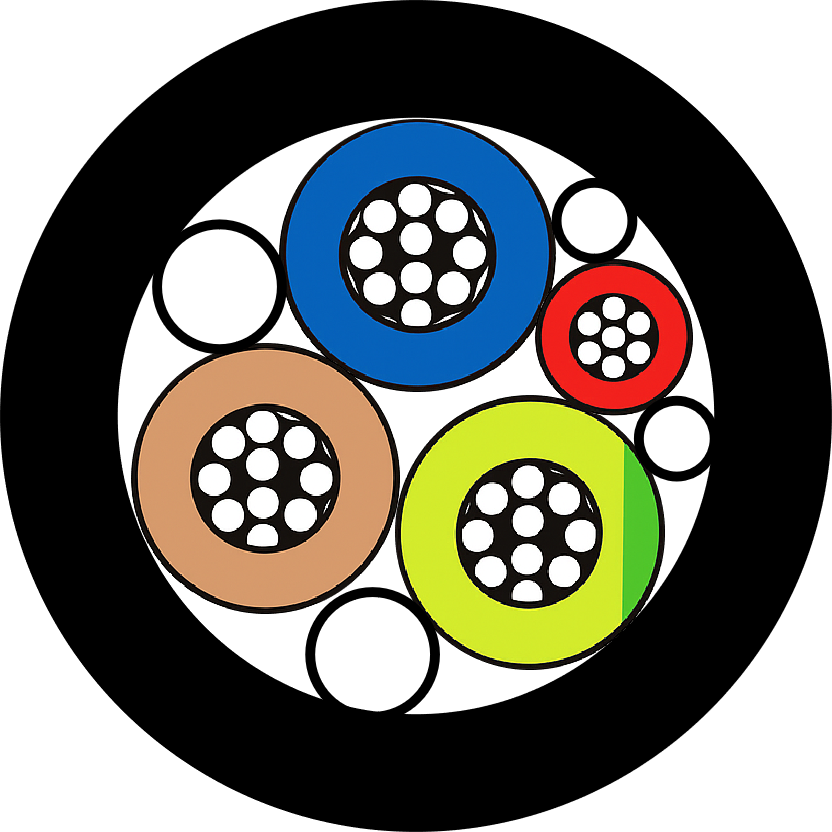
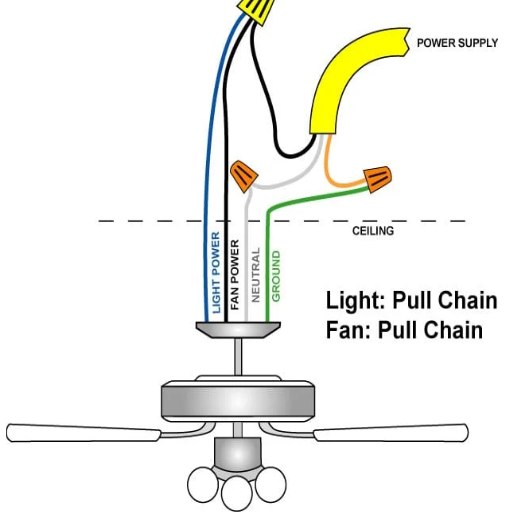
吊扇接線需要了解幾個主要組件。大多數情況下,吊扇有四根電線:
- 黑線 答:這是為風扇供電的熱線。.
- 藍線 答:如果有的話,這條電線將為燈供電。.
- 白線 2 負極線 2 完成電路。.
- 綠色或裸線 2 接地線 2 為了安全。.
這些電線連接到您家天花板盒中的配套電線。通常,天花板上的黑色線會連接到風扇上的黑色線,天花板上的中性(白色)線會連接到風扇的白色線,接地線會連接到金屬接地支架或接地線。風扇的藍色電線如果用於燈具,則連接到天花板電線。.
吊扇的組件
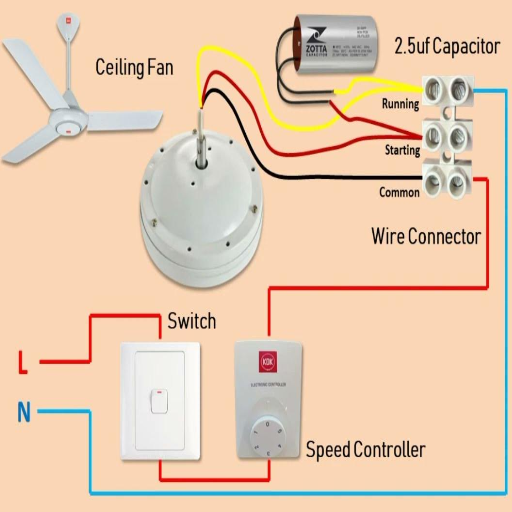
電容器
電容器有助於啟動風扇電機,並提高某些類型電機的運作效率。電容器有單或雙兩種。單一電容器用於電源啟動和運行電機,並作為並聯分支安裝在電路中,而雙電容器有兩個電路路徑:一個用於啟動,一個用於運行。.
控制
此組件控制風扇的速度,範圍從一種速度到五種或更多速度。具有速度抽頭開關的速度控制器會隨著設計中納入的速度抽頭的數量而變化。這可能是開關、轉盤上的指針、觸控板上的壓力或旋鈕。.
通常會為風扇提供額外的控制,其中包括風扇關閉的定時器設定。這些額外的控制裝置可以與牆壁控制器集成,風扇控制裝置內建於吊扇下方的照明燈具中、遙控器中或與智慧家庭應用程式集成。.
電容器是一種小型電子元件,透過充電和放電所需的電能來加速風扇的運轉。.
拉鍊、牆壁開關或遙控器
這些是不同的組件,可使用戶手動控制風扇速度、光線和開/關操作。許多現代風扇現在配備了可與家庭自動化系統整合的智慧控制裝置。.
燈套件(如果適用)
燈套件是一些安裝有 LED 或白熾燈泡的吊扇的一部分,為空氣流通提供了額外的功能元素。.
樹冠
天篷隱藏了安裝支架,使裝置看起來乾淨、完整,並隱藏了電線。.
接線和電氣連接
風扇內部有電線-馬達、電容器、光、熱、中性線和地線連接。正確的接線可確保系統的安全和良好工作。.
正確佈線的重要性
事實上,正確的佈線對於任何電氣系統(包括吊扇)的正確和高效運作都是必要的。佈線不當是一種危險;它可能會導致電氣火災、短路,甚至損壞風扇的內部組件。將熱線、中性線和接地線正確連接到各自的端子時,我們可以避免原本危險的電氣故障。正確的接地可以進一步防止電擊影響使用者並導致系統過早磨損。.
如今,吊扇有多種不同的選擇,可能會影響接線要求。這些選項包括頭頂燈、自動速度控制和速度變化,這些選項應完全按照製造商的規格進行接線。最好使用優質連接器;此外,接線應始終符合當地建築規範。應諮詢經驗豐富且有執照的電工,或在安裝階段的每個步驟中可能保留位置良好的安裝手冊。這不僅可以讓您遵守安全標準,還可以確保吊扇系統持久耐用。.
常見的接線配置
任何給定吊扇的接線將在很大程度上取決於特定的設置以及是否在其上連接了燈。接線通常有三種方法:
單開關接線
這種配置用於一個開關同時控制風扇和燈的情況。由於這種配置,黑色和藍色電線將連接到來自開關的帶電電線。因此,白色電線將連接到空檔,綠色或裸露的電線將連接到地面。.
雙開關接線
雙開關線提供單獨的牆壁開關,用於風扇或燈的獨立操作。風扇的黑色連接到風扇開關的熱,而藍色的連接到燈開關的熱。白色代表中性,而綠色或裸露代表地面。.
遠端控制接線
大多數現代吊扇都配有遙控接收器。風扇的黑、藍、白電線連接到接收器單元,然後將接收器電線連接到房屋佈線。由於各種型號可能有細微的變化,因此必須嚴格遵循特定製造商的接線圖。.
接線吊扇所需的工具
用於連接吊扇的基本工具有:
- 螺絲起子(十字頭和平頭) 用於緊固螺絲和連接線的孔。.
- 剝線鉗 去除電線絕緣層的效果。.
- 電壓測試儀 在啟動任何工作之前驗證沒有電源的訊號。.
- 線螺帽 留出尺寸以固定和絕緣電線連接。.
- 梯子或踏腳凳 適當地方便安裝。.
- 鑽頭和鑽頭 與安裝支架相關的任何額外孔鑽孔的圖示。.
- 電工膠帶 帶有膠帶的連接提供額外的安全層。.
確保所有工具都正常運作,並在整個過程中遵守安全措施。.
基本工具已解釋
在設定電氣或安裝工作時,基本工具的目的和使用非常重要。以下給出了一些工具的觀察:
- 螺絲起子(平頭和十字) 2 這些工具在安裝或拆卸過程中具有擰緊或鬆開電線的基本用途。合適的螺絲起子不會損壞螺絲頭並確保良好的連接。.
- 線切割機和剝線機 1 O 雙工具用於切割電線並剝離絕緣材料,而不會損壞下面的導體。任何輕微的不準確都可能導致電線損壞。.
- 電壓測試儀 答:此工具是處理前檢查電路是否斷電的重要安全工具。目前的測試人員配備了燈光或聲音指示器進行確認。.
- 線螺帽 2 這些微型連接器用於將電線與絕緣材料固定在一起,確保安全可靠的連接,防止任何類型的短路。.
- 梯子或踏腳凳 iv 這些工具旨在提供通往高架工作區域的穩定通道,必須滿足額外安全措施的重量和高度要求。.
- 鑽頭和鑽頭 答:使用鑽頭打孔。確保相對於工作材料選擇正確的鑽頭類型和尺寸。.
- 電工膠帶 答 此膠帶支援電線絕緣並保護連接,從而提高安全性和使用壽命。.
安全設備
當然,安全設備不僅是為了保護工作人員,也是為了保護工地本身。以下是基於流行最佳實踐的安全設備簡短清單:
- 絕緣手套 2 保護雙手免受電擊,除了定期檢查是否有任何形式的磨損或損壞外,還必須達到特定的額定電壓。.
- 安全護目鏡 5 在所有應用中都是必要的,可以保護眼睛免受火花、碎片或任何與腐蝕性物質的意外接觸。.
- 電絕緣墊 2 這些在電氣工作期間分佈在腳下,以增加工人和地面之間的隔熱效果。.
- 硬帽 5 存在頭頂危險時需要,例如墜落物體或裸露的接線。.
- FRC(防火服裝) 中午 減輕操作過程中發生電拱形或火花時嚴重燒傷的風險。.
- 電壓檢測器 手持式便攜式儀器,可協助確定電路在維修前是否斷電,從而防止意外電擊。.
- 聽力保護 2 在噪音過大的環境中,建議使用聽力保護設備,特別是當電動工具或發電機以潛在有害的分貝水平運作時。.
額外用品
為了保持安全高效的工作空間,除了其他用品外,還建議使用以下物品:
- 急救箱 B 應備有無菌繃帶、消毒液和止痛藥,並且必須符合 ANSI(美國國家標準協會)對工作場所急救的要求。.
- 滅火器 規定必須適合工作場所可能遇到的火災類型(即 A、B、C),並根據 NFPA(國家消防協會)規定進行維護。.
- 標誌和標籤 2 危險、警告和資訊標誌必須放置得很明顯,並且應符合 OSHA 所傳達的危險標準。.
- 溢出套件 – These are used for containing and neutralizing hazardous liquid spills as quickly as possible, particularly where chemicals or oil are handled.
- 聽力保護 – Should include earplugs or earmuffs that are appropriate for the high-decibel environment, with an adequate fit for each user, and a Noise Reduction Rating (NRR).
- Respiratory Protection – This may imply fitting the workplace with respirators or masks against airborne particulates or dangerous vapors, with standards being NIOSH (National Institute for Occupational Safety and Health).
A system for inventory checks should be set up to confirm regularly that all the equipment is in good working order and ready to be provided when needed. These supplies should be deployed according to workplace hazards for full preparedness.
Installing a Ceiling Fan
- 關閉電源 – Turn off the circuit breaker where the ceiling fan is to be installed to avoid electrical hazards. Test with a voltage tester to ensure the power is indeed off.
- Remove Existing Fixture – Carefully uninstall any old light fixture or fan in place and disconnect its wiring. Make sure that the electrical box is rated for ceiling fans.
- Install the Mounting Bracket – Install the mounting bracket, provided with the fan, to the electrical box, following the manufacturer’s instructions.
- Assemble the Fan – Partially assemble the ceiling fan as per the instructions, generally attaching the downrod or motor housing prior to installation.
- Wire the Fan – Connect the house wires to the fan wires accordingly, matching colors (black to black, white to white, green or bare wire to the ground). With wire nuts, secure all connections.
- Secure the Fan – Fasten the fan firmly to the mounting bracket or ceiling box. Tighten all screws to mount the fan enough to stand firm against the weight of the fan.
- Fix Blades and Light Fixture – Install the fan blades and the optional light kit, making sure everything is balanced and aligned.
- Restoring Power and Testing – Now switch the breakers back on. Test the fan and light to make sure they work correctly.
Preparation Steps
- Check the Electric Requirements – Verify local code compliance for electrical wiring and connections on the installation site. The ceiling box must be rated to hold the weight of the fan.
- Gathering Tools and Materials – Get all the needed tools, such as a screwdriver, pliers, drill, and maybe a ladder. Make also that you have all parts of the fan, the right mounting hardware, and a circuit tester.
- Switch Power Off – Go to the breaker panel and turn off power from the installation area. Use a voltage tester to confirm that there is no power for safety.
- Check Installation Area – Confirm that the selected place for installing the fan has a good, solid base. There must be sufficient clearance for the fan blades to rotate freely.
- Understand Ceiling Fan Design – Read the manufacturer’s instruction manual in detail to discern the assembly and installation requirements peculiar to that specific model.
Installation now begins on a safety and efficiency foundation if these steps are followed.
Mounting the Ceiling Fan
Mounting of ceiling fan first involves switching off the power supply at the circuit breaker to avoid any electrical hazards. Next, check that the mounting bracket of your fan is compatible with the electrical box, ensuring that the box is UL-rated for fan support. The mounting bracket of the fan is to be firmly secured to the electrical box with the provided screws or hardware, according to the mounting instructions from the manufacturer. If a downrod is used, fasten it onto the motor coupling and secure it with the pin and screws supplied, as outlined in the manual; if flush-mounted, secure the fan base directly to the mounting bracket while aligning the parts properly. Tighten all fasteners to minimize vibration, thus enhancing safety. In addition, check blade balance after installation to ensure smooth operation without noise or wobbling.
Connecting Wires for the Fan and the Light
Before beginning to hook up the electrical wiring for the fan and light, differentiate from the outset that the main circuit’s power, serving as a source of danger, must be switched off at the breaker. Next up is to identify the different ceiling wires, naming usually black (hot), white (neutral), green (ground), and sometimes a blue one for light. The connection should then proceed according to the wiring diagram furnished by the fan manufacturer:
- Black or Red Wire (Hot): Connect this to the black wire from the fan to power the motor.
- Blue Wire (Light): If the fan has a light fixture, connect the blue wire from the fan to the same ceiling hot wire that powers the fan (often black or red).
- White Wire (Neutral): Connect the fan’s white wire to the ceiling’s white neutral wire.
- Green or Bare Copper Wire (Ground): Connect this to the ceiling ground wire or to the ground screw on the mounting bracket.
Secure each connection using wire nuts, making sure the wires are properly insulated. The connections are then gently tucked inside the box, and the fan canopy is attached to complete the installation. Power is restored, and the operations of the fan/light are tested. Always consult the specific manual for the fan for variations, and local electrical codes must be observed.
Wiring Ceiling Fans with Separate Switches
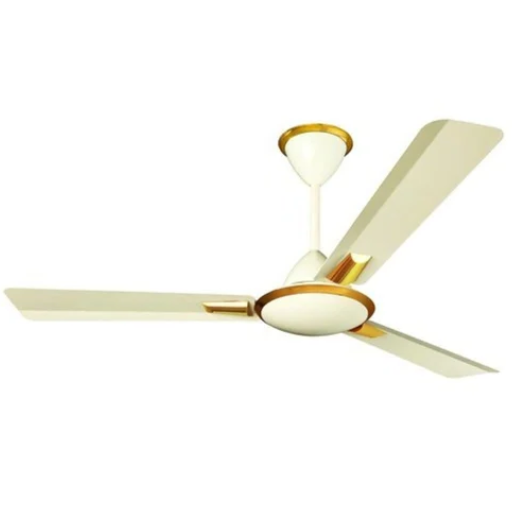
Typically, when wiring ceiling fans with separate switches, the cable needs to be a three-wire cable identifying red, black, white wires, plus the ground wire. The black wire is often wired for the fan motor, whereas the red wire is assigned to the light kit. Connect the white wire at the neutrals with the green or bare copper ground wire to the ground connections, either at the fan or at the mounting bracket.
At the switchbox, place a double switch or two single switches to enable separate control of the fan and light. Connect the black wire to one switch terminal for the fan; connect the red wire to the other switch terminal for the light. Tie them all up with wire nuts, ensuring good grounds throughout. Consult the wiring diagram of the fan and verify all procedures with local electrical codes. For safety, make sure the power is shut off at the breaker before installation.
How to Wire a Ceiling Fan and Light with One Switch
Steps are as follows: wiring a ceiling fan and attaching a light to one switch. First, ensure safety by switching off the circuit breaker. Next, identify black (hot), white (neutral), and green or bare copper (ground) wire both in the ceiling box and in the fan/light fixture. Connect the black wire from the fan and light to the line terminal on the switch. Connect neutral wires using a wire nut, finishing the neutral connection between war wire from the ceiling and that from the fixture; do the same for the ground wires. Wrap each connection with insulated wire connectors to be safe. Install the fan and light fixtures firmly to restore power at the breaker and check the operation. Check the fan wiring diagram and any other local electrical codes for a neat installation and safety.
Configuring a Separate Switch for the Light and the Fan
To wire a separate switch for the fan and light, first, you will have to verify the wiring configuration in your ceiling and wall switch box. Commence by making sure that the power supply is through the multi-wire cable to allow independent operation. Usually, this would be a 14/3 cable with black, red, white, and ground wires running between the switch box and the fixture.
Switch Box Setup
Install the double light/fan switch or two single-pole switches, whichever you prefer. Connect the black (hot) wire from the source to the common terminals or the corresponding input terminal for each switch.
Wiring at the Ceiling Fixture
At the ceiling, connect the black wire from the ceiling cable to the fan hot wire and the red wire to the light hot wire. Connect the white (neutral) wires using a wire nut while attaching the ground wires per the normal grounding procedure.
Testing and Compliance
After completing the connections, make sure all wire nuts and connections are tightly secured and properly insulated. Next, reenergize the power back at the breaker, test the switches all by themselves, and confirm that they do indeed control the fan and light. Make sure to check that all regulations comply with the local electrical codes before continuing.
The above-stated connection offers more flexibility and functionality as it offers another way to power the light and fan independently without having to do so by the pull chain.
Using a Pull Chain for Fan Control
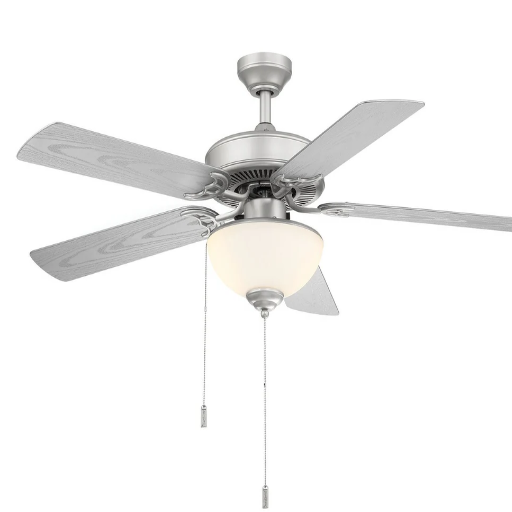
In cases where wall switches are absent or where additional wiring is not possible, pull chains are a simple and workable control arrangement. A pull-chain mechanism is included in the fan assembly, whereby one pulls on the chains to run the fan or control the light operation, depending on the needs atop of the speed. Pull chain use entails pulling once for the low-speed setting, twice for medium speed, thrice for high speed, and further for turning off the fan. For the lighted models, another pull chain usually operates the light independently. This way is cheap, requires no electrical changes, standard from a safety perspective, and confers only simple but reliable controls over your ceiling fan and light.
Advanced Wiring Options
Wall-mounted control switches are yet another option to consider. From the more complex wiring schemes, this bestows upon one fine control over the ceiling fan and lights. Features that could be offered by such switches include speed control, light dimming, and timer settings. To perform the upgrade, install a matching controller and wire it into your home’s electrical system, in accordance with fan-light specifications. Follow all instructions included by the manufacturer, and again, note compatibility was ensured before any changes were made. When in doubt or when faced with a more complicated installation, one should hire a licensed electrician to guarantee safety and adherence to code.
Installing a Fan with a Remote
Installing a ceiling fan with a remote control begins with the purchase of a fan model that has a remote kit or is compatible with a remote receiver sold separately. By safety measures, switch off the power to the existing fan or light fixture at the circuit breaker and remove the existing fixture. Follow the manufacturer’s instructions cautiously to mount the fan. Most remote control kits require mounting a receiver unit within the canopy of the fan, wiring it into the motor, and other fan wiring. Connect the colored wires coming from the receiver to those coming down out of the ceiling; generally, white is neutral, black is for the motor, and blue is for the light. Cap all the wire connections with wire nuts and tuck everything neatly inside the canopy.
Next, mount the fan blades and any other components, and ensure that all screws are tightened properly to avoid wobbling. Restore the power at the breaker, and test the functions of the fan through the remote, such as speed change and light control. Program the remote, following the manual to ensure an exact match with the receiver. Those confused about any aspect of installation or wiring should seek help from a licensed electrician to ensure proper installation and compliance with local electrical codes.
Integrating a Pull Chain for Light Without a Switch
To attach a pull chain to a light without a switch, I would begin by turning off the power at the breaker to protect myself against electrical hazards. After that, I would find the wires for the light kit inside the ceiling fan or fixture. The pull chain light switch is then installed by connecting its wires to the hot and neutral wires of the light kit, in accordance with the wiring diagram provided with the switch. Once the switch is firmly attached and mounted, power is restored, and the pull chain is tested to verify its functioning.
Common Troubleshooting Tips
Pull Chain Not Responding
If the chain pull does not turn on the light, check if the power supply is connected properly and ensure the wiring corresponds to that of the switch in the diagram. Inspect for any loose connections or damage to the wires and tighten or replace them if necessary.
Light Flickers or Is Not On
Verify that the bulb is correctly screwed in and that it is in good condition. Replace the bulb if not. Look for debris or corrosion inside the socket that could interfere with electrical contact. If damage is evident, clean or replace the socket.
Pull Chain Stuck or Jammed
This type of problem is usually due to mechanical wear. Take the switch out gently, then check the chain mechanism for obstructions or damage, and replace the switch assembly if it cannot be repaired.
Breaker Keeps Tripping
A breaker tripping might indicate a short. Turn the power off and double-check the connections to see if any wires are crossed or exposed. Reset the breaker after fixing the problem.
Overheated Switch
Excessive heat can mean electrical overload. Check that the wattage of the lightbulbs used does not exceed that of the fixture, and replace those with higher wattage than is recommended.
參考來源
“Numerical Investigation of Using FDCU on Temperature Distribution in Non-Unidirectional Cleanrooms”
- Key findings: This research investigates the uses of the ceiling supply fan filter unit and the ceiling return fan coil in cleanrooms. It brings to the fore the importance of wiring and system design to ensure proper temperature distribution.
“Discussion on Electrical Design of Passive Residential Building”
- Key Findings: The present paper discusses the electrical design of Passive Houses while focusing on wiring requirements for new fan systems using analog signals.
- Key Findings: The study was conducted to test the integrity of electric fan wiring under high heat to guarantee safety and performance.
常見問題(常見問題)
如何將吊扇與燈連接?
在用燈連接吊扇時,您需要連接許多電線。通常,風扇的電線是黑色的,燈的電線是藍色的,中性的電線是白色的。請務必將風扇單元的黑線與天花板上電箱的黑線連接起來,燈的電線是藍色的,處理器的白線與盒子裡的白線連接起來。在開始任何安裝之前,請務必關閉電源。.
我需要哪些工具來連接吊扇?
要為吊扇接線,您需要不少工具:螺絲起子、鋼絲鉗、剝線鉗、電工膠帶和電壓測試儀。這些工具將使您能夠安全地連接接線並正確固定所有東西。.
我可以在沒有開關電源的房間裡安裝吊扇嗎?
是的,可以在沒有開關源的房間安裝吊扇;儘管如此,必須使用吊扇遙控接收器。該設備將允許您控制風扇和遙控器的光線,從而無需牆壁開關。.
如何重新連接風扇和燈?
要重新接線風扇和燈,您要做的第一件事就是關閉斷路器的電源。然後,從天花板上取下風扇並識別現有的接線。將黑線從天花板連接到風扇的黑線,將藍線連接到光電源連接。對於中性線,白線連接到天花板盒中的白線。使用膠帶固定所有連接並將風扇安裝回原位。.
如果我只有一個開關,如何打開風扇和燈?
如果您只有一個開關,那麼您可以為開關進行光和拉鍊設定。這樣,您就可以從開關控制風扇,同時使用拉鏈控制燈。另一個選擇是安裝吊扇遙控器來控制風扇和燈,而無需多個開關。.
四根線吊扇接線?
四根電線的吊扇通常包括一根黑色電線用於風扇、一根藍色電線用於燈、一根白色電線用於中性線以及一根綠色或裸線用於接地。將黑色和藍色及其電源接線,白色與中性線接線,綠色與接地線接線以確保一切安全。.
如何調節風扇的速度?
安裝後調整風扇速度的方法包括使用拉鍊或遙控器,前提是您的風扇支援。大多數風扇組通常有多種速度設置,您可以使用遙控器或拉鍊快速切換。.
與吊扇佈線相關的常見斷路器是什麼?
與吊扇佈線相關的常見斷路器是照明電路和通用電路的斷路器。例如,最好有一個適當額定值的斷路器,可以承受風扇和燈具的負載,否則就會跳閘。.
有沒有沒有燈光的吊扇嗎?
是的,確實有沒有燈光的吊扇。這些風扇僅提供空氣流動,如果您想在房間內使用單獨的燈具,這是一個好主意。只需選擇一個適合您的風格需求和功能的燈具即可。.