Placing a ceiling fan with a light increases the feel and functionality of a space, and it also helps with energy matters. Without proper instruction, wiring such a device can prove intimidating, especially if one does not possess the required electrical knowledge. This complete guide will demystify the whole process and present you with specific step-by-step instructions on wiring a ceiling fan plus light safely and correctly. Whether you are replacing an old fixture or installing a brand new one, this article will empower you with all the knowledge to approach the job confidently. Starting from reading wiring diagrams to making sure your installation is secure and legal, we have covered everything!
Understanding Ceiling Fan Wiring
Wiring a ceiling fan requires understanding several major components. Mostly, ceiling fans will have four wires:
- Black Wire – This is the hot wire that feeds power to the fan.
- Blue Wire – This wire will feed power to the lights if there are any.
- White Wire – Negative wire – Completes the electrical circuit.
- Green or bare wire – Ground wire – For safety.
These wires are connected to their matching wires in the ceiling box in your house. Normally, the black from the ceiling would connect to the black from the fan, the neutral (white) wire from the ceiling would connect to the white wire of the fan, and the ground wire would be connected to the metal grounding bracket or the ground wire for the fan. The blue wire from the fan connects to the ceiling wiring if it is wired for the light fixture.
Components of a Ceiling Fan
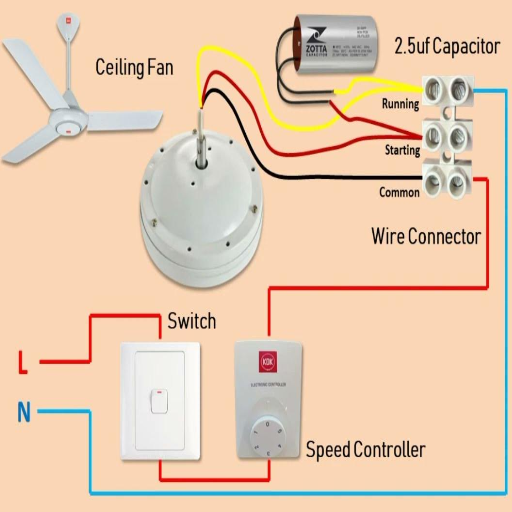
Capacitor
The capacitor helps to start the fan motor and also improves the running efficiency of some types of motors. Capacitors come in single or dual varieties. A single capacitor is used for mains’ start and run motors and is installed in the circuit as a parallel branch, whereas a dual capacitor has two circuit paths: one for start and one for run.
Control
This component controls the speed of the fan, ranging from one speed to five or more. Speed controllers having speed tap switches vary with the number of speed taps incorporated in the design. This may be a switch, a pointer on a speed dial, pressure on a touch pad, or a rotary knob.
Additional controls for fans are usually provided, which include timer settings for the fan to turn off. These extra controls may be integrated with a wall controller, with the fan controls built into a lighting fixture under a ceiling fan, in a remote, or with a smart-home app.
The capacitor is a small electronic component that speeds the fan’s action by charging and discharging the electrical energy needed.
Pull Chains, Wall Switch, or Remote Control
These are the different components giving the user manual control of the fan speed, light, and on/off operation. Many modern fans have now been equipped with smart controls that can be integrated with a home automation system.
Light Kit (if applicable)
A light kit is part of some ceiling fans installed with LED or incandescent bulbs, providing an additional functional element to air circulation.
Canopy
A canopy hides a mounting bracket to give the setup a clean, finished look and hides the wires.
Wiring and Electrical Connections
Inside the fan are wires-motor, capacitor, light, hot, neutral, and ground-wire connections. Correct wiring ensures the safety and good working of the system.
Importance of Proper Wiring
In fact, proper wiring would be necessary for the proper and efficient operation of any electrical system, including ceiling fans. Improper wiring is a hazard; it might cause an electrical fire, a short circuit, or even damage the internal components of the fan. In the correct connection of hot, neutral, and ground wires to their respective terminals, we avert electrical faults that would otherwise have been dangerous. Proper grounding further prevents electric shocks from affecting the user and from causing the system to wear down prematurely.
Ceiling fans these days come with a variety of different options that could affect the wiring requirements. Such options include overhead lights, automatic speed controls, and speed variations that should be wired exactly as per the manufacturer’s specifications. It is always best to use good-quality connectors; moreover, wiring should always be done in conformance with the local building codes. An experienced and licensed electrician should be consulted regarding wiring procedures, or a well-situated installation manual may be kept at hand during each step of the installation phase. This not only keeps you in compliance with safety standards but also ensures that the ceiling fan systems last.
Common Wiring Configurations
The wiring of any given ceiling fan will depend greatly upon the particular setup and whether a light was attached thereto. There are generally three methods for wiring:
Single Switch Wiring
This configuration is used where one switch controls both the fan and the light. Thanks to this configuration, the black and blue wire will be connected to the live wire coming from the switch. The white wire will therefore be attached to neutral, and the green or bare wire to the ground.
Dual Switch Wiring
A dual switch wire gives a separate wall switch for independent operation of the fan or the light. Black from the fan is connected to hot for the fan switch, while blue is connected to hot for the light switch. White acts as neutral, while green or bare is for the ground.
Remote Control Wiring
Most modern ceiling fans come with a remote control receiver. The fan’s black, blue, and white wires are linked to the receiver unit, and the receiver wires are then connected to the house wiring. Since various models might have slight variations, it is imperative to follow the specific manufacturer’s wiring diagram closely.
Tools Needed for Wiring a Ceiling Fan
Essential tools for wiring a ceiling fan are:
- Screwdrivers (Phillips and flat-head) – for fastening screws and attaching wires.
- Wire strippers – to peel off insulation from electrical wires.
- Voltage tester – to validate that there is no power before any work is initiated.
- Wire nuts – to hold and insulate wire connections.
- Ladder or step stool – to smoothly facilitate mounting.
- Drill and bits – for any extra hole drilling pertaining to the mounting brackets.
- Electrical tape – to provide additional layers of safety on taped connections.
Ensure all tools are functional and safety measures are adhered to during the entire process.
Essential Tools Explained
The purpose and use of essential tools are highly important when setting up electrical or mounting works. Observation of some of the tools is given below:
- Screwdrivers (Flathead and Phillips) – These tools serve fundamental uses of tightening or loosening wires in the process of installation or removal. A good-fitting screwdriver never damages the head of the screw and secures good connections.
- Wire cutters and strippers – The double tools are used to cut electrical wires and also to strip the insulation without damaging the conductor underneath. Any slight inaccuracy may result in wire damage.
- Voltage tester – The tool is an important safety tool to check if the circuit is de-energized before handling. Present-day testers come with light or sound indicators for confirmation.
- Wire nuts – These miniature connectors are used to hold wires together with insulation, ensuring a safe and secure connection, preventing any kind of short circuit.
- Ladder or step stool – Designed to provide stable access to elevated work areas, these tools must meet weight and height requirements for additional safety measures.
- Drill and bits – Use a drill for making holes. Ensure the correct type and size of the bit are selected relative to the working material.
- Electrical tape – This tape supports insulation on a wire and also protects the connection, thus improving safety and longevity.
Safety Equipment
Of course, the safety equipment is necessary to protect not only the person doing the work but also the worksite itself. Below is a short list of safety equipment based on the prevalent best practices:
- Insulated Gloves – Protect the hands from electrical shock and must reach a specific voltage rating, in addition to being inspected regularly for any form of wear and tear or damage.
- Safety Goggles – So necessary in all applications that shield eyes from sparks, debris, or any accidental contact with corrosive substances.
- Electrical Insulation Mats – These are spread out underfoot during electrical work to add insulation between the worker and the ground.
- Hard Hats – Required where overhead hazards exist, such as falling objects or exposed wiring.
- FRC (Flame Resistant Clothing) – Mitigates the risk of severe burns in the event of electrical arching or sparking during operations.
- Voltage Detectors – Handheld, portable instruments that help ascertain whether circuits are de-energized before servicing, thus preventing unintended shocks.
- Hearing Protection – In excessive noise environments, the use of hearing protective equipment is recommended, especially when electrical tools or generators are operated at potentially harmful decibel levels.
Additional Supplies
To retain a safe and efficient workspace, the following items, in addition to other supplies, are recommended:
- First Aid Kits – Should be stocked with sterile bandages, antiseptic solutions, and pain relievers, and must comply with ANSI (American National Standards Institute) requirements for workplace first aid.
- Fire Extinguishers – Must be appropriate for the types of fire that can be encountered in the workplace (i.e., A, B, C) and maintained in accordance with NFPA (National Fire Protection Association) regulations.
- Signage and Labels – Danger, caution, and information signs must be conspicuously placed and should correspond to the OSHA standard for the hazards they communicate.
- Spill Kits – These are used for containing and neutralizing hazardous liquid spills as quickly as possible, particularly where chemicals or oil are handled.
- Hearing Protection – Should include earplugs or earmuffs that are appropriate for the high-decibel environment, with an adequate fit for each user, and a Noise Reduction Rating (NRR).
- Respiratory Protection – This may imply fitting the workplace with respirators or masks against airborne particulates or dangerous vapors, with standards being NIOSH (National Institute for Occupational Safety and Health).
A system for inventory checks should be set up to confirm regularly that all the equipment is in good working order and ready to be provided when needed. These supplies should be deployed according to workplace hazards for full preparedness.
Installing a Ceiling Fan
- Turn Off Power – Turn off the circuit breaker where the ceiling fan is to be installed to avoid electrical hazards. Test with a voltage tester to ensure the power is indeed off.
- Remove Existing Fixture – Carefully uninstall any old light fixture or fan in place and disconnect its wiring. Make sure that the electrical box is rated for ceiling fans.
- Install the Mounting Bracket – Install the mounting bracket, provided with the fan, to the electrical box, following the manufacturer’s instructions.
- Assemble the Fan – Partially assemble the ceiling fan as per the instructions, generally attaching the downrod or motor housing prior to installation.
- Wire the Fan – Connect the house wires to the fan wires accordingly, matching colors (black to black, white to white, green or bare wire to the ground). With wire nuts, secure all connections.
- Secure the Fan – Fasten the fan firmly to the mounting bracket or ceiling box. Tighten all screws to mount the fan enough to stand firm against the weight of the fan.
- Fix Blades and Light Fixture – Install the fan blades and the optional light kit, making sure everything is balanced and aligned.
- Restoring Power and Testing – Now switch the breakers back on. Test the fan and light to make sure they work correctly.
Preparation Steps
- Check the Electric Requirements – Verify local code compliance for electrical wiring and connections on the installation site. The ceiling box must be rated to hold the weight of the fan.
- Gathering Tools and Materials – Get all the needed tools, such as a screwdriver, pliers, drill, and maybe a ladder. Make also that you have all parts of the fan, the right mounting hardware, and a circuit tester.
- Switch Power Off – Go to the breaker panel and turn off power from the installation area. Use a voltage tester to confirm that there is no power for safety.
- Check Installation Area – Confirm that the selected place for installing the fan has a good, solid base. There must be sufficient clearance for the fan blades to rotate freely.
- Understand Ceiling Fan Design – Read the manufacturer’s instruction manual in detail to discern the assembly and installation requirements peculiar to that specific model.
Installation now begins on a safety and efficiency foundation if these steps are followed.
Mounting the Ceiling Fan
Mounting of ceiling fan first involves switching off the power supply at the circuit breaker to avoid any electrical hazards. Next, check that the mounting bracket of your fan is compatible with the electrical box, ensuring that the box is UL-rated for fan support. The mounting bracket of the fan is to be firmly secured to the electrical box with the provided screws or hardware, according to the mounting instructions from the manufacturer. If a downrod is used, fasten it onto the motor coupling and secure it with the pin and screws supplied, as outlined in the manual; if flush-mounted, secure the fan base directly to the mounting bracket while aligning the parts properly. Tighten all fasteners to minimize vibration, thus enhancing safety. In addition, check blade balance after installation to ensure smooth operation without noise or wobbling.
Connecting Wires for the Fan and the Light
Before beginning to hook up the electrical wiring for the fan and light, differentiate from the outset that the main circuit’s power, serving as a source of danger, must be switched off at the breaker. Next up is to identify the different ceiling wires, naming usually black (hot), white (neutral), green (ground), and sometimes a blue one for light. The connection should then proceed according to the wiring diagram furnished by the fan manufacturer:
- Black or Red Wire (Hot): Connect this to the black wire from the fan to power the motor.
- Blue Wire (Light): If the fan has a light fixture, connect the blue wire from the fan to the same ceiling hot wire that powers the fan (often black or red).
- White Wire (Neutral): Connect the fan’s white wire to the ceiling’s white neutral wire.
- Green or Bare Copper Wire (Ground): Connect this to the ceiling ground wire or to the ground screw on the mounting bracket.
Secure each connection using wire nuts, making sure the wires are properly insulated. The connections are then gently tucked inside the box, and the fan canopy is attached to complete the installation. Power is restored, and the operations of the fan/light are tested. Always consult the specific manual for the fan for variations, and local electrical codes must be observed.
Wiring Ceiling Fans with Separate Switches
Typically, when wiring ceiling fans with separate switches, the cable needs to be a three-wire cable identifying red, black, white wires, plus the ground wire. The black wire is often wired for the fan motor, whereas the red wire is assigned to the light kit. Connect the white wire at the neutrals with the green or bare copper ground wire to the ground connections, either at the fan or at the mounting bracket.
At the switchbox, place a double switch or two single switches to enable separate control of the fan and light. Connect the black wire to one switch terminal for the fan; connect the red wire to the other switch terminal for the light. Tie them all up with wire nuts, ensuring good grounds throughout. Consult the wiring diagram of the fan and verify all procedures with local electrical codes. For safety, make sure the power is shut off at the breaker before installation.
How to Wire a Ceiling Fan and Light with One Switch
Steps are as follows: wiring a ceiling fan and attaching a light to one switch. First, ensure safety by switching off the circuit breaker. Next, identify black (hot), white (neutral), and green or bare copper (ground) wire both in the ceiling box and in the fan/light fixture. Connect the black wire from the fan and light to the line terminal on the switch. Connect neutral wires using a wire nut, finishing the neutral connection between war wire from the ceiling and that from the fixture; do the same for the ground wires. Wrap each connection with insulated wire connectors to be safe. Install the fan and light fixtures firmly to restore power at the breaker and check the operation. Check the fan wiring diagram and any other local electrical codes for a neat installation and safety.
Configuring a Separate Switch for the Light and the Fan
To wire a separate switch for the fan and light, first, you will have to verify the wiring configuration in your ceiling and wall switch box. Commence by making sure that the power supply is through the multi-wire cable to allow independent operation. Usually, this would be a 14/3 cable with black, red, white, and ground wires running between the switch box and the fixture.
Switch Box Setup
Install the double light/fan switch or two single-pole switches, whichever you prefer. Connect the black (hot) wire from the source to the common terminals or the corresponding input terminal for each switch.
Wiring at the Ceiling Fixture
At the ceiling, connect the black wire from the ceiling cable to the fan hot wire and the red wire to the light hot wire. Connect the white (neutral) wires using a wire nut while attaching the ground wires per the normal grounding procedure.
Testing and Compliance
After completing the connections, make sure all wire nuts and connections are tightly secured and properly insulated. Next, reenergize the power back at the breaker, test the switches all by themselves, and confirm that they do indeed control the fan and light. Make sure to check that all regulations comply with the local electrical codes before continuing.
The above-stated connection offers more flexibility and functionality as it offers another way to power the light and fan independently without having to do so by the pull chain.
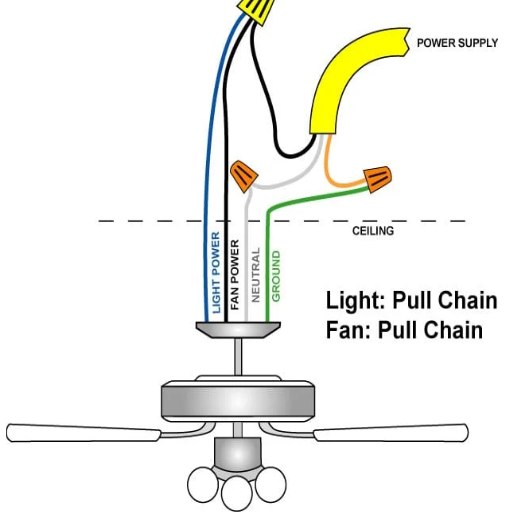
Using a Pull Chain for Fan Control
In cases where wall switches are absent or where additional wiring is not possible, pull chains are a simple and workable control arrangement. A pull-chain mechanism is included in the fan assembly, whereby one pulls on the chains to run the fan or control the light operation, depending on the needs atop of the speed. Pull chain use entails pulling once for the low-speed setting, twice for medium speed, thrice for high speed, and further for turning off the fan. For the lighted models, another pull chain usually operates the light independently. This way is cheap, requires no electrical changes, standard from a safety perspective, and confers only simple but reliable controls over your ceiling fan and light.
Advanced Wiring Options
Wall-mounted control switches are yet another option to consider. From the more complex wiring schemes, this bestows upon one fine control over the ceiling fan and lights. Features that could be offered by such switches include speed control, light dimming, and timer settings. To perform the upgrade, install a matching controller and wire it into your home’s electrical system, in accordance with fan-light specifications. Follow all instructions included by the manufacturer, and again, note compatibility was ensured before any changes were made. When in doubt or when faced with a more complicated installation, one should hire a licensed electrician to guarantee safety and adherence to code.
Installing a Fan with a Remote
Installing a ceiling fan with a remote control begins with the purchase of a fan model that has a remote kit or is compatible with a remote receiver sold separately. By safety measures, switch off the power to the existing fan or light fixture at the circuit breaker and remove the existing fixture. Follow the manufacturer’s instructions cautiously to mount the fan. Most remote control kits require mounting a receiver unit within the canopy of the fan, wiring it into the motor, and other fan wiring. Connect the colored wires coming from the receiver to those coming down out of the ceiling; generally, white is neutral, black is for the motor, and blue is for the light. Cap all the wire connections with wire nuts and tuck everything neatly inside the canopy.
Next, mount the fan blades and any other components, and ensure that all screws are tightened properly to avoid wobbling. Restore the power at the breaker, and test the functions of the fan through the remote, such as speed change and light control. Program the remote, following the manual to ensure an exact match with the receiver. Those confused about any aspect of installation or wiring should seek help from a licensed electrician to ensure proper installation and compliance with local electrical codes.
Integrating a Pull Chain for Light Without a Switch
To attach a pull chain to a light without a switch, I would begin by turning off the power at the breaker to protect myself against electrical hazards. After that, I would find the wires for the light kit inside the ceiling fan or fixture. The pull chain light switch is then installed by connecting its wires to the hot and neutral wires of the light kit, in accordance with the wiring diagram provided with the switch. Once the switch is firmly attached and mounted, power is restored, and the pull chain is tested to verify its functioning.
Common Troubleshooting Tips
Pull Chain Not Responding
If the chain pull does not turn on the light, check if the power supply is connected properly and ensure the wiring corresponds to that of the switch in the diagram. Inspect for any loose connections or damage to the wires and tighten or replace them if necessary.
Light Flickers or Is Not On
Verify that the bulb is correctly screwed in and that it is in good condition. Replace the bulb if not. Look for debris or corrosion inside the socket that could interfere with electrical contact. If damage is evident, clean or replace the socket.
Pull Chain Stuck or Jammed
This type of problem is usually due to mechanical wear. Take the switch out gently, then check the chain mechanism for obstructions or damage, and replace the switch assembly if it cannot be repaired.
Breaker Keeps Tripping
A breaker tripping might indicate a short. Turn the power off and double-check the connections to see if any wires are crossed or exposed. Reset the breaker after fixing the problem.
Overheated Switch
Excessive heat can mean electrical overload. Check that the wattage of the lightbulbs used does not exceed that of the fixture, and replace those with higher wattage than is recommended.
Reference Sources
“Numerical Investigation of Using FDCU on Temperature Distribution in Non-Unidirectional Cleanrooms”
- Key findings: This research investigates the uses of the ceiling supply fan filter unit and the ceiling return fan coil in cleanrooms. It brings to the fore the importance of wiring and system design to ensure proper temperature distribution.
“Discussion on Electrical Design of Passive Residential Building”
- Key Findings: The present paper discusses the electrical design of Passive Houses while focusing on wiring requirements for new fan systems using analog signals.
- Key Findings: The study was conducted to test the integrity of electric fan wiring under high heat to guarantee safety and performance.
Frequently Asked Questions (FAQs)
How do I wire my ceiling fan with the lights attached?
In wiring a ceiling fan with lights, you will need to connect the many wires. Usually, the wires are black for the fan, blue for lights, and white for neutral. Be sure to connect the black wire from the fan unit with the black wire from the electric box in the ceiling, blue for lights, and the processor white with the white wire from the box. Always make sure to turn off the power before starting any installation.
What tools do I need to wire a ceiling fan?
To wire a ceiling fan, you will need quite a few tools: a screwdriver, wire cutters, wire strippers, electrical tape, and a voltage tester. These tools will allow you to connect the wiring safely and secure everything properly.
Can I install a ceiling fan in a room with no switch source?
Yes, it is possible to install a ceiling fan in a room without a switch source; nonetheless, a ceiling fan remote receiver must be used. This device will allow you to control the fan and the light from the remote, doing away with the need for a wall switch.
How does one rewire the fan and light?
To rewire the fan and light, the first thing you want to do is to turn off the power at the circuit breaker. Then, take down the fan from the ceiling and identify the existing wiring. Connect the black wire from the ceiling to the black wire for the fan, and the blue wire to the light power connection. For the neutral, the white wire is connected to the white wire in the ceiling box. Use tape to secure all connections and mount the fan back in place.
How can I turn on the fan and light if I only have one switch?
If you have a single switch only, then you can go for a light and pull-chain setup for a switch. This way, you can control the fan from the switch, while the light would be controlled using the pull chain. Another option is installing a ceiling fan remote control to control both the fan and light without the need for multiple switches.
Wiring for a ceiling fan with four wires?
A ceiling fan with four wires usually includes a black wire for the fan, a blue wire for the light, a white wire for neutral, and a green or bare wire for ground. Wire the black and blue with their power sources, white with neutral, and green with ground to keep everything safe.
How can it adjust the speed of the fan?
To adjust the fan speed after installation, methods include either using a pull chain or a remote control, provided your fan supports that. Most fan sets usually have several speed settings you can switch quickly between, either using a remote or a pull chain.
What are the common breakers associated with the wiring of ceiling fans?
Common breakers associated with ceiling fan wiring are those of the lighting circuits and general-purpose circuits. For example, it will be a good idea to have an appropriately-rated breaker that can bear the load of the fan and light fixtures, or it will trip.
Are there ceiling fans without lights?
Yes, indeed, there are ceiling fans without lights. These fans provide air movement only, which is a great idea if you want to use a separate light fixture in the room. Just pick one that will suit your style needs as well as functionality.