








Transforming the interior of a room with a new ceiling light fixture is not only about the style but also the functionality. It is important to comprehend the wiring procedure, whether you are replacing an old lamp with a new one or opening up a lighting place in the house. The installation can be off safe to say you are sure about the wiring process, and this guide is meant to lead you through the wiring of a ceiling light. You will be able to comprehend easily the steps, and clear instructions will be provided that will make it doable for DIYers, the process being not only for them. You will be well guided from the process of picking the right tools and connecting the wires in a safe and secure way, to having a good knowledge of the project at hand. Now that you have prepared all the necessary things to brighten your house with a properly installed light fixture!
Understanding Light Fixtures
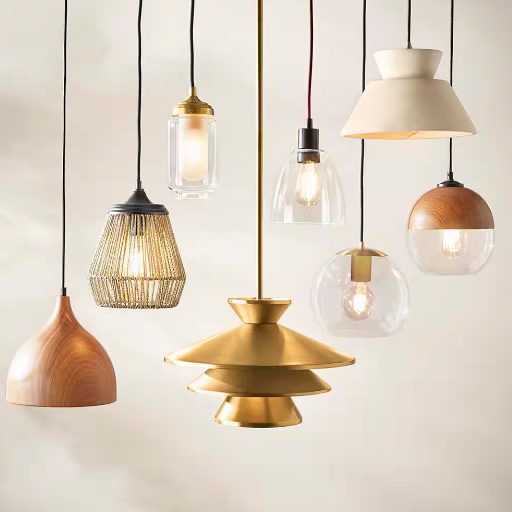
Light fixtures, or luminaires as they are scientifically known, are the instruments responsible for protecting the light sources, such as bulbs, and letting them shine effectively. The designs of fixtures vary widely, with examples such as ceiling-mounted, wall-mounted, pendant, and recessed ones catering to both functional and aesthetic purposes. A standard light fixture structure consists of housing, a light bulb socket or holder, and electrical connections and wiring. The process of selecting the right light fixture is done based on the primary purpose of the room, the quality of the bulb, and the favorite style or theme of the décor. Make it a practice to clarify the compatibility of the fixture with your electrical system and the wattage of the bulbs, as this is essential for safe operation.
Types of Light Fixtures
The classification of light fixtures is done according to various factors such as their design, location, and use. The following are the types of light fixtures that come up most frequently:
1. Ceiling-Mounted Fixtures
Ceiling-mounted fixtures are adaptable and mostly used for general lighting. They consist of flush mounts, semi-flush mounts, and chandeliers. Flush mounts are flat and touch the ceiling directly, thus giving a modern look that fits well with low ceilings; semi-flush mounts hang a little lower, making the room appear more spacious. Chandeliers not only impart grace but also serve as one of the focal points in the dining or living areas. The trend is towards using energy-efficient LEDs for ceiling lighting, which would eventually lower the electricity bill by 75% or even more compared to incandescent bulbs.
2. Pendant Lighting
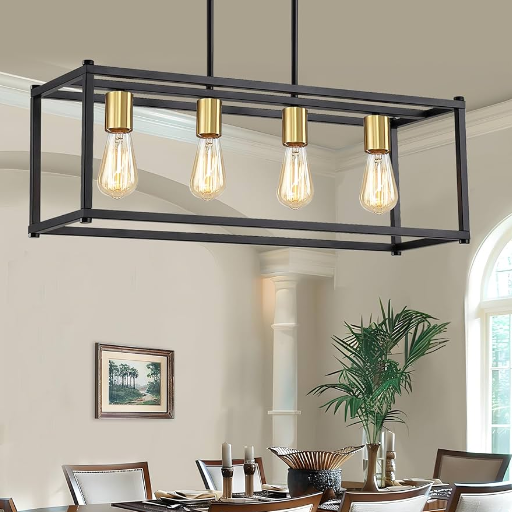
Pendant lights are hanging sources of lighting that focus the light directly downwards and are generally attached to the ceiling using wires, chains, or rods. They are mostly used as lighting over kitchen islands or dining tables or as general lighting in work areas. The present-day pendant lights are equipped with dimmers and different types of smart technology, which let users manage the light’s brightness and color temperature by using apps.
3. Recessed Lighting
Recessed lighting is also referred to as can lights or pot lights and is fitted into a space in the ceiling, which gives a smooth effect. It can be used as ambient or accent lighting, creating a soft glow of light that reveals an area or feature. Recently, recessed LED bulbs have been used across the board for installations owing to their energy-saving capabilities, thus less spent on electric bills, and for their long duration and low heat production.
4. Wall-Mounted Fixtures
Wall-mounted fixtures or sconces are employed to give light effects to some areas only or to provide more light in places such as hallways, next to mirrors, or around beds. Sconces that are modern generally have “flexible” angles for lighting of different directions and are made from eco-friendly materials like bamboo or recycled metals more often.
5. Floor and Table Lamps
The combination of floor and table lamps provides lighting that is both portable and convenient. Besides reading corners, they can also be used to lighten up the ambiance of living rooms and bedrooms. One trend that is on the rise is the production of lamps having features like wireless charging pads and USB ports, which makes the lamp both functional and lighted.
6. Outdoor Fixtures
Outdoor lighting fixtures such as floodlights, wall lights, and pathway lights are mandatory for safety reasons and also for making your home look good. Solar-powered lights and motion sensors are now a common addition to outdoor fixtures to reduce energy use and provide green alternatives.
7. Track Lighting
Track lighting has several lamps installed on a track system, which are able to turn and light up in various directions. It has become a common practice in art galleries and kitchens. One of the innovations in this area is the smart track lights that have color-changing bulbs and let you set moods with remote customization.
8. Specialty Fixtures
Specialty fixtures include things like under-cabinet lights, vanity lights, and cove lighting that serve to shed light on specific areas. Under-cabinet lighting makes it easy to do the cooking, while the mirrors around the lighted vanity ensure that the grooming goes right and no spot is missed. Cove lighting is done in recessed areas to create soft, indirect light that gives an elegant touch to the room’s atmosphere.
While choosing light fixtures, it is important to take into account energy efficiency, the design of the fixture that matches your room, and new technologies that allow more customization and control. The trend that is happening right now indicates that there is a drastic rise in the use of LED and smart lighting, which is a win-win situation in terms of both practicality and sustainability.
Components of a Light Fixture
A light fixture is made up of a number of important parts that work together to not only illuminate but also enrich the area’s décor. The major contributing parts are:
Bulb
The bulb is the one and only light source for all fixtures. LED bulbs have become a trend in modern lighting, and this is because of their high energy efficiency, long lifespan, and low heat output. Candela rating usage is similar for both a standard LED bulb and a traditional incandescent bulb, which can last up to 25,000 hours, that are quite a lot less compared to the latter ones’ lifespan.
Socket
The socket is the secure grip for the bulb and at the same time a connector to the electric wiring. The kind of socket used in various fixtures may differ depending on the bulb type and the design specifications. The most commonly used types are E26 and GU10.
Fixture Body
The structure of the light fixture, which is mostly made out of metal, plastic, glass, or wood, functions as a support. The component not only adds to the aesthetic appeal of the fixture but also plays a significant role in its overall unbreakability.
Shade or Diffuser
The shade or diffuser surrounds the bulb to help with the softening and uniform distribution of light. Fiberglass, fabric, or acrylic are common materials used to give the desired level of darkness and to lessen glare.
Mounting Hardware
Securely mounting hardware for light fittings includes brackets and screws, and so on. Proper installation is a must for ensuring safety and stability.
Wiring
Safe, high-quality electrical wiring from the power source to the bulb conducts electricity. Modern fixtures sometimes come with wiring that is wrapped in tough insulating materials, which increases their lifespan and reduces fire risks.
Control Mechanism
Dimmers, motion sensors, and smart lighting controls are some of the control systems that are built into many contemporary fixtures. With smart technology features, the user can change brightness and color temperature from their mobile app, which is convenient as well as energy-efficient.
Canopy or Base
The point at which the light fixture connects with the ceiling or wall is called the canopy or base. It makes sure electrical wires are hidden and gives the place a clean, shiny look.
Choosing the Right Fixture for Your Space
Choosing the perfect light fixture relies on various factors like the purpose of the room, the design aesthetic, and the energy efficiency goals. Chandeliers or pendant lights for living areas will point out the focal areas of the room, and recessed lighting will provide a more gentle effect. A kitchen usually needs task lighting, like under-cabinet fixtures or track lighting, to properly light up the work areas.
In the matter of energy efficiency, LED fixtures are still the most favored ones in the market because of their long life and very low energy consumption. Reports say that LEDs consume about 75% less energy, and they can outlive the incandescent bulbs by 25 times; thus, they are a very economical choice for homeowners. Besides, the use of dimmers and motion-sensor lighting can increase the personalization and efficiency even more by adapting the light use to the specific needs and thus, cutting down the waste.
Style choices are another very important factor. Modern interiors still get their share of sleek, minimalist fixtures, but vintage and industrial designs are becoming more and more popular for getting a rustic or eclectic look. Functionality and adaptability to several environments are making versatile designs with adjustable features, like swivel arms or rotating heads, more and more prevalent.
To make good decisions, homeowners should think of the size dimensions of their rooms concerning the fixture to avoid overpowering or under-lighting the space. Finally, mixing up the needs, look, and modern energy-saving technologies can set the mood for any interior perfectly.
Preparing to Connect a Light Fixture
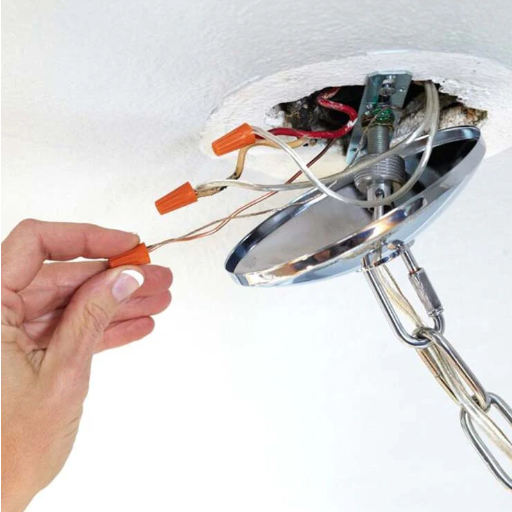
1Turn Off Power: To make certain that you will work safely, switch off the power to the circuit at the breaker box.
2Prepare Tools: Take the required tools with you, such as a screwdriver, wire stripper, and voltage tester.
3Verify Power is Off: Check the voltage tester to see if the electrical current is indeed cut off at the wires of the fixture.
4Remove Old Fixture (if applicable): Carefully unscrew and disconnect the light fixture, taking careful note of the connections of the wires.
5Connect Wires: Fixture wires are to be connected to corresponding wires in the junction box (normally black to black, white to white, and ground to ground). Use wire connectors to secure connections.
6Secure the Fixture: Fix the new light fixture to the mounting bracket or directly to the junction box according to the installation instructions of the manufacturer.
7Restore Power: The circuit breaker should be turned on again, and the new fixture tested to check if it is working properly.
It is important to always refer to the manufacturer’s manual for specific installation guidance and to consult a licensed electrician if you are not sure.
Gathering Necessary Tools and Materials
To install a light fixture properly, you will need the following tools and materials:
Tools:
- Screwdrivers (both flathead and Phillips)
- Voltage tester
- Wire strippers
- Pliers
- Drill (if needed for mounting)
- Ladder
Materials:
- The light fixture is to be installed
- Wire connectors
- Mounting hardware (usually provided with the fixture)
- Electrical tape
- Light bulbs (that are suitable for your fixture)
Prior to commencement, check to see that you have all the tools and materials available so that there will be no stoppage of work. Always make sure the light fixture is suitable for your space and is compatible with your home’s wiring. These measures will facilitate the installation process and guarantee safety.
Understanding Wiring Diagrams
Wiring diagrams are extremely useful in the comprehension and repair of electrical setups. Such diagrams use the same symbols to make a picture of an electrical system or circuit, and, as a result, they are very clear and simple in their representation of the flow of current everywhere in the whole circuit. Hence, the diagram explains everything clearly and will be of great assistance during maintenance and installation.
Schematics, layout, and pictorial are three major categories of wiring diagrams. Diagrams showing the circuitry of electricity deal with the logical flow of electricity and, therefore, are perfect for getting the idea of the technical operation of the circuit in which they are used. Wiring layouts, however, are concerned with the physical connections and paths of wires, which are an important guide in the installation process. Pictorial diagrams, on the other hand, are represented in a more realistic and visually comprehensible manner, as they show the components as if they were still in a real-world environment.
Color Coding in Diagrams: Color coding in diagrams is a very important detail. To illustrate, black and red wires are generally used for hot or live connections, whereas white ones are for neutral wires. Grounding is usually shown by green and bare wires. One of the biggest advantages of these conventions is that they make the electrical system safe and function well. For extra safety and proper functioning, the modern lighting fixtures may also have a ground wire that must be connected to the grounding screw or wire of the system.
Whenever you work with a wiring diagram, make sure you also check it against the instructions given by the manufacturer of the fixture. Safety codes and compliance requirements are being updated, and many diagrams already include them. Taking the time to go through these diagrams may prevent the occurrence of mistakes and will also ensure that you are working with the right components and that you are doing electrical projects safely for yourself and your house.
Safety First: Turn Off the Power
Shutting down the power supply to the electrical circuit involved is the first and most important step to take before starting any electrical project. The use of electric power is the cause of accidents and injuries each year, and most of them are easily avoided by simply turning off the power, which is indeed one of the most effective precautions that one can take. Understanding how to safely turn off power is as follows: locate the electrical panel in your house; this is where the circuit breaker and circuit switches are usually found. Determine the circuit for the area you are going to work on and switch it “off”. In case you are not sure about which breaker is for the circuit, it is always better to turn off the main breaker, hence cutting off the power supply to the entire house.
Always check to see if the power is off after you switch it off at the breaker. You can make use of a voltage tester or a multimeter to check if there is no current on the wires. A good practice is to label your circuit breakers clearly and to take detailed notes. Following these safety steps is evidence that you apply the best practices of the industry, and the guarantee that you will not be a victim of electric shock or cause of fire during electrical work is huge. However, if there is anything that you do not understand about the process or if you have any doubts, then the best course of action is to hire an electrician.
Step-by-Step Guide to Install a New Light Fixture
-
Turn Off the Power
The first thing you have to do is locate the circuit breaker that is responsible for the light fixture’s wiring and turn it off. A multimeter can then be used to confirm that there is no current flowing in the area that you are going to work on.
-
Remove the Old Fixture
Unfasten the current fixture from the ceiling or wall. Next, eliminate the wires cautiously and take down the mounting bracket that is connected to the electrical box.
-
Inspect the Electrical Box
Make sure that the electrical box is firmly attached and has a rating that can support the load of the new light fixture that you will install. If necessary, replace it with a more suitable box.
-
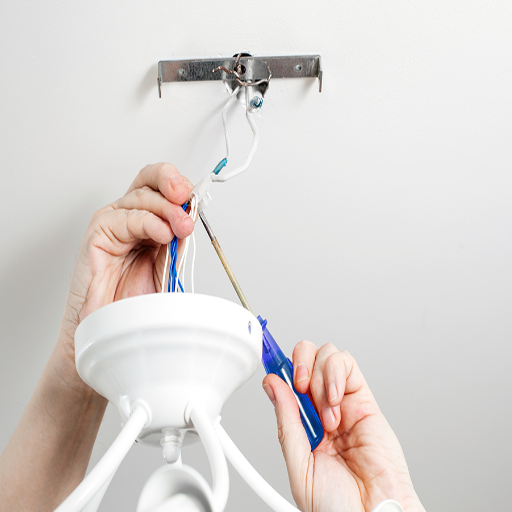
Connect the Wires
The wiring should be done according to the directions given by the light fixture manufacturer. Generally, connect the black (hot) wire from your fixture with the black wire in the box, then the white (neutral) wire to the corresponding white wire, and finally, the green or bare copper (ground) wire to the grounding screw or the ground wire.
-
Secure the New Fixture
Mount the bracket, if provided, and then secure the new light fixture to the electrical box. Double-check that all screws are fastened and connections are secure.
-
Install Bulbs and Cover
Put in the correct light bulbs as indicated by the manufacturer, and then cover or shade the fixture.
-
Turn Power Back On
As soon as everything is properly installed and secured, go back to the circuit breaker and turn the power on again. Check the new light fixture to be sure it is working correctly.
Always consult the manufacturer’s guide for particular information, and if necessary, do not hesitate to ask an electrician for help.
Removing the Old Light Fixture
Turn Off the Power
Start by switching off the power to the old light fixture at the circuit breaker. Verify the power is off by using a voltage tester on the fixture.
Remove the Bulbs and Cover
With caution, remove the light bulbs and any glass covers or shades from the fixture. This will be a good access point for the mounting hardware.
Unscrew the Fixture
Identify the mounting screws or nuts that hold the fixture on the ceiling or wall. Use a screwdriver to loosen and remove these fasteners while keeping a firm grip on the fixture to prevent it from dropping.
Disconnect the Wiring
Once the fixture is out, carefully pull it back from the electrical box to see the wires. Remember how the wires are connected—most of the time, wires are held by wire nuts. Carefully remove the wire nuts and detach the wires, starting with the ground wire, then neutral and hot wires.
Check for Damaged Components
Look over the electrical box and wires for any damage or wear that might require repair before the new fixture is installed. Make sure the electrical box is properly mounted and rated for the new fixture’s weight.
Wiring a New Light Fixture
Turn Off Power
Before you start working on the circuit, the first thing you need to do is to switch off the power at the breaker box. After that, use a voltage tester to make sure that the electricity is indeed not flowing through the wires.
Connect the Ground Wire
The next step is to identify the ground wires, which are usually either green or bare copper, from the light fixture and the electrical box. After that, they should be twisted together and fixed with a wire nut. In case the electrical box is made of metal, you might also have to connect the ground wire to a green screw inside the box.
Connect the Neutral Wires
The white (neutral) wire from the electrical box needs to be connected to the white wire on the light fixture. After that, twist the wires together and secure them with a wire nut.
Connect the Hot Wires
The black (hot) wire from the electrical box is to be attached to the black wire on the light fixture. Then, twist and secure with a wire nut. If the fixture has an extra wire (for a fan, for example), refer to the manufacturer’s instructions for the correct connection.
Secure the Fixture
To attach the fixture to the electrical box firmly, follow the fixture’s installation guidelines. Also, make sure that all the wires are tucked neatly inside the box.
Install Bulbs and Cover
Put the right bulbs into the fixture and place the cover or shade on it, depending on the design.
Turn On Power and Test
The next thing is to switch on the power at the breaker and check the new light fixture to make sure it works properly. If it doesn’t, turn the power off again and check the connections.
This concise guide combines safety steps and standard wiring instructions sourced from expert recommendations to make the installation process clear and efficient.
Mounting the Fixture to the Ceiling
Prepare the Junction Box
Make sure that the junction box is firmly attached to the ceiling and is capable of carrying the load of the light fixture. If needed, use a mounting bracket, and, to be sure, give it a slight tug to establish its stability.
Attach the Mounting Bracket
Place the mounting bracket in the proper position and screw it to the junction box. The bracket will provide stability for the light fixture.
Connect the Wires
Connect the fixture’s wires to those in the junction box in this way—white to white (neutral), black to black (live), and green or copper to the ground wire. Firmly twist on wire nuts to the connections and make sure there are no bare wires.
Secure the Fixture
Put the fixture base on top of the bracket and screw it down with the screws that came with it. Ensure that all parts are secured tightly so that there won’t be any wobbling or risk of falling down.
Install the Bulbs
Use bulbs that fit the fixture and are within the wattage limit specified by the manufacturer.
Restore Power and Test
Switch the circuit breaker back to on and check the fixture by using the switch. In case the light does not work, check the wiring connections one more time.
You can mount your ceiling fixture safely and quickly by carrying out these steps. Make sure to consult the manufacturer’s directions first for any particular details about your fixture model.
Connecting the Light Fixture to the Switch
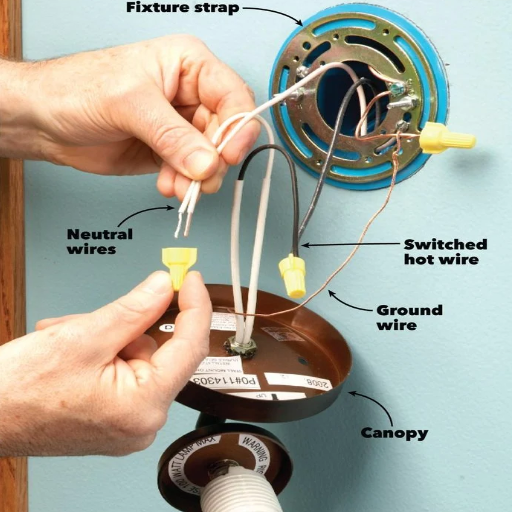
For connecting the light fixture to the switch, you need to follow these instructions:
- Turn Off Power: Make sure to cut off the power at the circuit breaker to avoid the risk of electric shock. Confirm that the wires are not live by using a voltage tester.
- Locate the Wires: Determine the location of the wires in both the switch box and light fixture. Usually, you will find black (hot), white (neutral), and green or bare (ground) wires.
- Connect Wires: Tie the black wire coming from the switch box to the one from the light fixture, and then attach them with connectors. The same goes for the white wires, ensuring that all connections are firm. The green or bare ground wire can now be put on the grounding screw or connected to the ground wire of the fixture.
- Secure Connections: Carefully push the wires into the electrical boxes, making sure that no wires are exposed, and mount the fixture according to the directions.
- Test the Setup: Turn the power back on at the circuit breaker and switch it to check that the light fixture is working correctly.
Always refer to the manufacturer’s manual and local electrical regulations for more requirements that might apply to your area.
Wiring Connections Explained
Wiring connections are the most important part of any electrical installation, getting rid of any hazards and making the setup functional. To make these connections successfully:
| Wire Type | Function | Connection Instructions |
|---|---|---|
| Black Wire | Hot/Live Wire | Carries electrical current from the power source. Connect black to black using wire connectors. |
| White Wire | Neutral Wire | Returns current back to the source. Connect white to white for circuit completion. |
| Green Wire | Ground Wire | Safety wire that prevents electrical shocks. Connect to grounding screw or ground wire. |
| Bare Copper | Ground Wire | Alternative ground wire without insulation. Connect to grounding screw or green wire. |
Know Wire Types
The color of electrical wires mostly signifies their purposes. Black (hot), white (neutral), and green or bare (ground) are the most common color codes. Wire functions should always be checked, since local systems can be different.
Secure the Right Connections
Identify the wires of the same type, and connect them. Wire connectors (caps) are to be used to secure the connections and also to prevent contact with other wires. In the case of fixtures, get the ground wire attached to the grounding screw or wire from the box.
Safety Protocols
Power off the circuit at the breaker before wire handling. Use a voltage tester to confirm that no current is present before moving on with connections.
Double-Check Your Work
Put wires inside the electrical boxes neatly, making sure that there is no exposed wire visible. Make sure that all connections are tight; otherwise, you can have potential risks like arcing or short circuits coming up.
Following these steps, and at the same time, reading the manual for the fixture, as well as checking the local electrical codes, you can make sure that your wiring setup is safe, long-lasting, and compliant with the code.
Testing the Switch Functionality
Testing Procedure
To carry out the testing of a freshly installed switch, just do the following:
Restore Power
Power up the circuit by turning on the circuit breaker or the other way around. This step is essential as it will help you check the rightness of the connection.
Verify Operation
The next step is to turn the switch on and off to the light fixture or the connected device at least three times, then check if the device works as it is supposed to. If not, check the wiring and connections again.
Check for Faults
In case the switch or fixture does not work properly, a voltage tester should be used to ascertain that power is supplied to the switch and device. Also, look for loose or faulty connections that might require readjustment.
Listen for Irregularities
During the switching operation, be very alert for any buzzing or sparking noises, as these could be signs of a bad connection or a potential safety issue.
Final Inspection
After the testing, confirm that the switch and the socket covers are tightly secured, and that not a single wire is showing. If needed, do the tests again to be sure the operation is safe and right.
Through a systematic approach, testing and troubleshooting will let you be sure that your electrical installation is not only working but also safe and reliable.
Final Adjustments and Safety Checks
It is very important that you make the proper changes and take all necessary precautions when completing your electrical project. First of all, check all the wire connections and find out if they are completely shut and firmly held because loose connections are the main cause of electrical malfunctions. Check the quality of your wiring insulation, and make sure that no wires are exposed that could lead to shorts or electrical shocks.
Moreover, a voltage tester or multimeter should be used to check if all outlets and switches are giving the correct voltage. Standard household outlets are supposed to supply around 120 volts according to the industry, while large appliances may require 240 volts. If your readings are not within these limits, further investigation is necessary to avoid the possibility of long-term damage to your electrical devices.
Further, ground fault circuit interrupters (GFCIs) must be tested by pressing their “test” and “reset” buttons to confirm proper functionality, an important step for safety in areas where moisture is common, such as bathrooms and kitchens. Moreover, check that circuit breakers are operating properly, trip mechanisms are responsive, and they are appropriate for the load of their associated circuit.
Next, do a visual inspection of the outlet and switch covers, taking care that they are properly aligned and secured, with no gaps or loose screws. This is not only a safety concern but also an aesthetic quality of your project. When you combine careful adjustments with precise testing measures, you can safely and confidently finish an electrical setup that is durable and up to modern safety standards.
Final Steps After Installation
Testing All Fixtures and Devices
Verify that all switches, outlets, and lights are working. Make sure that no component is flickering, and all are cool and smooth in operation.
Looking at Circuit Breakers
Make sure the circuit breakers are in the proper place according to their labels, and check that none of them has been tripped.
Safety Inspection
Inspect your connections very carefully for loose wires or unprotected parts. Deal with any problems right away to eliminate hazards.
Cleanliness of the Work Area
To guarantee a safe atmosphere, clear the installation site of rubbish, tools, and any remaining materials.
Recording the Installation
Make a note of any changes that have been made, including circuit diagrams or adjustments, to make future maintenance or troubleshooting easier.
By adhering to these acts, you will make sure the installation is not just operational but also safe.
Testing the Light Switch
Testing the light switch properly requires first turning off the power at the circuit breaker, so as to guarantee safety. Using a voltage tester on the wires attached to the switch, confirm that the power is off. After that, turn the power back on and toggle the switch on and off. If the light behaves normally—turns on and off—the installation is good.
In case the light does not operate, look for poor connections and make sure that the wires are tightly connected to their respective terminals. Also, check that the bulb and light socket are working. Use a continuity tester to check that the switch is ok—it should read on when the switch is in the “on” position and off when in “off”.
Finally, check the circuit parts for any damage or wear and repair them before the whole thing is put back together. If none of the suggested measures resolve the problem, then it is advisable to seek the help of a qualified electrician.
Ensuring Proper Mounting of the Fixture
In order to properly install the fixture, I always confirm first that the mounting bracket is well fixed to the electrical box. I make sure that the screws are tight and that the fixture has been placed in line with the mounting plate. After making sure that everything is properly aligned and secure, I check again to make sure that all the wires are connected and insulated correctly before finishing the installation. This meticulous procedure allows me to be certain that the fixture is stable and safely mounted.
Maintenance Tips for Your New Ceiling Light
Regular Maintenance Guidelines
Cardinal maintenance steps like these will help you keep your ceiling light shining bright and functioning in a safe and efficient manner for longer.
Clean Regularly
It is inevitable that the light fixture will accumulate dust and dirt, and a corresponding decrease in light intensity will occur as a result. Wipe down the fixture with a soft, lint-free cloth and refrain from using any tough chemicals that might tarnish the surface.
Inspect Bulbs
Make it a point to check the light bulbs regularly to ascertain they are working properly. Timely replace the ones that are gone and the ones that are flickering, and always use the right wattage as per the manufacturer’s instructions.
Tighten Components
Gradually, screws and other parts might get loose due to shaking or general usage becoming very less. Now and then, check the fixture and tighten the loose parts for safety and stability.
Check Wiring
Unusual flicker or buzzing sound may suggest the wiring is problematic. Turn off the power and perform the visual inspection of the wiring. If you spot any deterioration, contact a qualified electrician for repairs.
Replace Aging Parts
Those light fixtures that are old can be obtained through the replacement of their main parts, like sockets or mounting hardware, to ensure they are safe and suitable for operation.
Use Proper Bulbs
With the help of energy-efficient bulbs like LEDs, it is easier to not only lengthen the life of the fixture but also reduce energy usage, which makes it an eco-friendly option for your house.
Reference Sources
“SMART HOME AUTOMATION BY USING INTELLIGENT ELECTRICITY DISPATCH”
- Key Findings: The incorporation of lighting in smart home systems is examined in this research paper, with a main focus on the role of ESP8266 modules in the interconnection of devices. It reveals the opportunity for light fixtures to act as points in a more extensive smart home network.
- Key Findings: The discussion around the conversion of light fixtures into wireless routers providing high-speed internet access has been dealt with in this paper. The study shows the dual role of light fixtures as sources of light and partners in the internet connection.
“POWER SAVER STREET LIGHTING USING MICROCONTROLLER USING ATmega16”
- Key Findings: The main subject of this study is the microcontroller-driven street lighting systems that consume less energy and are thus more efficient. Among other things, the connection of the light fixtures to a regulated power supply was done in order to use energy in the best possible way.
Frequently Asked Questions (FAQs)
How to Connect Wires When Installing a New Light Fixture?
In the process of connecting a light fixture, normally, you will have to handle two wires: the black wire coming from the fixture and the white wire. The black wire is the hot one, while the white one is neutral. For safety reasons, always switch off the power at the circuit breaker before you start the installation process.
What is the Role of the Green Wire in Light Fixture Installation?
The green wire is the ground wire connecting the ground to the box most of the time. This wire is very important for safety, as it is the one that prevents electrical shock by providing a way for the stray electricity to come back to the ground.
Can I Connect a Light Fixture with Three Wires?
Absolutely, you can connect light fixtures that have three wires. In most instances, the wires come in these colors: black wire, white wire, and ground wire. Make sure to link the black wire to the hot, the white to the neutral, and the ground wire to green or bare copper correctly.
What Are the Steps to Wire a Ceiling Light Fixture?
To wire a ceiling light fixture, the first course of action is to turn off the power. Next, take down the old fixture and reveal the wiring. Join ceiling black to fixture black, white to white, and properly connect the ground wire, finally. Then, cover the wires neatly and perch the new fixture.
How Do You Pull the Switch When Installing a Light Fixture?
Once it is guaranteed that the power is off, you can pull the switch to determine if it is working the way it should be. Switch testing will require turning the power back on after connecting the wires and checking if the new fixture lights up with the switch turned on.
What Electrical Questions Should I Ask Before Connecting a Light Fixture?
Prior to the connection of a light fixture, it might be a good idea to ask about the maximum wattage of the fixture, if the circuit can bear the load, and the wire gauge that should be used. It is also crucial to ensure that you have the right wiring diagram for your specific installation.
How Do I Connect the White Wire in Light Fixture Wiring?
In order to connect the white wire, you have to connect it to the matching white wire in the ceiling. This connection makes sure that the neutral current returns without any hazards. It is always a great idea to double-check that the wires are firmly joined and well insulated.
What Should I Do if My New Light Fixture Doesn’t Work After Installation?
If the newly installed light fixture does not work, the first step is to check if the power supply is on. Next, review the connections to confirm that the wires are connected correctly. If you have checked everything thoroughly, you may then consider testing the light switch or checking for blown fuses.