Changing a thermostat can sound like an intimidating job, especially the wiring part. The process of connecting wires to a thermostat is actually quite straightforward, and anybody can learn it, given that he or she is guided correctly. In this guide, we will look into how to wire a thermostat in the safest, efficient way possible, while making sure the HVAC also gets to runs perfectly. Whether upgrading to a smart thermostat or just replacing an older version, one will need to know how to use it correctly. After reading this article, you would have understood everything and would feel quite confident about going through the entire project with ease.
Understanding Thermostat Wires
The wiring of a thermostat is color-coded for easier installation and corresponds to various functions in an HVAC system. Here is a common wire breakdown:
| Wire Color | Function | Description |
|---|---|---|
| Red (R) | Power | Power for the thermostat is supplied by the HVAC system |
| White (W) | Heating | Heating system control |
| Yellow (Y) | Cooling | Air conditioning regulation or control |
| Green (G) | Fan | Fan control |
| Common (C) | Power Supply | Used specifically to supply continuous power to smart thermostats so they can operate properly |
Types of Thermostat Wires
The setup of thermostat wiring depends on the HVAC type; here are some of the most common wires found:
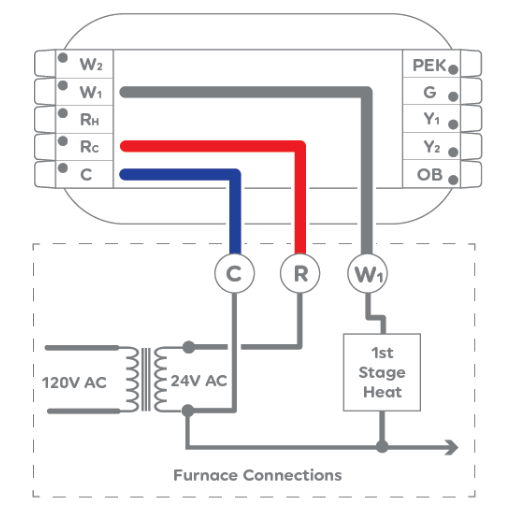
- R (Red Wire): 24 volts of power from the HVAC system’s transformer is supplied to this wire; it is known by several names: R, RH, or RC, depending on the system.
- C (Common Wire): Being the return for steady voltage is critical for powering smart thermostats and their LED display.
- W (White Wire): Connected to the heating system, it allows for the thermostat’s control over heating methods such as furnaces.
- Y (Yellow Wire): Connected to an air conditioner; the yellow wire enables thermostats to manage cooling.
- G (Green Wire): Powers the fan in the HVAC system.
- O/B (Orange/Blue Wire): Heat pump systems use these wires to change over from heating to cooling, and vice versa.
- Aux/E (Auxiliary/Emergency Wire): Sometimes found in systems with a heat pump; it allows the activation of auxiliary or emergency heat.
- K Wire (Optional): Used only for some sophisticated types of thermostats; this wire multiplexes several control functions into one connection.
Identifying Wire Colors
When wiring a thermostat, it is important to understand the widely accepted wire colors for proper installation. Below is a quick reference chart based on common standards:
- Red (R Wire): Power source from the transformer in an HVAC system; often separated into Rh for heating and Rc for cooling when two transformers are used.
- White (W Wire): Controls the heat side and turns on the furnace or heat strips.
- Yellow (Y Wire): Controls the air conditioning compressor in cooling systems.
- Green (G Wire): Controls the blower fan that circulates air through the system.
- Blue or Black (C Wire): Famed as the common wire, it has continuous return and powers the thermostat where required.
- Orange (O Wire): Energizes the reversing valve in heat pump systems, switching the system between heat and cool modes.
- Brown (Emergency or Auxiliary): Can be used for auxiliary or emergency heat on some systems.
Common Thermostat Wire Configurations
Thermostat wire configurations vary based on system type, including other features. Few configurations, however, do exist that are more commonly certificated for various systems:
1. Single-Stage Heating and Cooling
The wiring for a system of single-stage heating or cooling is generally as follows:
- R (Red): Power from transformer
- W (White): Heat signal
- Y (Yellow): Cooling signal
- G (Green): Fan control
- C (Blue or Black): Common wire (modern thermostats generally require this wire)
2. Multi-Stage Heating and Cooling
For multi-stage systems, which facilitate more efficient temperature control, more wires are used:
- R (Red): Power from transformer
- W1 and W2 (White): First stage and second stage of heating
- Y1 and Y2 (Yellow): First stage and second stage of cooling
- G (Green): Fan control
- C (Blue or Black): Common wire
Some of the more complex systems may require O/B (Orange) for heat pump reversing valve activation.
3. Heat Pump Systems
Heat pump systems providing heating and cooling facilities require more intricate wiring. Some typical setups are:
- R-Red: Power from the transformer
- O/B-Orange: Heat pump reversing valve
- Y-Yellow: Compressor operation
- G-Green: Fan control
- C-Blue or Black: Common wire
- W-White: Backup heat or auxiliary heat
4. Two-Wire (Heating Only) Systems
An older, or rather simple, heating-only system uses a minimal configuration:
- R (Red): Power from the transformer
- W (White): Heat signal
5. Compatibility with Smart Thermostats
Most modern smart thermostats require a C-wire (common wire) that provides a constant power supply. Adapters or power-extender kits are available to enable compatibility with smart thermostats if your system does not have such a wire.
Notes on Compatibility and Setup
- Verify wiring labels and matching terminal connections on the thermostat and control board of your HVAC unit.
- Connecting HVAC wiring incorrectly can lead to damage or even functional problems; therefore, it is best to always check the manual and the specifications before proceeding or to consult a professional technician.
- Make sure the power to the system is stopped before connections are made to avoid electrical hazards or damage.
Essentially, the thermostat wire configurations are crucial for communicating with the thermostat with the HVAC system for proper operation and energy efficiency. Reconsider your system’s needs and ask a professional whenever in doubt.
Preparing for Installation
Get your things ready and keep your screwdriver, wire stripper, and voltage tester at hand during the course of the installation. Check out the manufacturer’s instructions for the thermostat and consult the manual for your HVAC system to make sure of wiring compatibility, if a common wire is needed. Turn the power off at your HVAC system to avoid electrical hazards. Label wires upon disconnection to ease the process of putting the wires back on. If uncertain about any of the steps, have an expert take a look so as to avoid any inconveniences during installation. Safety and accuracy must always be your top priority.
Gathering Tools and Materials
Get ready with your set of tools and supplies for the installation of your thermostat. The likely required ones are:
- Screwdriver
- Drill
- Wire stripper
- Level
- Mounting hardware
- Wall anchors
- Wire labels for identifying the connections
Always check the packaging or the product manual of the thermostat to identify any extra tools or materials pertinent to your model. Check first to see if the C-wire will be required since many of today’s thermostats use it to be powered. Check compatibility between your HVAC system and your thermostat model to avoid hitches in the installation process. Start to plan, thus avoiding running all over and wasting time looking for the right tools!
Safety Precautions Before Starting
- Make sure that the power to the HVAC system is turned off at the circuit breaker before commencing thermostatic installation to prevent electrical hazards.
- Use your voltage tester to ascertain that no current is now flowing through the wires.
- If you ever feel a bit lay-off of electrical work, then consult a professional; otherwise, you might end up with a little accident or damage.
- Take precautions when handling wires to avoid causing shorts or disconnections.
- Always follow the manufacturer’s instructions applicable to your thermostat model; install all components securely to avoid malfunctioning.
These precautions will ensure safe and efficient installation.
How to Remove the Old Thermostat
Step 1: Turn Power Off
Before starting, switch off the power to your HVAC system at the circuit breaker and have it verified with a voltage tester or on the display of the thermostat itself.
Step 2: Removing the Thermostat Cover
Pull off the thermostat cover carefully or unscrew it, depending on the model. Some covers snap off, and others must be unscrewed.
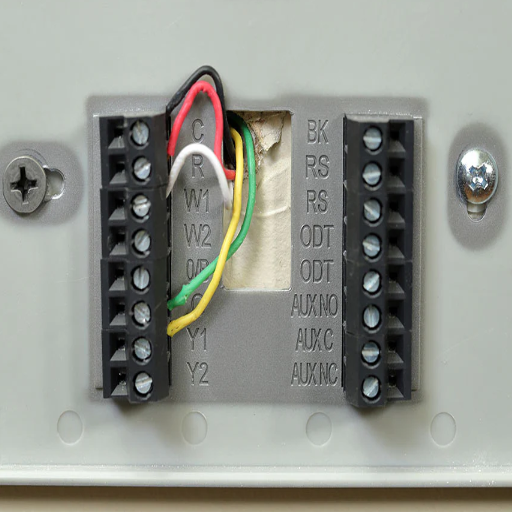
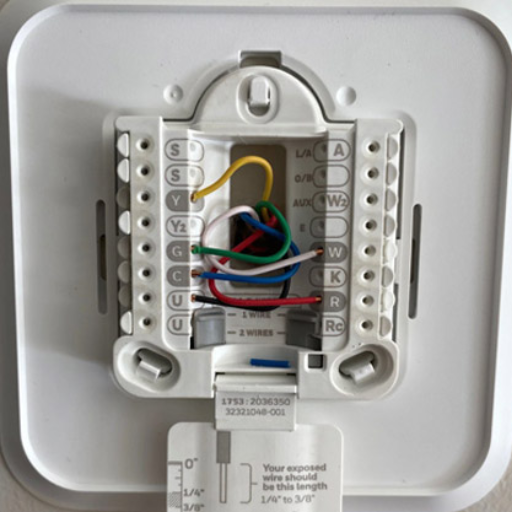
Step 3: Label the Wires
Take a picture of the wiring, or label the wires with tags so that they correspond to the terminals to which they were connected (such as R, W, Y, G). It will be easier to reconnect the wires to the new thermostat.
Step 4: Disconnect the Wires
Loosen the screws holding the wires to the terminals. Grab the wires carefully; otherwise, they might slip back into the wall. Now tape the wires in place.
Step 5: Remove the Mounting Plate
Unfasten the screws that are holding the mounting plate to the wall. Keep your screws and mounting plate just in case they are needed later.
Step 6: Check Compatibility Issues
The wiring and wall opening should be checked to accommodate the new thermostat. Make any repairs and adjustments if necessary before continuing to install.
Connecting Wires to the New Thermostat
Identify the Wires
Match the wires from the wall to the relevant terminals on the new thermostat. Check the thermostat’s manual for the correct labels (e.g., R, W, Y, G).
Secure the Wires
Push a wire into a terminal, then tighten the screws to secure the connection. Do not tighten so hard that you damage the wire.
Check Compatibility
Ensure again that each terminal is connected to the correct wire and that the configuration fits the manufacturer’s instructions.
Organize the Wires
Keep excess wire organized and stored away in the wall so that the faceplate of the thermostat won’t be mounted askew.
Prepare for Mounting
After the wires have been set, ensure that the system is ready for the thermostat to be mounted onto the wall plate.
Identifying the Correct Wire Connections
Check the wiring reference of the manual that usually shows a wiring diagram specific to the model to identify the correct wiring connections for your thermostat. Generally, wires include red wires for power or sometimes labeled “R,” white wires for heat “W,” yellow for cool “Y,” and green for the fan “G.” Different HVAC systems may have other wires too, like “C,” which is a common wire for smart thermostats needing constant power.
A digital multimeter may be used to verify each wire’s voltage and check whether it is well-connected. Refer to the labeling on the HVAC control board if the wires confuse you on suitability. Never try handling the wires with the power on, or you might get hurt, or things might get damaged. By following the above sequence, you can’t go wrong with a safe and efficient-functioning thermostat.
How to Wire a Thermostat Step-by-Step
-
Turn Power Off
Start by turning off the power supply to the HVAC system using its circuit breaker. Safety measures must be ensured before working with any electrical connections.
-
Remove the Old Thermostat
Removing the cover of the existing thermostat gives you the opportunity to inspect the wiring closely. Take a picture with your phone or label the wires to track their previously attached connections before removing them.
-
Identify the Wiring
The wires of thermostats tend to be color-coded, but the colors might not necessarily describe their function. Common wires include:
- Red (R): Wire energized
- White (W): Heat control
- Yellow (Y): Cooling
- Green (G): Fan control
- Common (C): Continuous power (used by smart thermostats)
Use the multimeter to check the voltage in order to confirm with your new thermostat.
-
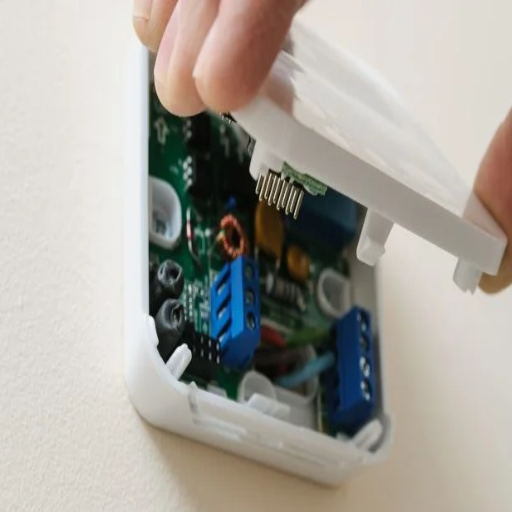
Install New Thermostat Base
The new thermostat base is to be fixed onto the wall using the screws and anchors supplied in the kit. The base should allow the wires to be fed through the designated opening.
-
Wire It Up
By referencing the wiring guide or manual of the new thermostat, match all wires and then connect the wires appropriately. Push the wires tightly into the terminals and tighten the screws securely for no loose connection.
-
Attach the Thermostat Display
Once the wiring is complete, attach the thermostat display to the base. Double-check that the display snaps firmly into place.
-
Restore Power and Configure Settings
Turn the power back on at the breaker. Follow your new thermostat’s setup instructions, including programming schedules, connecting to Wi-Fi, if applicable, and testing the functionality of your system.
Following these clear steps and along with your thermostat user manual, you can quickly wire and mount your thermostat for optimum performance.
Common Mistakes to Avoid When Wiring
An essential aspect of wiring is to install it correctly for securing the efficient functioning of the thermostat. It has been seen that many common mistakes can lead to operational issues or sometimes safety hazards. So here are some of those mistakes to avoid and some details that could lead to an accurate installation:
Improper Labeling of Wires
This is another nail in the installation coffin: an installer fails to properly identify wires before disconnecting the old thermostat, leading to much confusion for the installation of the new one. Industry analysis reports that over 30% of all installation errors are accounted for by mislabeling. Use proper wire labels or at least take a picture of the wire layout for future reference.
Never turn off power at the circuit breaker
Live circuits pose a major threat to life safety; shock hazards are there, and so is damage from the HVAC system. One statistic indicates that about 12% of incorrect installations are due to the power not being switched off. The power should be checked twice before going any further.
Confusion Amid Wire Types
Thermostats are usually for low-voltage systems, but mistakenly applying high-voltage wiring could give rise to permanent damage either to the unit or to the HVAC system. Check your manual to see if your wiring and thermostat model coincide.
Poor Connection of Wire
Loose wire connections cause a short-circuit or intermittent-off functionality. In fact, reports state that almost 20% of thermostat malfunctions are caused by improperly connected wires. Make sure that all terminals are tightened and that no wire is exposed.
Leaving Out the Most Important Wire: The Common Wire (C-Wire)
In most people-think-i-finitely-smart thermostat models, a C-wire is required for power. Not connecting or failing to check the C-wire connection is the most common issue with these systems. If you do not have one, you may want to get an adapter that works or call in a professional.
Not Following Manufacturer’s Instructions
Although it may appear easier to generally rely on some type of instruction, not following the instructions specific to that thermostat leads to much higher chances of failing. The Institute says that in 15% of the complaints of a defective thermostat, the defective installation was the reason; mostly, the installer skipped steps.
Testing the Thermostat
After installation, you must test your thermostat to be sure it operates properly. Set the thermostat to both heating and cooling to see that your HVAC system reacts accordingly. Check whether the thermostat shows the right room temperatures and whether it adjusts correctly. If there are problems, recheck the wiring and confirm all settings match the user manual exactly. If they act up still, consult with your technician.
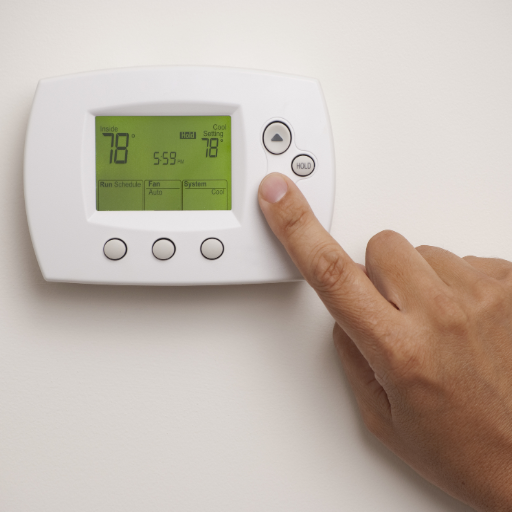
How to Power On the New Thermostat
Powering an HVAC thermostat follows a series of steps to make sure that it is ready and functioning at the outset. Begin by ensuring the thermostat is installed properly and connected to the HVAC system. Then locate your breaker panel and turn the power supply on for your HVAC system. Batteries may be necessary for any of the modern thermostats, so check if yours needs them in order to operate. Insert batteries, if needed, of the correct type recommended in the manual, such as AA or AAA.
With power restored, the thermostat may light up or bring up its startup screen automatically. For a good smart thermostat, you may have to pair the device with your home’s Wi-Fi network. This would usually consist of on-screen instructions prompting you to select a network and then enter the password.
Once the thermostat has been turned on, configure the initial parameters, including setting the language, time, and date. Then, carry out the calibration of the thermostat so that temperature determination is accurate for the room being conditioned. You may even set a personalized schedule or create temperature preferences for your comfort and energy efficiency needs. Most contemporary models provide energy-usage insight and are controllable remotely through smartphone apps for monitoring. Should the thermostat fail to power on and display, make sure to check that the wiring of the connections inside is accurate and that it is compatible with your current HVAC-based system.
Checking for Proper Functionality
In ensuring personal checks, common things must be addressed for the proper functioning of an apparatus. For example, it may seem like the device does not respond to temperature changes, provided the thermostat is not calibrated correctly. An error in setting would not produce accurate readings, and the space may be unequally heated or cooled.
Ensure for smart thermostats that your Wi-Fi keeps on remaining stable because connectivity issues would disrupt remote control or app-based integrations. In a recent study, an estimated 15% of thermostat malfunctions were purportedly blamed on weak or interrupted network connections. Placing the Wi-Fi router nearer to the device could be a solution.
Another power feature should be checked. Dead and weak batteries might be the pigeons of partial or non-working of the. If hardwired, double-check the circuit breaker that feeds power; there should be no tripped or loose wires. It is about 20% that power configuration problems lead to thermal troubles.
Lastly, ensure the software or firmware is up-to-date. Ever so often, there are updates offered for the newer thermostats that are meant to improve the overall performance of the device and also fix any bugs encountered. Check the recommended update schedule from the manufacturer to prevent any compatibility lesson down the road with app integrations or device functions.
When to Call an Electrician
There are certain circumstances in which a professional electrician must be called in to ensure proper operation and safety. If the thermostat has no sense of power even when the circuit breaker is set and does some investigation for wiring purposes, an electrician’s underlying issue would be involved. Bad wiring is one of the most common issues, but the estimate applies as about 51,000 home fires occur each year, in the US alone, due to some electrical problem-that shows just how essential it is to have these things professionally done.
Breakers suddenly tripping or burning smells coming from the thermostat point to potential hazards, whether overheating or a short, demanding an urgent fix. When disruptions grow frequent and troubleshooting does not provide a solution, such as an unruly HVAC unit, not to mention that there may be an issue in basic electrical connection or ground, beyond the scope of a DIY job.
You should also call an electrician if you notice inconsistent voltage levels. Modern smart thermostats generally run through low-voltage systems, and a certified technician can conduct the necessary tests in a way that avoids any possibility of overvoltage and damage to the system. Studies have shown that electrical systems, being installed and maintained incorrectly, end up reducing the life period of any devices connected to them; hence, the expert’s intervention is critical. Always think about safety and consult a certified professional when in doubt.
Troubleshooting Common Issues
If the voltage levels are erratic, call in a qualified professional to inspect your wiring. Smart thermostats operating on low-voltage conditions could be tested by an expert to avoid any overvoltage damage. Improper installation or servicing of electrical wiring could grind the life away from the connected devices. When in doubt, always seek the help of a licensed professional to ensure safety and working conditions.
Identifying Problems with the C Wire
The C wire or common wire is a crucial setup for providing continuous power to the smart thermostat. The most common C wire issues arise from wrong installation or loose connections, which gradually become damaged. If your thermostat is acting up or losing power very frequently, then either the C wire is faulty or outright disconnected. Another common problem is incompatibility; an older style HVAC system might not have a dedicated C wire, so an adapter or alternative wiring would be required. Check the wire for its obvious damage or loose ends, to be seen from the thermostat end and also from the HVAC control board end. In the case of more complex problems, it is well advised to call an expert so as not to damage your thermostat or HVAC system.
Resolving RC and RH Confusion
To me, the better way to decode these two abbreviations is: RC is “cooling power,” while RH means “heating power” on the thermostat. These are two secret terminals for the two separate HVAC functions in action. We generally bridge the RC and RH terminals in a single-transformer operation for heating and cooling in common systems, so power can be shared between them, but when separate transformers are installed, RC and RH go their own separate ways in being wired. Just by knowing how to connect each terminal based on my system, I shall avoid the configuration problems, and all runs well.
What to Do If the Thermostat Does Not Power On
Whenever your thermostat fails to power up, the most common fixes should be checked. For starters, confirm if the thermostat is getting power: check whether the circuit breaker is tripped and if the fuse of the HVAC system is intact. If the thermostat is battery-powered, try new batteries, as dead or low batteries are the most common culprits.
Afterward, proceed to the wiring check: power may be interrupted due to wires that are loose, burned, or disconnected at the thermostat terminals. Turn the HVAC system off when making any wiring modifications, for safety against electric shock. Make sure the wires fit tightly to their assigned terminals.
Check the transformer and the HVAC system last. A bad transformer will deprive the thermostat of power, while an improperly functioning HVAC system (e.g., with a blown control board) may be the culprit instead. If searching in these places doesn’t yield a solution, it is best to seek a full assessment by an expert HVAC technician.
Reference Sources
“Room Thermostat with Servo Controlled by PIC Microcontroller”
“A Survey of Various Intelligent Home Applications Using IoT and Intelligent Controllers”
“Design and Examination of Yogurt Maker Machine with Sensor Temperature DS18B20”
Frequently Asked Questions (FAQs)
How to wire a thermostat with colored wires?
For wiring a thermostat by means of colored wires, first, determine the terminals on your new thermostat plate. You will normally find the wires with the letters R (red), C (common), and Y (yellow for AC), W (white for heat), and G (green for fan). Connect the wires of your old thermostat to your new one. Besides this, make sure to take down from the wall your old thermostat and take note of how the wires were connected before the installation of the new one.
What is the function of the C terminal in thermostat installation?
The C terminal, or common wire, is the one that basically completes the power transformation to 24V continuously. You must have this common wire for your programmable thermostat, but mostly for smart thermostats, which require the power at all times to work properly. If you have no C wire, your thermostat will most likely refuse to work. So, the presence and attachment of the C wire during installation should be ensured.
How do I take the old thermostat off the wall?
To remove your existing thermostat from the wall, first make sure that the power to the HVAC system is off, so there is no dangerous electric shock. Take out the screws that hold the thermostat onto the wall plate, then gently pull it away from the wall. Be cautious that no wired connections might be damaged. Once removed, you can proceed to wire your thermostat with the new one.
What are the connections from the five wires on a programmable thermostat?
If you have five wires for your programmable thermostat, these are usually R, C, Y, W, and G. The R wire goes to the R terminal, the C wire to the C terminal, Y wire goes to Y terminal for cooling, the W wire to the W terminal for heating, and the G wire to the G terminal for the fan. Make sure that each wire is well connected to the correct terminal on your new thermostat plate.
How do I wire my thermostat to control the entire HVAC system?
In installing wiring the thermostat to an HVAC system, the R wire is connected to the R terminal, the C wire is connected to the C terminal, and finally, Y, W, and G connect to the lenses for cooling, heating, and fan control, respectively. However, a very good understanding of the HVAC wiring is required to ensure the OEM’s instructions are properly followed for installation and operation.
What if I don’t have a C wire when installing a thermostat?
Without a C wire, the thermostat may not get an adequate 24 Volts for power to operate properly. You can add a new wire running out from the HVAC system, or adapt your power so that R becomes the C. Or, if you feel bold, you can have a new-age thermostat that doesn’t even require a C wire; your best bet would be to check first with your Honeywell manual or any other brand you have.
How do I view the wires before installing the thermostat?
Determining the wires from your old thermostat bears some importance before actually installing the new thermostat. Carefully work your way out from the mounting screws and keep a good note of every wire’s color and connections in relation to where they are attached. You can snap a good close-up picture of the wiring for reference. This will help you correctly wire up your new thermostat by ensuring that each wire connects to the proper terminal.
What should I consider when installing a programmable thermostat?
When installing a programmable thermostat, consider the compatibility with your HVAC system, whether or not a C wire is present, and the wiring layout in general. Follow your manufacturer’s instructions specific to your model. In case you are unsure, or call an electrician to make the whole process go smoothly, just in case. Another thing to consider would be that the thermostat should be installed in such a way as to be capable of accurately measuring the temperature.