For most RVers, a dependable electrical hookup is not just a convenience but a requirement to ensure their journey is comfortable and hassle-free. Whether you are a seasoned traveler or a beginner in the world of RVing, a basic understanding of electrical hookups can help you avoid sudden mishaps, damage to equipment, and disruptions to the smooth running of your trip. This guide will walk you through the bare essentials and help you understand, step by step, what it takes to safely and efficiently connect your RV to a power source. From voltage requirements to safety precautions, we’ll cover everything you should know to bounce back and be ready to hit the road. Continue reading to ensure your next road trip is both stress-free and enjoyable!
Understanding RV Electrical Hookups
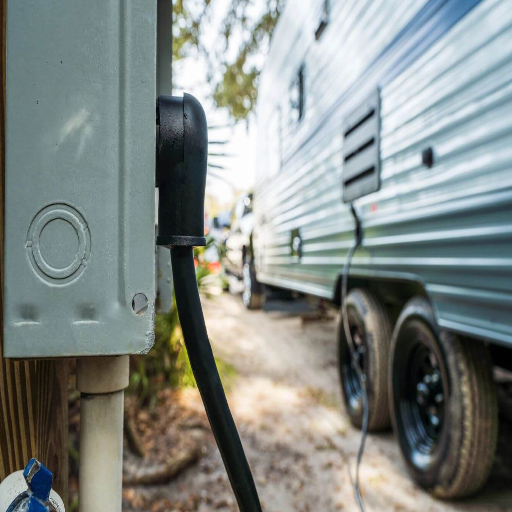
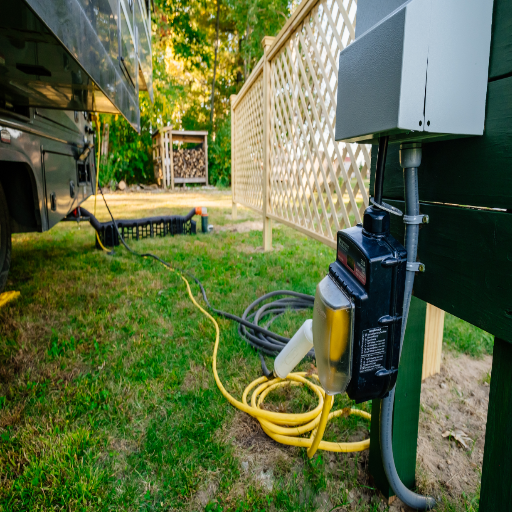
RV electrical hookups provide a power connection to the motorhome, allowing appliances to operate, devices to be charged, and an environment to be maintained for comfortable living. These hookups are commonly found in campgrounds or RV parks and offer three power options with connectors rated for 20-amp, 30-amp, and 50-amp service. Always consider the electrical ratings of your RV when selecting a hookup that can handle them without placing an undue burden. Check the power pedestal for damage before hooking up your power cord. Use a surge protector for added safety, as power surges can occur occasionally.
What is an RV Electrical Hookup?
An RV electrical hookup provides a dedicated point of connection through which your recreational vehicle (RV) can draw electrical power from an external source. They are commonly found in campgrounds, RV parks, and some private homes, offering an easy and reliable way to provide for an RV’s appliances, lighting, and climate control systems without relying solely on batteries or an onboard generator.
RV electrical hookups usually come in three standard amperage configurations:
20-amp hookup: This one provides the bare minimum power, which is 120 volts. Typically, 20 amps meets the power needs of smaller RVs or when only minimal power is required.
30-amp hookup: The 30-amp connection is the standard choice for mid-sized RVs, due to its reliable performance. By supplying 120 volts at a maximum of 3,600 watts, it provides sufficient power to operate most appliances in an RV, but often requires power management that monitors loads.
50-amp hookup: Suitably fitting larger RVs with bigger power consumption requirements; the 50-amp connection is two separate 120-volt circuits, capable of providing a total 12,000 watts at any given time. Multiple air conditioners can be easily turned on, along with other major kitchen appliances and devices.
Knowing the amperage levels is imperative for selecting the right hookup for your RV. Using a low-amperage connection beyond its capacity can damage the electrical components and yield potential fire hazards. Surge protectors are essential safety accessories, as they provide surge protection to an RV system from voltage fluctuation during power surges or lightning strikes.
It’s good practice to check if the campgrounds you’re planning to stay at offer compatible hookups to your RV needs. It’s a fact that 90% of campgrounds across the U.S. offer 30-amp hookups, while only 50% offer 50-amp hookups. Being prepared with the correct adapter and possessing the knowledge to connect to a power pedestal safely will make your camping experience more enjoyable and less challenging.
Types of RV Hookups
RV hookups are primarily divided into three categories: full, partial, and dry camping. The only difference among them is the degree of utility services they offer, and they cater to varying camping needs.
Full Hookups: Full hookups afford the benefits of electricity, water, and a sewage connection. These are most suited for extended stays, as there are no limitations on the use of water tanks, sewer systems, and electrical appliances. Typically, a full hookup provides both 30-amp and/or 50-amp service, allowing for adjustments to accommodate various RV sizes and power needs. According to recent statistics, full hookups are prevalent in modern RV parks and larger campgrounds throughout the U.S., making them a popular choice among RV travelers.
Partial Hookups: Partial hookups offer electrical hookup and water hookups but do not provide for sewer hookup. This type of hookup is the one most commonly found in national parks, state parks, and smaller campgrounds. Those traveling with partial hookups must use their RV’s holding tanks for waste management. It is recommended that one monitor water usage and have information about the nearest location to the dump station before emptying the tanks during their stay.
Dry Camping (Boondocking): Dry camping means staying at campsites without any utility connections. Such places include remote, off-the-grid kind of areas in the public domain, which are sometimes managed by agencies such as the Land Management Bureau or BLM, in short. Dry camping offers a harsher experience, almightyuring dredged up with natural charm. While this kind of camping entails your total self-sufficiency, dry campers carrying a set of solar panels or a generator, alongside managing water and waste tanks, should make for an enriching experience. A 2023 survey found that nearly 20 percent of RV owners sometimes go dry camping in pursuit of greater solitude and greater freedom.
The length of stay, the type of utilities required, and bargain-oriented levels of convenience offered are to be considered when deciding on the common types of RV hookups available. Preparation sets the stage for a safe and comfortable camping outing!
Importance of Safe and Efficient Electricity
Electricity is essential for powering lighting, heating, cooling, and operating various appliances during an RV trip. Inefficient use of electricity can damage equipment or cause significant safety hazards. Recent industry data now show that electrical problems cause approximately 25 percent of RV-related breakdowns, underscoring the importance of regular maintenance and proper usage. Using energy-efficient appliances, such as LED lights, will reduce their power consumption, thereby extending battery life and decreasing dependency on external power supplies. Additionally, it is always best to use a surge protector to prevent unexpected power surges at campground hookups from causing damage. Get familiar with your RV’s electrical capacity, including amperage requirements, so you can distribute power accordingly and keep the system from being overloaded. By thinking about safety and efficiency, RVing becomes that much more reliable and stress-free.
Power Sources for RVs
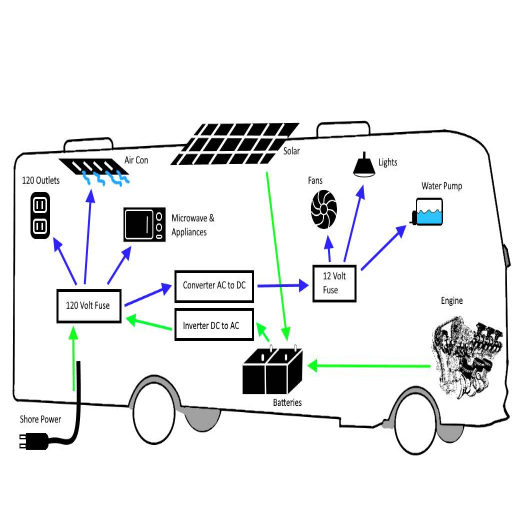
Depending on your requirements and setup, an RV can be powered by any of the following sources:
Shore Power – Provides consistent electricity to your RV by allowing an external power source (such as at a campground or elsewhere) to be connected, typically offering either 30-amp or 50-amp service.
Batteries – An RV battery shall store enough energy to run the very minimum system, such as lights or a water pump. Deep-cycle batteries, for example, are used for that purpose.
Generators – Generators, whether portable or built-in, produce power when shore power is unavailable. They need to be fueled with gasoline, diesel, or propane.
Solar Panels – These panels harness energy from above and can be used to charge your batteries, thus enabling a greener way to power your RV off the grid.
With an appropriate combination of these sources, the power needs of an RVer can be set at any level.
30-Amp vs 50-Amp RV Electrical Systems
RV electrical hookup requirements typically include access to a compatible power pedestal, proper cables and adapters, grounding, surge protection, and knowledge of your RV’s specific electrical system (30-amp or 50-amp).
|
Parameter |
30-Amp System |
50-Amp System |
|---|---|---|
|
Voltage |
120V |
240V/120V |
|
Amperage |
30A |
50A |
|
Wattage |
3,600W |
12,000W |
|
Prongs |
3 |
4 |
|
Cable Size |
Smaller |
Larger |
|
Compatibility |
Limited |
Broader |
|
Usage |
Light Loads |
Heavy Loads |
|
Common Devices |
Basic Needs |
High-Power Devices |
|
Adapters Needed |
Minimal |
Occasionally |
|
Cost |
Lower |
Higher |
This table highlights the differences between the two RV electrical systems, helping RVers select the proper setup based on their power requirements and usage. Ensure your RV’s electrical hookup matches the power pedestal specifications for a safe and efficient connection.
Connecting Your RV to Different Power Sources
Connecting your RV to power safely and efficiently involves understanding the type of electrical system your RV uses and the available power source. Typically, RVs use either 30-amp or 50-amp systems; the proper setup must be formed to avoid any electrical damage.
Know Your Power Needs: Refer to your RV manual or the plug on your power cord to determine if your RV requires a 30-amp or 50-amp hookup.
Inspecting the Pedestal: Ensure the power pedestal provided by the campground or RV park has a matching outlet before plugging in. Check the voltage with a multimeter; it should be within the safe range for the RV (typically 110–120 volts).
Use the Correct Adapter: If the power source is incompatible with your RV’s system (e.g., 50 50-amp RV at a 30-amp pedestal), use a dogbone adapter. Just make sure not to overdraw power from the lower-rated system—that could cause the breakers to trip or circuits to overload.
Employ Surge Protection: Use a surge protector to set up between your RV and the pedestal. This protects your RV’s electrical system from surges, low voltage, or incorrect wiring.
Disconnect Safely: When you disconnect, switch off the power at the pedestal and unplug the surge protector first, followed by the power cord. This procedure is for your safety and the integrity of your RV equipment.
When done following the steps with the right tools, you never need to worry about hooking up your RV and electric hazards. Always look for good connections, then check your components for wear and tear or any other sign of damage.
Common RV Electrical Issues
The electrical problems of RVs can spring from various causes, often disturbing the vehicle’s operation. Understanding the difficulties in their entirety can help RV owners be more proactive and handle the situation adequately should problems arise.
Blown Fuses and Tripped Circuit Breakers: These are often the most common RV electrical problems, as fuses blow and circuit breakers trip. More often, it could be because one is overloading the circuits by running many heavy-load appliances concurrently. For example, running an air conditioner, microwave, and other appliances simultaneously may exceed their allowed amperage. Knowing the power limits of your RV is one good preventive step toward avoiding this problem.
Battery Drainage: When not properly maintained, RV batteries can drain rapidly and quickly if an appliance is left running for an extended period. Batteries used in RVs are mostly lead-acid or lithium-ion, but either type requires regular charging and monitoring. For instance, leaving things like lights, fans, or other electronics on can significantly discharge the battery. Installing a battery monitor and turning off devices when they are not in use will help improve battery life.
Loose or Corroded Connections: A power discrepancy or total failure of any electrical circuit in your RV may be caused by corroded terminals or loose connections. Corrosion occurs more rapidly when moisture reaches the terminals. Regular check-ups and cleanings of terminals, as well as tightening of loose connections, are essential to maintain stability in your electrical system.
Improper Wiring or Grounding Problems: Another cause of problems encountered by many is defective wiring, wrong polarity, and/or improper grounding. These will create appliances that behave erratically or put them at risk of potential fire hazards. To minimize potential dangers, it is advisable to periodically inspect the wiring of your RV and hire experts for any necessary repairs or upgrades.
Faulty or Failed Surge Protector: Surge protectors are designed to protect your equipment against impending voltage spikes, but sometimes they fail. A malfunctioning surge protector fails to protect your RV appliances, rendering them vulnerable to irreparable electrical damage. Therefore, it is advisable to have your surge protector checked regularly and replaced when necessary.
Failed Converter or Inverter
Power converter or power inverter failures can cause power disruptions; typical symptoms include dim lights, non-working outlets, and the like. Worse still, when these converters and inverters are out, your whole system is out. Weighing the prospect that your converters and inverters might fail and require replacement at some point is a prudent thing to do.
Addressing these common RV electrical issues promptly can significantly impact the safety and functionality of the RV. Preventative maintenance through regular inspection and energy efficiency helps curb most of these problems. Being prepared and adopting a proactive attitude will enable you to enjoy worry-free RV living.
Using RV Park Facilities
RV parks abound with facilities meant to make your stay comfortable and convenient. Electrical hookups and water points tend to be among the most common, allowing for your RV to be set appropriately. You may also find bathrooms, shower areas, laundromats, and recreational facilities. Please check with the park about any specific rules or policies, such as quiet hours, and whether they operate their waste disposal. Following these policies will ensure a smooth stay. Please be responsible when using these facilities and do not hesitate to ask for assistance from park staff if you have any queries or difficulties.
Identifying Electrical Hookup Options at Campgrounds
Electrical hookups, depending on availability at the given campground, enable your vehicle to support its operating systems. In a way, they work like a charging outlet of sorts. Campgrounds typically offer three types of electrical outlets: 20-amp, 30-amp, and 50-amp. The amperage levels meet the differing power needs of the RV’s size and the goods being used by it. For smaller RVs with less power-demanding appliances, a 20-amp outlet typically suffices. However, larger RVs or motorhomes equipped with appliances such as air conditioners, microwaves, and electric heaters would require a 30-amp or 50-amp service.
National and state parks often offer fewer electrical hookups, with some providing only basic 20-amp service. In contrast, private RV parks offer a complete range of options to cater to a broader array of clientele. Before your arrival, please confirm that your RV’s electrical hookups are compatible with the facilities. A surge protector should be purchased to protect your RV’s electrical system in the event of a power surge or inconsistency at the campground.
The data indicate that the 30-amp hookup is most often offered at campsites throughout the United States, serving mid-sized RVs with the typical appliance load. Meanwhile, the 50-amp ones are gaining popularity rapidly as more and more RV tourists opt for larger and modern vehicles. Thus, the electrification facilities of a camping site should be checked on their website, over the phone, etc., before finally signing up for a spot.
Understanding RV Park Electrical Systems
With different power requirements for various types of RVs, the electric systems of RV parks cater to diverse needs. Typically, 30-amp and 50-amp hookups are provided, which is the most common level of service. A 30-amp hookup offers 3,600 watts of power and is suitable for smaller or medium-sized RVs with basic appliances and moderate power demands. In contrast, a 50-amp hookup offers 12,000 watts of power for large RVs with more advanced appliances, air conditioning, or other high-energy-consuming devices.
Still, double-check and ensure you know the types of connections your RV power cords require when hooking up to an RV park’s electrical system. Mismatch can prove costly. It’s also wise to carry a couple of adapters for parks where hookup styles vary. Very importantly, protect your RV with a surge protector against sudden power surges or erratic voltage.
Lastly, always verify the type of electrical hookup provided at your selected RV park so that your stay goes as smoothly as possible. This can be achieved by visiting the park’s website, calling ahead, or establishing this during the reservation process. Thus, once you have a better understanding of these systems and make adequate preparations, you will be well on your way toward the actual RV camping experience.
Checklist for Safe Connections at RV Parks
Inspect Electrical Hookups: Before plugging in your RV, inspect the electrical pedestal at the campground for any damage, signs of corrosion, or loose wires that may be present. Damaged outlets could result in voltage fluctuations and power failures.
Use a Surge Protector: Plug in an RV surge protector at the pedestal before connecting to the RV. Surge protectors safeguard against voltage spikes, fluctuations, or temporary power losses, which can significantly reduce electrical damage to your RV.
Test Voltage Levels: Use a voltmeter or an electric monitor to measure the voltage on the outlet. Typically, the safe voltage range for an RV is between 108V and 132V. If the voltage is outside this range, it may potentially damage the RV’s electrical system.
Confirm Connection Type and Amperage: Check if the RV Park offers hookups that meet your RV’s requirements, either 30 amps or 50 amps. Using an alternative amperage may cause an overload of the circuits or appliance damage.
Buy a High-Quality Power Cord: Ensure your RV power cord is compatible and in excellent working condition. Faulty or worn cords can create unsafe connections or generate excessive heat, potentially leading to a fire hazard.
Check for Grounding Issues: Use an outlet tester to verify if the pedestal is grounded correctly, as an ungrounded setup poses a higher risk of electrical shock.
Keep Cords Elevated and Dry: Position the electrical cords so that they do not come into contact with water and do not pose a tripping hazard. Cable supports are an option for safely elevating the cord off the ground.
Turn Off Appliances During Connection: Ensure all appliances are turned off when disconnecting or connecting an RV to the pedestal to prevent sparking and damage.
Avoid Overloading the Circuit: Monitor your consumption closely to prevent overloading the circuit. Avoid simultaneous high-power usage, such as operating the air conditioner and electric heaters simultaneously.
Ensure GFCI Protection: Ground fault circuit interrupters add a layer of safety by switching off power during ground faults. Make sure either the pedestal or your surge protector comes with a GFCI.
If you follow these steps to establish a safe connection at RV parks, you can safeguard your RV’s electrical system while enjoying a smooth and stress-free adventure.
Surge Protectors and RV Batteries
Surge protectors and RV batteries serve complementary yet distinct roles in the RV electrical system. Surge protectors safeguard your RV against power spikes and fluctuations when connected to an external power source. Damage to appliances and wiring would otherwise occur. RV batteries store energy to power your RV’s systems when shore power is not available. A surge protector ensures safe and stable power delivery, whereas properly charged batteries guarantee the uninterrupted operation of essential systems, even when traveling or in off-grid status. Both are essential for a smooth and safe RVing experience.
Why Use a Surge Protector?
The surge protector becomes a vital tool for protecting your RV’s electrical systems and appliances from damage caused by surges or voltage spikes. Power surges are sudden and brief voltage increases that a lightning strike, disturbances on the grid, or an irregular power supply at campgrounds may cause. These surges, if left unaddressed, can cause havoc to your RV’s delicate electronics, such as air conditioners, refrigerators, and entertainment systems, which will, in turn, require expensive repairs or replacements.
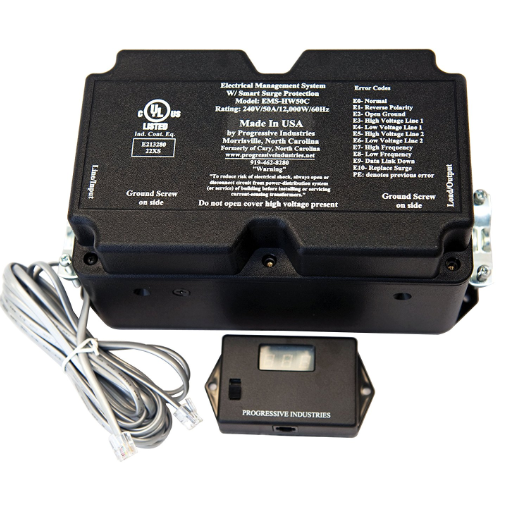
Today’s surge protection devices are available with various functionalities, ranging from basic surge suppression to more advanced features. For example, many of them are capable of detecting wiring faults or voltage irregularities from the external power source, as well as detecting leaks, thereby further preventing them from entering. Market insights report that such voltage fluctuations at campgrounds usually drop to as low as 90 volts and sometimes spike above 140 volts during peak usage, causing harm to appliances that require sound and stable power. Hence, most RV appliances are designed to operate safely within a range of 105-135 volts.
Another significant reason why an RV surge protector is needed is the danger posed by low-voltage damage, also known as “brownouts.” Low voltage can damage motors and compressors over time, as it causes those appliances to operate under strain. A high-quality surge protector, fitted with Automatic Voltage Protection (AVP), will shut down the power to your RV when the voltage is either dangerously high or low and will restore power to your RV upon stabilization.
An investment in a surge protector could save RVers thousands of dollars in potential damage and provide assured safe and clean power on their adventures. With options galore, ranging from plain vanilla models to high-tech surge guards that provide real-time monitoring, a surge protector remains an absolute necessity for any RV owner.
Choosing the Right Surge Protector for Your RV
Selecting the ideal surge protector for your RV depends on fully understanding what you need and the features each model offers. First, consider the amperage rating of your RV’s electrical system. Most RVs operate on either a 30- or 50-amp system; therefore, it is crucial to make sure that any surge protector you purchase can handle your RV’s capacity.
Next, you need to decide between the portable and the hardwired type. Portable surge protectors offer the most convenience, as all you need to do is plug them into the campground pedestal. In contrast, hardwired ones are permanently installed in your RV, since their protection is integrated into the RV itself. Hardwired models often come with more sophisticated features, such as remote monitoring through a smartphone app.
The ideal surge protector will protect against surges and low-voltage problems, as low voltage can, over time, slowly damage your appliances in the RV if not compensated for. Premium surge protectors give you an automatic shut-off during severe conditions, along with real-time energy monitoring and diagnostics to recognize wiring errors at the power source.
When examining surge protector ratings, also consider the actual joules of energy the unit can absorb. The higher the joule rating, the better protection it provides against a power surge. Anything rated 3,000 joules and above provides heavy-duty protection.
Secondly, consider safety certifications. Devices that come with certificates from reputable bodies, such as Underwriters Laboratories (UL), are believed to deliver consistent performance and have undergone testing to meet high safety standards.
Lastly, check verified reviews and select the brands that have a solid commercial reputation for durability and customer support. These include Progressive Industries, Surge Guard, and Southwire, the few brands that matter in the RV world for reliable and extremely feature-rich surge protectors.
All these factors contribute to an informed decision that will serve to protect your RV wherever you are headed.
Maintaining RV Batteries for Optimal Performance
Regular maintenance and care are essential to ensure your batteries function properly. The first thing to consider is the type of battery an RV uses, which can vary from lead-acid to AGM and lithium-ion, as each requires different care and maintenance. For instance, lead-acid batteries require regular maintenance to ensure water levels are maintained, which means they must be kept completely filled with distilled water. On the other hand, lithium-ion batteries require minimal attention, but they do require a charging system that is compatible with them.
Temperature has a greater impact on battery life than any other single factor. If extreme heat or freezing temperatures are present, they can significantly reduce a battery’s lifespan. So, ideally, an RV battery should be stored in temperatures between 32°F and 80°F. A battery monitoring system on the RV will be beneficial in knowing when the voltage exceeds a safe level, thereby protecting the batteries from overcharging, a significant cause of battery wear.
Also, cleaning is necessary. Battery terminal corrosion affects battery performance, so whenever you spot any buildup on a terminal, clean it with a solution of water and baking soda. Ensure all connections are tight and well-secured to maintain uninterrupted power flow.
You must disconnect the batteries or use a trickle charger while storing your RV in the off-season. Studies reveal that allowing batteries to discharge thoroughly before recharging can diminish their overall lifespan. Lead-acid batteries should be topped up to over 50% of their capacity; lithium ones are happiest when maintained between 20% and 80% charge.
Buying a solar charging system would even better keep your batteries flowing if you love boondocking. Solar panels provide an uninterrupted energy flow and share the load with chargers, ensuring batteries remain full throughout long off-grid transits.
Following all these steps will help you increase the lifespan of your RV batteries, save on replacement costs, and keep your adventures uninterrupted for many years.
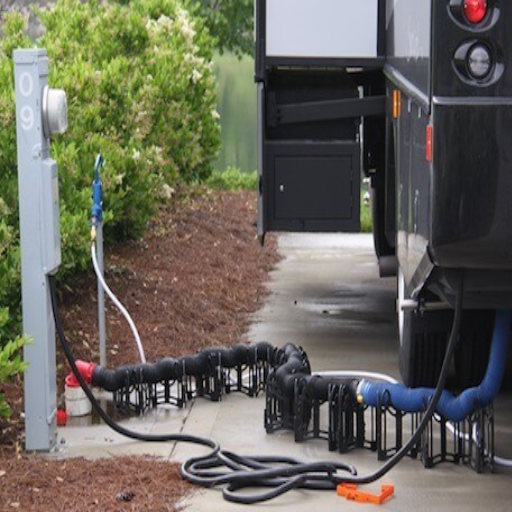
Connecting Your RV: Best Practices
Proper Electrical Setup: First and foremost, any RV-to-house hookup begins with ensuring that a power supply suitable for the RV’s electrical requirements is appropriately connected. Confirm that the voltage and amperage in the supply are within the accepted range of the RV; otherwise, a strange surge may lead to the destruction of sensitive electronic apparatuses. To protect your RV against power surges and voltage fluctuations, use a surge protector.
Securing Water Connections: Start by hooking up your hose to the potable water outlet at the campsite. Remember to use a water pressure regulator to safeguard your RV plumbing system against damage. Always use a separate potable water hose to avoid contamination and for clean drinking water.
Setting Up the Sewer System: Attach the sewer hose to the designated dump station inlet at the RV, ensuring that the connections are tight enough to prevent any spillage. Open the black tank valve first, then the grey valve to rinse out the hose thoroughly and keep it clean.
Cable TV and Internet Connections: If cable TV or internet service is provided, connect the RV to the service using the appropriate cables. Be sure to use good-quality coaxial cable or Ethernet cords to maintain signal strength and guarantee connection reliability.
Following these tips ensures a safe and expedient setup while minimizing any potential inconvenience when hitting the road.
Step-by-Step Guide to Connect Your RV
Parking and Leveling Your RV: Now park your RV at the given site and level it out. Use the leveling blocks or the automatic leveling system if the RV is equipped with one. An unlevel RV can put stress on its frame, hinder the proper functioning of appliances inside it, and make it uncomfortable to live in.
Connecting to Shore Power: Find the electrical hookup pedestal at your campsite. These usually offer 20, 30, or 50-amp services. Confirm whether your RV’s electrical system is compatible with the composition of the power source. Inspect the power cord for any damage before making the connection. And protect your RV’s electrical systems by using a surge protector. Next, plug your RV’s power cord into the pedestal, ensuring it is securely in place and not loose in any way.
Water System Connection: Connect an approved hose for drinking water to the water hookup that has been prepared at the site. Be sure to have a water pressure regulator attached between the water source and your hose to prevent high-pressure water from damaging your RV’s plumbing system. Stormwater should be turned on slowly, constantly checking for leaks. Additionally, consider using an inline water filter to ensure clean and safe water for your RV.
Sewer System Hookup: Connect the sewer hose to a hookup or dump station provided at the campsite. The other end is securely fastened to the RV’s waste outlet. Be sure to clamp both ends tightly to prevent any leaks or spills. You might want to level support for your hose to enhance its drainage rate. Check the connections to ensure they are correct before opening the tank’s valves. Open your grey water valve only after your black water tank has drained to help rinse the system.
Propane Setup: Check the propane system of your RV to ensure that it is safe to operate. If needed, top off propane tanks before you leave. Ensure that everything is securely in place and that the valves have been correctly opened. This should ensure the use of your propane appliances, including the stove, water heater, or refrigerator.
Cable TV and Internet Connection: Locate the cable TV and internet connection hookups provided for the site. For cable TV, connect your RV coaxial cable to the outlet. For the Internet, connect the Ethernet cable if it is available, or log on to the site’s free Wi-Fi. If necessary, use signal boosters to enhance connectivity, especially in remote locations.
Testing Systems: Once all sets of connections have been made, test the systems in your RV to ensure they are all functioning correctly. Check the lights, outlets, plumbing, and appliances to ensure they are functioning correctly. Address any issues promptly to prevent them from escalating during your stay.
Following these guidelines will guarantee that you efficiently connect all necessary systems to your RV, thus allowing you to enjoy a comfortable and trouble-free camping experience. Regularly check your RV’s connections and components to ensure its reliable performance.
Tips for Avoiding Electrical Issues
I want to ensure that my RV’s power cords are regularly checked for any damage, loose connections, or voltage spikes. I keep a surge protector in the loop at all times when the RV is connected to electricity; I also inspect the cords for any signs of damage or wear. I try to avoid drawing too much power from multiple appliances, which could overload the electrical system. Regular maintenance and monitoring the status of my equipment help me address any unwanted critical issues before they arise.
When to Seek Professional Help
There are times when electrical issues within an RV require the expertise of a professional. Intermittent power failures, flickering lights, and strange odors emanating from the outlets may be signs of a serious problem, such as poor wiring or overloaded circuits. Each year, electrical malfunctions are a significant risk of RV fires and constitute a relatively large percentage of incidents, according to industry reports.
Additionally, modern RVs have become more sophisticated from an electrical perspective, with solar panels, inverters, and complex wiring, all of which can confuse the average owner attempting to troubleshoot the system. For instance, a malfunctioning inverter or erratic battery behavior requires the use of diagnostic equipment and technical knowledge to fix safely. The advantages of working with a licensed RV electrician extend to resolving problems correctly and safely. Lastly, if you plan to install additional power outlets, high-demand appliances, or other equipment, hiring a professional will ensure that your upgrades are correctly integrated into your system and will not cause damage or overload.
Reference Sources
Frequently Asked Questions (FAQs)
What are the RV electrical hookup requirements for a 30-amp RV?
The RV electrical hookup requirements for a 30-amp RV typically involve a 30-amp plug and a compatible power source. This setup usually provides a maximum of 3,600 watts of electricity, which is sufficient for running basic appliances and systems within the RV. It’s essential to ensure that the electrical service at the RV park or campground is compatible with 30-amp connections. Using a surge protector can help safeguard your RV’s electrical system.
How does a 50-amp RV electrical system differ from a 30-amp system?
A 50-amp RV electrical system can provide up to 12,000 watts of power, allowing for greater power usage and the simultaneous operation of more appliances compared to a 30-amp system. The 50-amp plug features four prongs, enabling it to deliver a higher electrical load. If you own a 50-amp RV, ensure that you are connecting to a proper 50-amp electrical hookup at your destination.
What do I need to check before connecting my RV to campground electrical hookups?
Before connecting your RV to campground electrical hookups, you should check the power source to ensure it matches your RV’s electrical requirements, whether 30-amp or 50-amp. It’s advisable to inspect the electrical outlet for any visible damage and confirm that it is a GFCI outlet for safety. Carrying a checklist can help ensure you have all necessary adapters and equipment ready for a seamless connection.
Can I use a 30-amp RV in a 50-amp electrical hookup?
Yes, you can use a 30-amp RV in a 50-amp electrical hookup by utilizing a 50-amp to 30-amp adapter. This adapter will allow you to connect your RV to the 50-amp service, but please note that your RV will only draw the maximum of 30 amps available. Ensure that you monitor your power usage to avoid overloading the system.
What is the importance of using a surge protector when connecting an RV?
Using a surge protector is crucial when connecting your RV to an electrical hookup. It helps to protect your RV’s electrical system from voltage spikes and electrical issues that could damage sensitive electronic components. A surge protector can also provide peace of mind, ensuring your safety while plugged into campground electricity.
What should I do if my RV electrical system is not functioning correctly?
If your RV electrical system is not functioning correctly, start by checking all connections and ensuring that the power source is active. Inspect your RV batteries and electrical panel for any faults or blown fuses. If the problem persists, consult your owner’s manual for troubleshooting tips or consider seeking assistance from a professional RV technician.
How can I efficiently power my RV using a home electrical system?
To efficiently power your RV using your home’s electrical system, you can connect your RV to a suitable power outlet using the correct adapter. It’s essential to ensure the outlet can handle the required power load, whether it’s a 30-amp or 50-amp plug. Additionally, consider using a transfer switch to prevent backfeeding electricity into your home’s system, which can be dangerous.
What are the standard RV hookup requirements for full-time RV living?
For full-time RV living, standard RV hookup requirements include access to both 30-amp and 50-amp electrical hookups, water supply, and sewer connections. It’s essential to consider the electrical load of your RV and determine the daily power requirements. Utilizing a surge protector and maintaining a checklist can enhance safety and efficiency while living in your RV.