Installing wiring for a garbage disposal might seem to be a difficult task at first, but with some appropriate instructions, any DIYer can attempt it confidently. Whether you are an installer putting in an entirely new unit or an upgrader enhancing an existing one, the wiring of your garbage disposal should be well understood for your own safety and the functionality of the unit. This detailed and step-by-step guide aims to walk you smoothly through the important steps of wiring your garbage disposal correctly, efficiently, and up to safety standards. By the time you have finished reading this article, you will have a solid understanding of this process and the confidence to achieve the successful completion of wiring a garbage disposal on your own.
Understanding Garbage Disposal Wiring Basics

Proper wiring of a garbage disposal requires attention to certain vital points for installation and operational safety. These include:
- Power Source: Garbage disposals may be plugged into a grounded outlet or hardwired into the home’s electrical system. The power source must meet the unit voltage requirements, which for most homes is 120 volts.
- Circuit Requirements: A disposal has to be on a separate circuit, with the circuit breaker rated at 15 or 20 amps. If the disposal shares the circuit with any other appliance, there is are chance of the circuit getting overloaded.
- Switch Control: The disposal is generally controlled by a wall switch. The switch must be conveniently located and must not control any other appliance.
- Wiring Connections: Typical disposals are equipped with a junction box for final wiring. Make your connections in there using wire nuts, matching in color—the black to black (hot), white to white (neutral), and green to green or bare (grounded).
What is Garbage Disposal Wiring?
Garbage disposal wiring is the name given to the wiring of garbage disposal units to function efficiently and safely. Generally, garbage disposals may be hardwired into the electrical system or installed using a power cord and plug. In either case, such units have to be fed through a dedicated circuit, usually a 15- or 20-amp circuit, adequately supporting the motor load without causing the circuit to trip.
Standard disposals use 120 volts in the United States, and they are made to operate with a ground-fault circuit interrupter (GFCI), providing safety in wet surroundings. For proper wiring, the appropriate wire gauge must be used: 14-gauge for 15-amp circuits and 12-gauge for 20-amp circuits.
An improperly designed wiring can cause disruption to the functioning of circuit breakers, resulting in motor failure and, in the worst situation, causing electrical shock. Hence, giving detailed orientation and appropriate adherence to the local electrical codes becomes imperative while installing or servicing a garbage disposal unit.
Types of Garbage Disposal Wiring
Proper wiring for garbage disposals can differ with regard to the type of installation and any particular need of the disposal being fitted in. Below are the most common types of disposal wiring and their details:
| Installation Type | Description | Advantages | Requirements |
|---|---|---|---|
| Hardwired Installation | Direct connection to the home’s electrical system | Secure, permanent connection; no visible cords | Dedicated 15-20 amp circuit, disconnect switch |
| Plug-and-Cord Connection | Plugs into a grounded outlet under the sink | Easy installation, portable, flexible | GFCI-protected outlet, 7-12 amp capacity |
| Dual-Purpose Circuits | Shared circuit with dishwasher | Efficient use of electrical circuits | Minimum 20 amp circuit, independent controls |
| Smart Disposals | Wireless or smartphone app control | Modern convenience, monitoring features | Standard wiring plus additional power provisions |
Safety Switch Placement
Garbage disposals are usually controlled by a wall or counter switch, whether hardwired or with a cord and plug. The switch should be readily accessible and comply with safety laws requiring it to be at least 24 inches away from any sink.
Importance of Proper Wiring
Proper wiring is critical to the safety and operational efficiency of electrical appliances such as garbage disposals. Improper wiring can cause electrical overloads, short circuits, and, in the worst-case scenario, wildfires that pose threats both to property and life.
Besides safety, proper wiring makes for greater appliance performance, lower power consumption, and increased life span of the appliance. For example, a garbage disposal properly wired will minimize the chances of the motor being overworked or subjected to power surges. Therefore, it is really worth spending valuable time and money to have it inspected or installed professionally. That time and money assure your electrical systems are installed per code and are built to last!
Hardwired vs Plug-in Installation
The primary difference between hardwired and plug-in installation is simple and boils down to the method of connection. Understanding both options will help you choose the best method for your specific situation.
Advantages of Hardwired Installation
There are a number of advantages to hardwired installations, including reliability, safety, and the desire for an aesthetically pleasing environment. The greatest advantage is that there is enhanced dependability when considering hardwired appliances. Most appliances are hardwired into the electrical system and will not become loose or accidentally unplugged from the wall. Such connections also allow for the maximum power capacity to be transmitted, hence much used by heavy-duty appliances such as ovens, dishwashers, or HVAC systems.
In terms of safety, hardwired installations keep the floor and wall areas clear of wiring and corded trip hazards. A hardwired connection means that the connection can never go through wear and tear compared to a plug-in connection; therefore, the cost for repair or replacement is kept to a minimum.
From the standpoint of appearance, a hardwired installation is entirely seamless because the visible cords and outlets are removed from sight. The aesthetic is more pleasing in contemporary homes or work areas that emphasize a clean look or a minimalist approach.
Advantages of Plug-in Installation
Plug-in installations are well-favored since they are considered easy to use, economical, and flexible. Usually, installation of a plug-in setup will not require a separate technician, saving the cost of installation. This makes them great for temporary installations or for situations where breathing space is a priority—say, time in a rented space or a portable application.
Among the benefits of plug-in appliances is flexibility: being unplugged and moved around offers any kind of inconvenience in renovation or relocation. Also, present-day plug-in appliances come with an advanced set of safety measures, including grounding, surge protection, and overload check.
Choosing the Right Method for Your New Disposal
In choosing conditions for any new disposal, there are several considerations that must be taken into account on the basis of efficiency, ecology, and long-term reliability. First, the disposal should meet the household garbage; hence, the size and power of the disposal unit are important considerations. For a family that prepares large meals almost every time, the disposal with a more powerful 1 HP motor could be suitable to grind down the food scraps, such as bones and fibrous vegetables, with ease.
Environmental concerns, of course, also matter greatly. Today’s disposals use multi-stage grinding and septic assist technologies to help improve the breakdown of waste and to ease the pressure on the wastewater system. Studies suggest that these new-generation disposals reduce food waste volume by up to 20%-30%, offering a Green alternative to food waste going to the landfill.
Tools and Materials Needed
If you want to install or repair your disposal, having the right tools and materials at the disposal of your disposal will guarantee a smooth operation and ensure safety. A full list is given below as a guideline:
Screwdrivers (Flathead and Phillips)
For mounting and wiring, some screws may have to be loosened or tightened.
Adjustable Wrench
Use to loosen drain connections and to tighten mounting nuts.
Putty
Apply around the sink flange to make a watertight seal.
Wire Strippers
To strip down electrical wires properly for connections.
Electrical Tape
Use it to secure wiring and provide insulation during assembly.
Bucket or Pan
To catch any water coming out of pipes during disassembly.
Flashlight
Used in dark spots beneath the sink.
Replacement Garbage Disposal Unit (if applicable)
Make sure it fits the dimensions of your sink and matches the plumbing setup. These are most commonly sized from 1/3 to 1 horsepower, depending on domestic requirements.
Step-by-Step Guide to Wire a Garbage Disposal

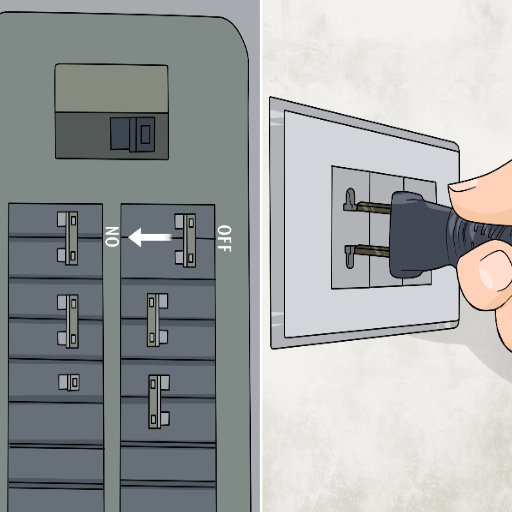
Step 1: Turn Off Power
Before starting, go ahead and ensure that power to the disposal site has been switched off at the circuit breaker. Double-check this using your voltage tester and make sure there is no power flow for safety.
Step 2: Identify the Wires
Locate the electrical wires on the garbage disposal and power connections near the sink. Most garbage disposals require a standard 120 volts and a ground wire. The wires could be black (hot), white (neutral), and green or bare copper for ground.
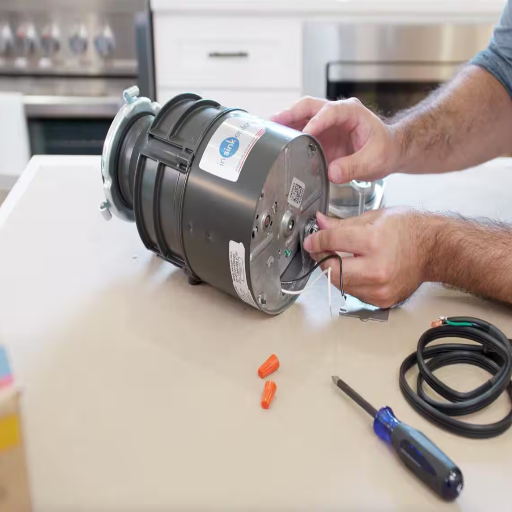
Step 3: Remove the Electrical Cover Plate
Locate the electrical cover plate, which is set on either the bottom or side of the garbage disposal, and then remove it using a screwdriver. This will reveal the wiring compartment behind that cover plate.
Step 4: Connect the Wires
- Match the black wire from the power supply (hot) with the black wire on the disposal unit, and connect with a wire connector.
- Do this again with the white (neutral) wires.
- Provide an attachment for the green or bare grounding wire from the disposal into the green screw inside the wiring compartment or to the green/bare wire from your power source.
- Secure each wire connection to avoid loose wiring.
Step 5: Secure the Cable Clamp
If your garbage disposal has a cable clamp, this cord must be properly clamped into place to prevent it from shifting or disconnecting over time.
Step 6: Replace Cover Plate
Replace the cover plate after all connections have been made to ensure that the wiring remains protected. Fasten the cover plate firmly so nothing will be left exposed.
Step 7: Test Your Connection
Turn the power back on at the circuit breaker, then activate the garbage disposal using the wall switch. If the unit turns on flawlessly and there are no strange noises or malfunctions, you have completed the wiring procedure successfully.
Step 8: Safety Check
Let water run in your sink and activate the garbage disposal for a little while to check that it works properly. Check the location where you made the wiring to ensure that there aren’t any exposed wires or loose components.
Common Mistakes to Avoid
Failing to Turn Off Power
One of the most hazardous errors committed while working with a garbage disposal is the failure to cut off the power at the circuit breaker. For such a lack of precaution, you can easily be fatally injured or receive an electrical shock. Observe all safety rules and approved precautions: always double-check to make sure power is disconnected before starting wiring work.
Using Wrong Wire Connections
Wire connections are made wrong when wires are tied together that have differing ratings or when wire nuts are not used to secure the connections—wrong wire connections might keep disposal units from working or cause electrical fires.
Ignoring the User Manual
Various disposal models have different designs and requirements. Failure to follow the specific instructions in the user manual could cause an improper installation or damage to the unit. Always read the manual thoroughly to avoid the common pitfalls specific to your model.
Overtightening Connections
Whether getting into the wires or the screws, tightening them too much will do the component damage with time and, therefore, hamper the function of the garbage disposal. Too much pressure can strip down the thread or crack the soft material, resulting in costly repairs or replacement.
Skipping a Safety Test
Having done the wiring, some users forget to perform safety tests to check that indeed everything is working fine. Run water through the sink and switch on the disposal momentarily, and be sure all of the electrical components are fastened securely with no wires exposed before calling it a day.
Wiring a Switch for Your Garbage Disposal
Wiring the switch for the garbage disposal has to follow certain steps, observe safety measures, and must be towards functionality or code compliance. The detailed steps below will allow you to perform this task:
Choose the Right Switch and Outlet
It has to be a single-pole switch rated at 15 amperes, or conform to what is recommended by the manual for your individual garbage disposal. The outlet powering the disposal has to be GFCI-protected, especially since its use is in the kitchen, where moisture is commonly involved. Also, ensure that a grounding outlet is provided for safety.
Turn Off Power at the Breaker
Before dealing with any wires, find the correct circuit breaker inside the electrical panel and switch it off. Utilizing a non-contact voltage tester, check that there is no live current flowing to the wires at the disposal or switch location.
Plan the Electrical Path
Normally, a hot wire (black), neutral wire (white), and ground wire (green or bare) make up the wiring varied path. The hot wire connects to the switch, while neutral and ground wires bypass it to complete the circuit. If unsure, please look into the disposal manual for the circuit diagram or look into local codes.
Mount the Switch Box
Install an electrical box for the wall switch at a convenient height, usually 48 to 54 inches from the floor. Use a box compliant with National Electric Code (NEC) standards.
Wire Connections
- Connect the black (hot) wire of the power source to one terminal of the switch.
- The second black wire from the switch connects to the garbage disposal hot wire or the outlet controlling the disposal.
- Twist the white (neutral) wires using a wire nut; they should not be connected to the switch.
- Connect the remaining ground wires to the green terminal on the switch, as well as to the outlet frame or disposal frame.
Using a Receptacle for Plug-in Models
Most plug-in disposal shockers are better accommodated by installing a receptacle. Before installation, make sure there is already a convenient outlet under the sink installed according to local electrical codes and fitted with a GFCI circuit for safe operation. To avoid electrical hazards, remember to use a grounded three-prong receptacle for your disposal’s plug.
Find a convenient spot for your outlet and, if needed, run a new electrical wire from your box to the outlet. Install a single-gang electrical box rated for the wattage of your disposal. Connect wires so that the black wire is connected to the live wire, the white wire is connected to the neutral wire, and the green or bare wire is connected to ground, ensuring that all connections are fully tightened. After that, secure the outlet cover and proceed to plug in your disposal to test it.
Ensuring Safety with Circuit Breakers
Circuit breakers are the essential means of protecting electrical systems by breaking the current flow during overloads and short circuits. Once a breaker capacity is matched with the electrical load it will carry, safety is assumed as assured. For example, a 15-amp breaker should never be allowed to exceed its protective limit to prevent overheating and consequent damage to the system.
Before any work is carried out on any circuit, the fixing cutter should be switched off, and the power supply with a voltage tester. Routine maintenance will save you lots of trouble—fixing cutters must be thoroughly checked for indications of wear or damage, such as discoloration, burning odor, or tripping that cannot be reset. Should any of those be present, it is highly recommended to replace the cutter at once. Also, always use breakers that are compatible with your panel.
Choosing the Right Cables for Garbage Disposals

When buying cables for garbage disposals, make sure they are durable, well-insulated, and rated for use with kitchen appliances. Use a 14-gauge wire or higher, depending on the power factor of the motor as specified by the manufacturer. Locally acceptable and no-code-violating cables should be chosen. For most cases, a grounded 120-volt circuit is utilized. Always make sure of cable compatibility with the disposal. When in doubt, check the product manual or call in a licensed electrician.
Types of Electrical Cables
| Cable Type | Description | Best Use | Specifications |
|---|---|---|---|
| Non-Metallic Sheathed Cable (Romex) | Most common household wiring cable | Standard disposal installations | 14/2 or 12/2-gauge with ground wire |
| Armored Cables (BX or AC Cable) | Metal-protected exterior for durability | Exposed wiring areas requiring protection | Additional protection for inner wires |
| Flexible Appliance Cord | SPT or SJ type insulated cord | Direct motor-to-disposal connections | Rated for appliance use, flexible connections |
Tips for Selecting the Right Cable
- Look into Disposal Requirements: Check the manufacturer’s specifications in the trash disposal manual to determine which cable type and gauge to use. Most disposal units require a cable equal to that of their amperage rating; otherwise, it is generally 14 gauge for 15-amp circuits or 12 gauge for 20-amp circuits.
- Select the Appropriate Cord Type: Flexible insulated appliance cords such as SPT-3 or SJTW are best-suited for garbage disposals. These types of cords are durable and heat-resistant, and normally work well in damp environments to afford greater safety and durability to the installation.
- Have the Installation Meet Your Local Code: Electrical codes differ from place to place. Hence, you should make sure your cable complies with your local safety code. For example, the use of a grounded, three-prong plug is mandatory in most areas for purposes of safety.
- Durability and Safety Come First: Select cords with adequate insulation and grounding to prevent hazards like overheating or electric shock, and check if the cord remains flexible in tight spaces for ease of installation.
Conclusion
Successfully wiring a garbage disposal requires careful attention to safety protocols, a proper understanding of electrical connections, and adherence to local building codes. Whether you choose a hardwired or plug-in installation, the key factors remain the same: proper circuit protection, correct wire connections, and thorough testing of the completed installation.
Remember that electrical work can be dangerous, and there’s no shame in consulting with or hiring a licensed electrician when you’re uncertain about any aspect of the installation. A properly wired garbage disposal will provide years of reliable service while maintaining the safety of your home’s electrical system.
Always prioritize safety over convenience, follow manufacturer instructions carefully, and ensure your installation meets all applicable electrical codes. With the right approach and attention to detail, you can complete this project and enjoy the benefits of a properly functioning garbage disposal.
Reference Sources
1. The Making of Self-Disposing Contactless Motion-Activated Trash Bin Using Ultrasonic Sensors
2. An Effective Solid Waste Management for Modern Cities Based on IoT
3. SMART GARBAGE MANAGEMENT SYSTEM
Frequently Asked Questions (FAQs)
How do I wire a disposal into a wall outlet?
To wire a garbage disposal into a wall outlet, first make sure to cut off the power at the circuit breaker. Using a screwdriver, remove the cover plate from the outlet box and connect the disposal’s black wire to the outlet’s black wire. Connect the white wires and ground the green wire to the outlet ground. Make sure that all wire connections are secured with wire nuts, then replace the cover.
What are the basics of garbage disposal wiring?
Basic wiring for a garbage disposal implies connecting it to a supply of power. The power source is either a separate outlet or may be hardwired into the electrical system. How do we connect the disposal? The black wire from the disposal to the black wire from the supply. The white wire from the disposal to the white wire from the supply. And finally, the green wire is grounded. Make sure all your connections are solid, so that wiring errors do not occur.
How do I perform a hardwired installation for a new garbage disposal?
To perform a hardwired installation for a new garbage disposal, open its wiring compartment, which is located at the bottom of the garbage disposal. Then remove the cover and connect the black wire from the disposal to the black wire from the power source and connect the white wire to the white wire from the power source. Ground the green wire to the grounding screw using the wire nut. Also, make sure all wire connections are secure before turning on the power.
What should I do if my garbage disposal will not turn on?
If your garbage disposal will not turn on, check whether it has power. The first thing is to verify that the switch in the electrical box is in the “on” position and that a circuit breaker has not tripped. The second thing would be to check the wiring near the wiring compartment for any loose or disconnected wires.
How can a switch be wired for a garbage disposal?
Depending on your plumber’s wiring habits, the wiring of the switch for the garbage disposal varies. In other words, one terminal of the switch is connected to the black wire from the power source; the other terminal is connected to the black wire of the disposal. Then, the switch should be fastened securely, and all the wiring should be insulated to avoid electric shock hazards.
What is involved in a plug-in installation of a new disposal?
Plug-in disposal installation involves the actual wiring of the disposal unit to a dedicated outlet. You will plug the disposal unit into the outlet when the outlet’s amperage is enough for the disposal. One major point is that the outlet should be controlled by a switch so one can operate the disposal with ease.
Can I connect my garbage disposal to a single outlet?
The unit can be connected to a single outlet, provided that the outlet, which is not shared with other equipment, provides a dedicated circuit to the disposal that meets the electrical requirements of the disposal. Wiring is to be done following wiring procedures; black and white wires are to be connected accordingly to their purpose, whereas the green wire is to be grounded.
What are common wiring errors when installing a garbage disposal?
Some common wiring errors while installing a garbage disposal include incorrect connections between the black and white wires, failing to ground the green wire, and connections that are not properly secured. Another problem would be using the wrong type of outlet or circuit for the unit may pose a problem for its operation. Always double-check the working connections before turning on the disposal.
How do I disconnect the wires in my old disposal?
To unplug the wires from your old garbage disposal system, you have to turn off the power from the circuit breaker. Next, the wiring compartment has to be located at the bottom of the unit. Using the screwdriver, remove the cover, then carefully disconnect the black, white, and green wires. Be sure to keep the ends of the wires insulated so that they do not accidentally come into contact with anything while installing the new disposal.