








Wiring the doorbell transformer can seem daunting if one is not well-versed in electrical systems. Yet, following a few procedural steps with the correct set of tools can turn this project into a fun and rewarding DIY exercise. Installing a new doorbell or upgrading the existing doorbell system requires understanding how to wire your transformer safely to ensure an operational doorbell. This article provides step-by-step instructions, safety precautions, and other essential information to give you the confidence to tackle the task. By the time you’re finished, you’ll have a working doorbell and the satisfaction of mastering a pretty valuable home improvement skill.
Understanding the Doorbell Transformer
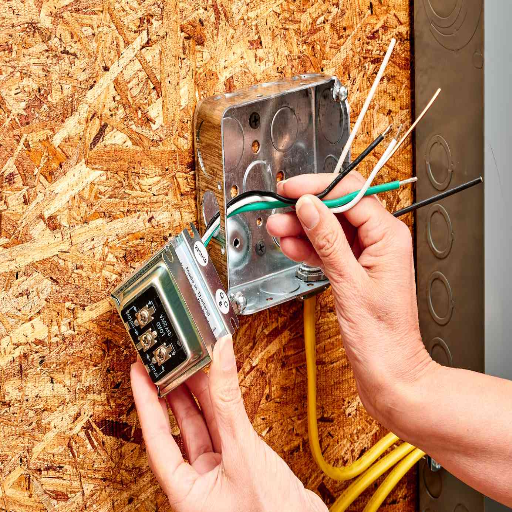
The doorbell transformer is a small device that converts the standard electrical voltage (typically 120 volts) to a safe and lower voltage required for doorbell operation, generally between 16 and 24 volts. The resulting voltage from the transformer ensures that the door chime or buzzer operates safely and efficiently. The transformer is typically installed near your home’s electrical panel, inside a junction box, or close to the doorbell. In any case, familiarize yourself with your transformer before starting installation, replacement, or troubleshooting. This ensures that you will avoid issues and maintain the proper operation of the doorbell system.
What is a Doorbell Transformer?
Doorbell transformers are electrical devices designed to convert the high voltage of a house’s electrical system (usually 120 or 240 volts) into the lower voltage required by its doorbell system. The doorbells mostly work at 16 or 24 volts, depending on the type and manufacturer. Transformers need to ensure that a doorbell is safely powered—neither underpowered nor overpowered.
Modern doorbell transformers cater to the needs of both traditional mechanical chimes and advanced video doorbells. For instance, popular video doorbells like Ring or Nest preferably need 16-24 volts AC with an output rating of at least 10VA for proper operation. If the transformer is weak or under-rated, it can become a nightmare, making it challenging to perform well, and worse, the doorbell may fail to connect to its Wi-Fi network half the time.
Typically, doorbell transformers are found in locales near the electrical panel, attic, basement, or even inside a junction box. It is advisable to avoid this option if the transformer’s rating does not match the power requirements of your doorbell system. Newer design transformers are compatible with smart home setups and offer an enhanced power output with slim dimensions, providing a better fit in contemporary homes. Knowledge of this small but critical offering is essential for installing, troubleshooting, or upgrading your doorbell.
Why Use a Transformer for Your Wired Doorbell?
A transformer is a crucial component for a wired doorbell, as it regulates the voltage supplied to the device, enabling it to operate safely and efficiently. Most wired doorbells require a specific voltage range for operation, typically between 16 and 24 volts. Electrical systems, on the other hand, usually supply 120 volts or 240 volts, which are too high for a doorbell to carry directly. Thus, despite this voltage disparity, the transformer plays a vital role in stepping down the electricity to usable levels.
Present-day transformers exhibit a wide range of designs, many of which offer energy-saving options that can help reduce overall power consumption. For example, low-power advancement transformers maintain consistent performance while minimizing waste, giving them a dual advantage in environmental and economic respects. Additionally, modern transformers can be seamlessly integrated with innovative doorbell systems, and in many cases, they come with built-in surge protection against voltage spikes. Choosing a transformer ideally suited for the doorbell will increase its life span and ensure that it works tolerably well every time the doorbell is triggered.
Standard Specifications of Doorbell Transformers
Getting your transformer specifications right is one effective way to support the most critical parameter: doorbell voltage properly. Doorbell transformers generally output voltages within the range of 16V-24V, and typical power ratings are expressed in VA (Volt-Amps), with values of 10VA, 16VA, or higher, depending on the power requirements. These typically apply to a broad array of wired doorbells, video doorbells, and chime systems. Transformers are commonly wired into your electrical system and must comply with regional electrical codes for safety, such as those established by the Underwriters Laboratories (UL) in the U.S.
New transformers typically feature designs that preserve power and minimize heat generation. Since many new video doorbells require more power, it is essential to consult the manufacturer’s instructions regarding voltage and VA rating. It ensures that the transformer meets these requirements, which guarantees its smooth operation and prevents any potential problems caused by humming disturbances or power shutdowns. More minor transformer cases paired with clearly marked wiring terminals are widespread, allowing for quick installation.
Preparing to install the doorbell transformer
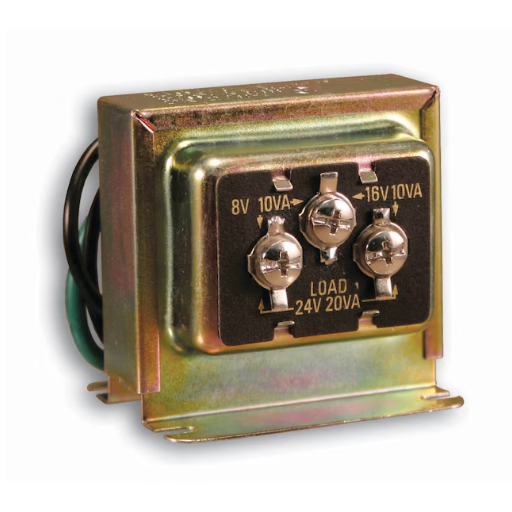
A doorbell transformer installation cannot be performed without first proving that the electricity feeding the circuit will be turned off for safety considerations. Determine the wiring requirements for the transformer by referring to the manufacturer’s instructions, as this will provide the most reliable information. Select a convenient location for installation, preferably near your doorbell chime or breaker box. Using the supplied mounting hardware, install the transformer as directed. Connect the wires to the labeled terminals, double-checking to ensure the connections are both reliable and suitable for the circuit. After everything has been set up and double-checked, turn on the power and test that the system is working correctly.
Tools and Materials Required
Transformers for Doorbell Systems – Choose a transformer that matches your doorbell system and is specified for the required voltage (usually 16V or 24V, depending on the type of doorbell).
Voltage Tester – This device is used to verify that wiring is functioning correctly and to confirm that power has been turned off, ensuring safe installation.
Electric Screwdriver – An instrument used precisely to loosen and tighten terminals during wire connections.
Wire Stripper – For safely stripping wire ends to provide clean connections.
Drill and Mounting Hardware – These will be used to securely mount the transformer on the wall or a nearby stud near your breaker box.
Electrical Tape – To insulate wires safely, protecting them from any shorts.
Wire Connectors or Caps – To make safe, solid connections for wires to hold together.
Circuit Map or Breaker Label – Get a diagram or label of your circuits to identify the correct breaker and doorbell wiring.
Measuring Tape – For the precise location of mounting and the exact wire length needed during installation.
Protective Gear-Non-conductive gloves and goggles must be worn to protect against any untoward incident involving electricity or a shower of debris during drilling and wiring.
This equipment and these materials form the foundation of a safe, precise, and efficient installation process. Always ensure that your tools are functioning correctly and follow safety protocols to achieve the best results.
Safety Precautions to Consider
When carrying out an installation procedure, it is essential to uphold safety standards to prevent accidents and ensure a smooth process. Here are some of the precautions to consider:
Understand Electrical Hazards – Electrical installations are inherently hazardous. Ensure that the power supply is completely shut off at the breaker before commencing work. Recent figures indicate that 9% of electrical injuries result from accidental contact with live current. Wearing of precaution is always a must.
Use Appropriate Protective Gear – Wear non-conductive gloves, safety goggles, and insulated footwear to minimize the risk of exposure to electrical contact, flying debris, or other hazards. When you wear the correct safety equipment, you can reduce workplace injuries by up to 60%.
Check Tools and Equipment – Examine tools such as voltage testers and wire cutters for damage before using them: faulty equipment can malfunction or even create dangerous situations during installations.
Maintain a Clean Work Environment – Be vigilant for any unwanted items or debris in your workspace. An untidy area raises trip and fall hazards, which are among the most common workplace injuries.
Observe Installation Directives – Review the manufacturer’s documentation in detail and follow the recommendations provided. Failing to do so may not only result in installation errors but also create safety hazards.
Take Another Along – In a perfect world, have someone alongside you to lend a hand or check for emergencies. A response to an emergency can be significantly enhanced with this setup.
If these precautionary measures are followed strictly, the likelihood of an untoward incident occurring during the installation project decreases considerably, providing a significantly safer working environment. Whenever safety is prioritized, it goes a long way in securing both the well-being of the individual and the successful completion of the job.
Removing the Old Transformer
Correctly removing the old transformer is necessary to ensure proper safety arrangements and efficiency during installation. First, disconnect the power source going to the transformer before any procedure to avoid shock hazards. Verify and reverify that all circuits connected to the transformer have been de-energized, preferably using a voltage tester. If the transformer is mounted on a pole or structure, cordon off the area to prevent accidents during the removal process.
Be sure to carefully identify all wiring connected to the transformer and label the wires accordingly. Otherwise, installing the new unit may be confusing. Transformers of certain types and ages may contain specific chemicals or materials that require special handling and disposal. For older models, check the insulating fluid for the presence of polychlorinated biphenyls (PCBs), as these are hazardous materials that must be handled according to environmental regulations. More recent technical standards require the disposal of transformers with PCB contents under very stringent guidelines in most parts of the world.
To ensure safety during the extraction of the transformer, the use of the proper tools and lifting equipment is considered ideal. Larger transformers, weighing several hundred pounds, argue more strongly for the involvement of a professional or the use of a special tool to eliminate the hazards involved. Once removed, take the old transformer to an authorized recycling or disposal facility; otherwise, improper disposal can result in environmental contamination. Keeping documented proof of their disposal ensures conformance with environmental policies and local government regulations, thereby supporting sustainable practices.
Wiring the Doorbell Transformer
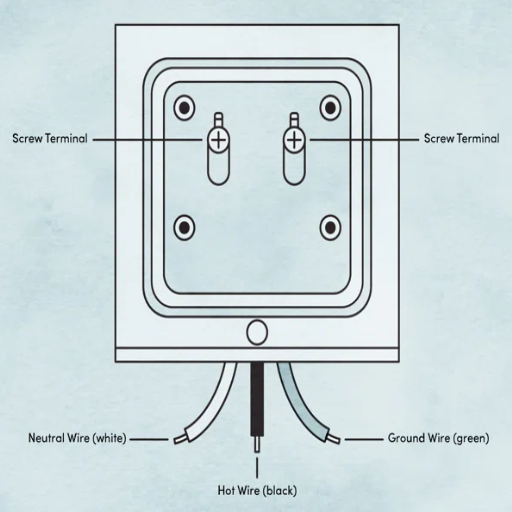
The doorbell transformer wiring process begins with the crucial step of turning off the power at the circuit breaker for safety. Locate the circuit where you intend to install it, which is typically close to the main electrical panel or where the existing doorbell wiring is located. Connect the transformer wires to those of the supply source: black to the hot terminal, white to the neutral terminal, and green to the ground terminal. Secure wire nuts over your connections and ensure all wires are properly insulated. Fasten the transformer firmly to keep it from moving or being damaged. Power on and test the doorbell to ensure proper operation once the installation is complete. Ensure you follow your local electrical safety codes and consult an electrician if you are in doubt.
Step-by-Step Wiring Instructions
Turn off the power: First, switch off the power to the doorbell circuit at the breaker box. Use a voltage tester to check and ensure that nothing is being drawn into it.
Locate the Doorbell Transformer: Identify the existing doorbell transformer or the designated location for the new one. Commonly, these are installed near the electrical panel, basements, attics, or utility rooms.
Connect the Transformer: Connect the power to the doorbell transformer. Connect the black wire of the transformer with the hot wire, the white one with the neutral, and the green one to the ground wire. Secure and insulate the connections with wire nuts.
Run Wires to the Doorbell: Special wires are run from the transformer to the doorbell chime or receiver. Typically, two low-voltage cables are connected to the respective terminals, which are traditionally labeled as “TRANS” and “FRONT” (or “REAR” if multiple doorbells are attached).
Mount the Doorbell: Doorbell Button Location: With the doorbell button in hand, fasten it to the wall outside. Ensure you have a tight hold on the wires connected to the screws on the back of the button.
Secure and Double-Check Connections: Inspect all connections to ensure they are tight and secure. Make sure no wires are exposed.
Turn on Power and Test: Switch the power back on at the circuit breaker and test the doorbell by pressing the button; ensure that the chime rings properly.
Troubleshoot as Needed: If the issue persists, verify all wiring connections, confirm that the transformer is outputting the correct voltage, and refer to the doorbell manual for specific troubleshooting recommendations.
Note: Always consult local electrical codes and standards for specific requirements. If in doubt, seek the help of a licensed electrician to ensure safety and accuracy.
Connecting Wires to the Transformer
Properly connecting the wires to the transformer is essential for ETDOORBELL to work correctly. Follow these steps to establish a firm connection:
Identify Wires: Identify the wires intended for connection to the transformer. Usually, there will be a pair of cables—one line, or hot, and the other, neutral or return path. Double-check the wiring diagram in your doorbell manual to confirm its purpose.
Cut Power: Before touching the wires, switch off the circuit breaker supplying power to the transformer to avoid hazards.
Strip the Wire: Strip about a half-inch of insulation from the ends of the wires, after identifying them, using wire strippers.
Connect to the Terminal of the Transformer: Attach the wire ends to the transformer using stripped wires. Typically, the transformer would have screws labeled for this correspondence. For example, the terminal marked “Input” will accept the wire from the power source, and the terminal marked “Output” will take the wire going to the doorbell system. Ensure you tighten the screws well to prevent any loose connections.
Restore Power and Testing: Switch the circuit breaker on and test the doorbell. Ensure the transformer is supplying the correct voltage to the system, as specified in the manual.
Safety Check Again: Verify all connections for tightness and inspect for any exposed or bare wires. If you conclude there are any, immediately turn off the power and rectify the situation.
Note: Always observe local electrical codes and safety guidelines. Do not hesitate to consult an electrician if you feel uncertain about any step. A transformer, when correctly installed, will serve both you and your doorbell system well for a long time.
Using Screw Terminals Effectively
The screw-type terminal is a secure method for making electrical connections in numerous applications, including doorbells, across a wide range of uses. The best connections occur when one strips about half an inch (12mm) of insulation from wire ends. Twist the bare wire ends tightly to prevent them from fraying since loose ends can weaken the connection or become hazardous. The tightly twisted wire is inserted firmly underneath the screw terminal and further tightened by screwing clockwise until it is firmly clamped down. Do not overtighten, as it may damage the wire or terminal.
Appropriately sized screw terminals must be used for the wire gauge stated in your installation. For instance, 20-gauge wires are a common choice for low-voltage applications, such as doorbells; however, it is essential to check for compatibility with your specific requirements. Moreover, research has shown that consistent torque in connections helps their longevity and reliability. Using a torque screwdriver to apply the specified torque would aid in this regard.
The terminals should be inspected periodically for signs of corrosion or loosening due to age. Corrosion may decrease the effectiveness of the connection, while loose terminals can cause arcing, heating, or system failure. By working in this manner, with all wire connections well-maintained, screw terminals can be an enduring yet effective solution for securing wire connections in your doorbell or other electrical systems.
Testing Your Doorbell System
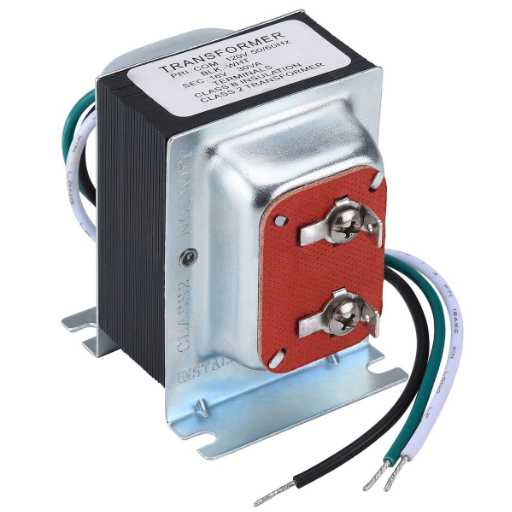
Check by pressing the doorbell button and listening for the chime to test a doorbell system. If no chimes are heard, verify that the doorbell receives power by checking the wiring and ensuring the connections are properly secured. Next, check if the doorbell transformer works by measuring its voltage output using a multimeter. If the transformer and wiring are in good condition, there is likely an issue with the chime unit. Fix or replace any parts as needed to return proper functioning.
Initial Testing Procedures
To troubleshoot a doorbell system, established processes and accurate readings can help track down the root cause. Start by testing whether the doorbell works at all. Press the button several times to ensure it is not stuck or damaged. A doorbell system is a low-voltage system operated at voltages between 16 and 24 volts, depending on the model and its power requirements. Check the voltage across the doorbell button terminals using a multimeter. If you read below the expected voltage, this could suggest a problem with the button or the wiring on its way.
If the button responds correctly, its focus should be shifted to the transformer. Often, they are needed to step down the household voltage of approximately 120 volts AC to the lower voltage required by the doorbell system—a transformer, when in working order, will consistently provide the correct voltage. Using a multimeter would be the best way to measure the input and output voltages of the transformer. Any output that is significantly below the allowed range (for most systems, below 16 volts) serves as a strong indication of the probable failure of the transformer, and hence it will need replacement.
Furthermore, check the wires attached for any visible damage or corrosion, as well as loose connections. Wires that are damaged or frayed may interrupt the current signal, causing intermittent operation. All cables should be securely fastened to their terminals. If optical or wireless components are installed, ensure that they have a power source and remain securely connected to the central bell system.
This is a physical inspection for obstructions or wear in the mechanical components of the chime unit, particularly for mechanical chime systems. Testing should then be performed either on the button, wiring, or transformer. If the problem is not detected there, then the chime unit will be tested. Install or replace defective components to ensure the doorbell system functions properly.
Troubleshooting Common Issues
Having problems with the doorbell system renders any preliminary diagnosis crucial in identifying and resolving a specific issue. Here is an exhaustive guide prepared to help you work through a few of the more common problems:
Doorbell Button Malfunctions: One of the main reasons for doorbell problems is a faulty button. Check whether the doorbell is clogged with dirt or debris, or if it is physically damaged. Its working will be obstructed by wear and tear through the general course of time and weather. Cleaning or replacing the doorbell button usually resolves the problem.
Wiring Issues: Erroneous wiring can disrupt the flow of electricity to the doorbell system. Any break or interruption in the circuit can be tested for by using a multimeter. Repairing torn cables and restoring loose connections may help the system regain its function. Additionally, it is essential to verify that wires are not corroded, as this can lead to intermittent failures.
Transformers Issues: Transformers convert the house voltage to the lower voltage used by doorbell systems. Test the voltage output of the transformer to ensure it meets the requirements of your system (typically 16-24 volts for standard doorbells). If the output voltage is too low or nonexistent, then that is likely the cause, and replacing the transformer will resolve the issue.
Smart Doorbell Connectivity: For wireless or innovative doorbell systems, poor WiFi connectivity may cause alerts to be sent with a delay or may prevent alerts from being sent altogether. Ensure that the doorbell is within range of a strong Wi-Fi signal and has the latest firmware installed. Dual-band routers operating at 2.4 GHz and 5 GHz can also improve connectivity for many modern systems. Studies have shown that performance problems of this nature are usually absent if the signal strength is maintained at or above 70 percent.
Failure of Chime Unit: Mechanical and electronic chimes may develop faults over time. For mechanical chimes, remove the cover and inspect for any dirt, stuck plunger, or worn-out parts. Most of the time, cleaning or replacement will resolve the issue. Electronics may also require a system reset or firmware update to function correctly. Also, confirm that the chime is getting enough power.
Power Supply Interruptions: Ensure the circuit in question is not affected by power interruptions. Test the circuit breaker to confirm it has not tripped, and check the electrical panel to ensure power is reaching the doorbell. In a house older than 20 years, there may be an issue due to outdated wiring systems. Such cases will require assessment by a professional electrician.
Most common problems can be resolved efficiently when you systematically review each part of the doorbell system to confirm it is functioning correctly. This, in turn, will ensure that the system remains reliable and responsive. With regular maintenance and timely replacement of worn-out parts, good performance can be enjoyed.
Ensuring Safe Operation of Your Doorbell
Be careful! Consider the following and stay up to date with modern practices to ensure safe doorbell operation is realized. Proper wire insulation is one of them, since exposed wiring can lead to short circuits or electrical fires. According to the National Fire Protection Association’s record of safety, which lists approximately 51,000 electrical fires that occur in homes every year in the U.S., there is undoubtedly a need to maintain vigilant electrical safety.
In the case of your wireless or smart doorbell, avoid using third-party or low-quality power adapters, as they may cause damage due to overheating or other issues. Often, manufacturers mention the required voltage and amperage on the packaging itself, so be sure to check the user manual for your device in case of doubt. Again, for your Wi-Fi network, ensure it is secure: unauthorized entry into your system could compromise your privacy.
Finally, the doorbell system, including the chime unit and push buttons, should be tested regularly to detect and address any potential issues early. The use of voltage detectors or multimeters can help to check whether there is continuity in the electric flow throughout the system. Staying proactive and adhering to these guidelines shall keep your doorbell working efficiently and safely.
Removing and Replacing the Doorbell Transformer
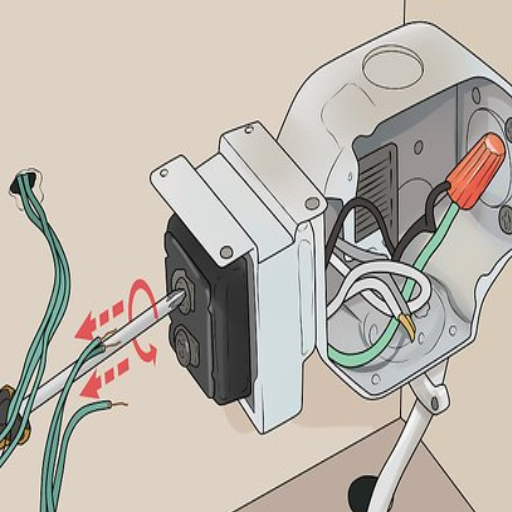
These are instructions one would follow when removing and replacing a doorbell transformer:
Turn Off Power: Locate the disconnect switch for the doorbell transformer and flip it to the off position, ensuring safety.
Locate the Transformer: Typically, the transformer is located near the electrical panel in the basement or the chime unit.
Disconnect Wires: Use the screwdriver to unscrew the screws holding the wires in place. Note down how the wires are arranged so you can put them back later.
Remove the Old Transformer: Now, unscrew the mounting screws or brackets that hold the transformer in place and carefully detach it.
Install the New Transformer: Securely mount the replacement transformer and connect the wires to the correct terminals, as noted earlier.
Restore Power and Test: Reset the circuit breaker to power the circuit back on, and then test the doorbell to ensure it functions properly.
Performing this procedure will enable you to replace your transformer and keep your doorbell system in working condition.
How to Safely Remove the Old Transformer
The transformer removal process: Initially, shut off the power at the circuit breaker to avoid electrical shock. Next, confirm, using a voltage tester, that the transformer has no power running to it. Then, after giving a final check of whether it is safe, the transformer is unscrewed or detached from its mounting bracket, taking care to preserve the adjacent components. Finally, disconnect the wires, making a note of their wiring configuration for the new installation.
Installing a New Doorbell Transformer
The installation of a new doorbell transformer should begin by mounting it to the electrical box or mounting bracket using screws. With it so securely fastened, join the wires coming out of the transformer to the wires of the electrical system. Typically, this involves connecting the black or hot wire of the transformer to the black wire of the house, the white or neutral wire of the transformer to the white wire of the house, and, if present, the ground wire to the grounding screw or ground wire. Wire nuts are then used to secure the connections, and electrical tape provides an extra layer of safety. After connecting the wires, check all the connections one last time to ensure they are tight and well-insulated. When all is set, closing the circuit breaker will restore power. Finally, test the doorbell operation.
Final Checks and Testing After Replacement
After the installation is complete, verify all wiring connections for security and proper insulation, and confirm that they correspond to the specified polarity. Verify that power has been restored at the circuit breaker and that no circuit is overloaded. Inspect the doorbell unit to ensure it is securely fitted and oriented correctly for its intended position.
With the preliminaries over, proceed to test the doorbell by pushing the button to check whether it rings as expected. If the doorbell is part of an intelligent system, follow the manufacturer’s instructions for connecting to the Wi-Fi network and downloading the mobile application. Proceed with checking for software updates to ensure you have the best version. If the system fails to work, perform a few checks on the wiring, power source, and any app settings that may be causing the issue.
Reference Sources
Design and Construction of an Electric Doorbell
Home Clinic: When the Doorbell Doesn’t Work, Here’s How to Fix It
Hacking the House Chapter 2: The Boston VoIP Doorbell
Frequently Asked Questions (FAQs)
How to Wire a Doorbell Transformer Safely?
To wire a doorbell transformer safely, first, ensure that the power is turned off at the circuit breaker. Next, locate your transformer, which usually steps down the voltage for your doorbell. Connect the low-voltage wires from the transformer to the doorbell system according to the manufacturer’s instructions. Ensure all connections are secure and insulated to prevent any electrical hazards.
What Type of Wire Do I Require for My Doorbell?
You typically require low-voltage wire, often referred to as doorbell wire, to connect your doorbell system. This wire is usually 18 gauge and comes in two or four conductors. For a basic setup, two conductors are sufficient; however, if you plan to connect multiple doorbells or additional features, consider using four conductors.
How Do I Install a Doorbell Transformer?
To install a doorbell transformer, first, mount it securely on a wall near a power source, ensuring it is easily accessible. Connect the primary side of the transformer to your electrical supply and the secondary side to your doorbell system using the appropriate low-voltage wire. Ensure that you follow the manufacturer’s instructions for voltage ratings and connections.
Can I Remove an Old Doorbell Transformer?
Yes, you can remove an old doorbell transformer. First, ensure the power is turned off at the circuit breaker. Disconnect the transformer from the electrical supply and remove the low-voltage wires connected to it. It is advisable to label the cables for easy identification when installing a new transformer.
How Do I Test My Doorbell After Wiring?
To test your doorbell after wiring, turn the power back on at the circuit breaker. Press the front push button while listening for the doorbell chime. If the chime does not sound, check all connections to ensure they are secure and correctly wired. If issues persist, inspect the transformer and replace it if necessary.
What Should I Do If My Doorbell is Not Working?
If your doorbell is not working, start by checking the power supply to the transformer. Ensure that the circuit breaker is on and there are no blown fuses. Next, inspect the wiring connections for any loose or damaged wires. If everything appears intact but the doorbell still does not work, you may need to test or replace the doorbell itself or the transformer.
Is It Safe to Wire a Doorbell Transformer Myself?
Wiring a doorbell transformer can be safe if you follow proper electrical safety guidelines. Always turn off the power before starting any electrical work. If you’re unsure about your electrical skills or the installation process, it’s best to consult a licensed electrician to ensure everything is installed safely and correctly.
What Is the Best Location to Install a Doorbell Transformer?
The best location to install a doorbell transformer is in an accessible area near a power source, such as an electrical outlet. It is typically mounted on the wall in a basement, attic, or utility room. Ensure the location is dry and away from excessive heat and moisture to prolong the transformer’s life.