Introduction to RV Electrical Systems
The RV electrical system refers to a collection of parts and components that supply power to all the electrical devices and appliances inside your RV. The system works via two main power sources: the first one is a 12-volt DC (direct current) system powered by batteries, and the second one is a 120-volt AC (alternating current) system receiving power from shore power or a generator. Each of these systems is vital to the proper functioning of the devices, such as lights, outlets, and appliances. Therefore, it is very important to know the two systems and their interaction for safe and efficient management of your RV power consumption.
What is RV Electrical Wiring?
The term RV electrical wiring signifies the network that supplies power and provides all the electrical components with the necessary support in a recreational vehicle. It includes the wiring, circuits, breakers, and connectors that together conduct the 12-volt DC system and the 120-volt AC system. Generally, the 12-volt DC system takes care of lighting, water pumps, and some electronic devices through batteries that are charged in the RV, while the 120-volt AC system transfers high voltage from outside sources such as shore power or a generator, thus allowing the use of bigger appliances such as air conditioners, microwaves, or refrigerators. The right RV electrical wiring guarantees the smooth and reliable functioning of the RV’s systems by minimizing energy losses, providing protection from power surges, and being a key factor in the overall operation of the RV’s systems. It is vital to know the layout, capacity, and maintenance needs of this wiring to avoid electrical failures and to be safe on the road.
Importance of Understanding RV Electrical Basics
The RV electrical systems are not only a set of circuits but a complex system to be understood for the owners’ safety and our proper functionality. It is primarily the know-how about amperage and power capacity that will help to avoid overloads and the resultant fire hazards. Over the years, most RVs have been designed for 30 or 50 amp systems, making it vital that the various appliances used have their energy requirements matched accordingly. The next thing is that the user should be well conversant with power sources, meaning the shore power, generators, and batteries. Thirdly, knowing the basics of converters, inverters, and circuit breakers, etc., will help you not only to identify problems such as tripped breakers or blown fuses but also to complete the task very quickly. Lastly, prompt and periodic maintenance of wiring, connectors, and outlets will keep corrosion, wear, and bad connections at bay, thus ensuring both safety and the equipment’s longevity. When RV owners learn these core electrical principles, their travel gets more enjoyable, while technical risks are reduced.
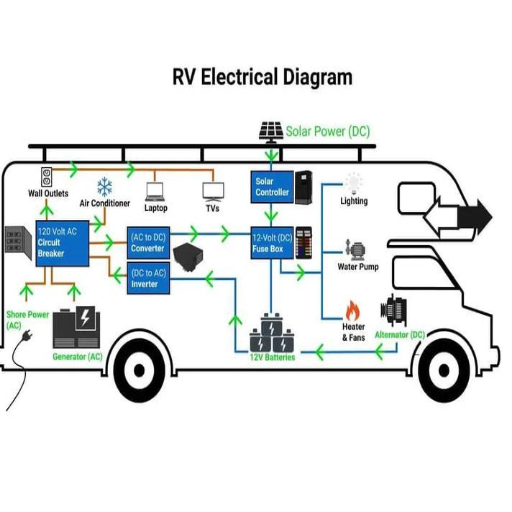
Overview of RV Wiring Diagrams
Understanding RV Wiring Diagrams
RV wiring diagrams represent the basic documents for understanding the electrical arrangement of recreational vehicles. They are a great help for troubleshooting, repairs, and system improvements. These diagrams usually illustrate the 12-volt DC and the 120-volt AC systems together, showing the physical view of the wiring of batteries, power converters, inverters, breaker panels, outlets, and appliances. The 12-volt DC system is mainly used to light up and ventilate the vehicle, besides controlling it and even powering other low-energy items, whereas the 120-volt AC system is intended for high-energy items like air conditioners and microwaves.
The first aspect to look for in RV wiring diagrams is the recognition of the wire colors that are coded; this is the way the connections are standardized (for instance, red for positive and black for ground in DC systems) and the mapping out of circuits for both the coach and chassis systems. It is equally important, however, that the terminals, switches, and fuses are clearly marked so that maintenance can be done more easily and the chances of wrong modifications are minimized. Furthermore, grounding is among the most critical areas that are furnished with the aid of diagrams; having a good ground connection not only secures the system but also eliminates faults.
Lastly, RV wiring diagrams are an indication of the compatibility of your RV with the external equipment, such as solar panels, generators, and extra batteries. Circuit specification in the wiring diagram is of paramount importance when connecting these components, as it helps to maintain system stability and avoid overloading. Taking the trouble to study these diagrams, RV owners can, in turn, become capable of diagnosing electrical faults pretty much right away, installing upgrades, and making sure the power supply is continuous during their trips.
Types of Power Sources for RVs
To accommodate their energy requirements, RVs use a combination of power sources:
Shore Power
Shore power is the connection of the RV to an external power source, the same as that in regular houses, at campgrounds or similar places, and it is usually 120V AC. It is a very stable and reliable choice for the daily needs of the appliance and charging batteries.
Batteries
Batteries for RVs keep power and provide 12V DC power for lighting, water pumping, and other critical systems. Deep-cycle batteries are mostly used because of their ability to give power continuously for long durations.
Solar Panels
Solar energy converts sunlight into electricity for battery charging, thus being an eco-friendly and noiseless energy option. It is especially beneficial for long periods of off-grid camping.
Generators
Generators are available sources of AC power that operate by burning fuel such as gasoline, diesel, or propane. They are very flexible and can even cover areas where there is no electric power supply, but may need fuel and maintenance.
Propane Systems
Propane is the fuel used for a few selected devices like stoves, refrigerators, and water heaters etc. It is a very small and efficient source of energy, making it excellent for off-grid applications.
These power sources allow RV users to choose the option that fits their needs best, whether they are in a full-service campground or a remote area.
DC Power in RVs
DC power, often referred to as direct current, is a key part of the electrical system in RVs and is mainly derived from the batteries installed in the vehicle. This kind of power is what drives the vital 12-volt appliances and systems, including, for example, interior lighting, water pumps, ventilation fans, and some electronics. The batteries used in RVs are mainly divided into two categories: lead-acid and lithium-ion, with lithium-ion having the advantages of higher energy efficiency, longer lifetime, and less maintenance.
Batteries are kept charged to have a continuous supply of DC power through various means, like solar panels, shore power using a converter, or the RV’s engine alternator. Proper energy management is very important when DC power is the only source, as using too much energy without proper recharging can result in battery depletion. Moreover, monitoring systems are usually used to keep an eye on the battery charge levels and to prevent over-discharging, which can lead to irreversible damage. With good maintenance of the batteries and the adoption of energy-efficient practices, RV users will be able to improve their DC power supply, particularly in off-grid situations.
AC Power and Shore Power Connections
In an RV, AC power operates just like in a home, with the same voltage, and it is also the main source for running the electrical appliances, air conditioning, and other power-hungry devices. The primary way of getting AC power is through the connection to shore power, where the RV gets plugged into the external electrical supply that is commonly found in camps or RV parks. A heavy-duty power cord usually makes this connection, and it is of utmost importance to ensure proper compatibility with the amperage of the shore power outlet (which is usually either 30-amp or 50-amp) so as not to cause electrical damage or overloading.
Using RV surge protectors or electrical management systems (EMS) is greatly recommended for safe operation. The devices monitor your RV’s electrical system for voltage irregularities, power surges, or reversed polarity, thereby protecting it from potential hazards. When connecting to shore power, it is important to make sure the circuit breaker at the power pedestal is turned off before plugging in or unplugging your RV to prevent electrical arcing.
In places where shore power is not available, RV users commonly resort to onboard inverter systems that convert DC battery power into AC electricity. Regular inspection and maintenance of shore power connections, including monitoring for frayed cables and replacing plugs, are crucial to obtaining a dependable and safe power supply throughout your trip.
Using Generators for RV Electrical Power
When there is no shore power available, generators are still an option you can count on to power your RV. They can do that by providing AC electricity through the process of mechanical energy being converted to electrical energy, and the common fuels for that are gasoline, propane, or diesel. The generator’s wattage capacity that suits your RV’s requirements is to be chosen if your main goal is to get the most out of the generator. Total power demands, which consist of the wattage of necessary appliances, should be calculated in such a way that you do not exceed the capacity of the generator.
Keeping the generator running means treating it right and taking good care of it. The first step is to place the generator outside in a ventilated area to avoid the dangerous carbon monoxide gas from building up, since it is lethal. A surge protector should also be used as a preventive measure to safeguard your RV’s electrical system against any voltage increases. Besides, if the maintenance gets done regularly, like especially checking oil levels, replacing filters, and inspecting for wear, that plays an important role in prolonging the life and reliability of the generator.
Noise is the major issue for RV users when camping, especially if they are sharing the area with others. If you really care about noise and want to be considerate to others around you, then inverter generators should be your first choice as they are quiet, fuel-efficient, and suitable for sensitive appliances. However, always be attentive to the local generator usage rules, as this will not only ensure you are operating within the limits of camping etiquette but also regulations.
Components of the RV Electrical System
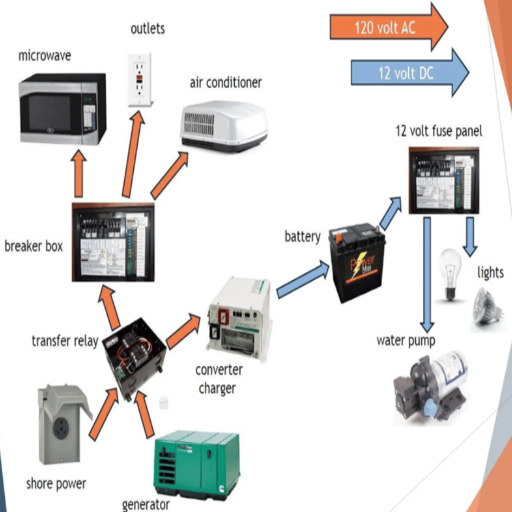
Batteries
RV batteries collect electric energy and are the source of energy for a variety of systems on board the RV, such as lights, water pumps, and appliances. Lead-acid or lithium-ion batteries are the most common types used in RVs.
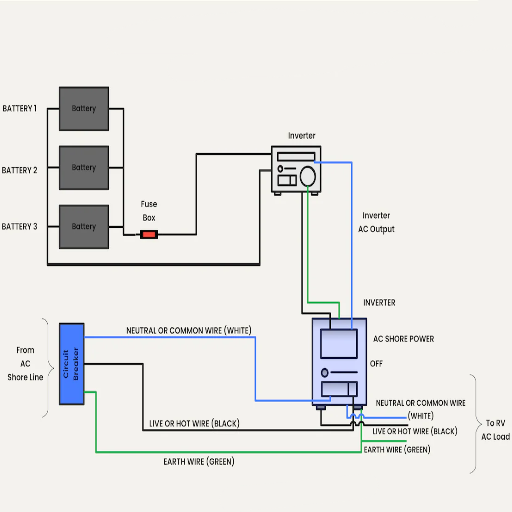
Power Converter
The power converter transformer changes the 120-volt alternating current (AC) from external sources like shore power into 12-volt direct current (DC) for charging the RV’s batteries and powering the DC systems.
Inverter
An inverter does the opposite of a converter and changes 12-volt DC power coming from batteries to 120-volt AC power for use with standard household appliances.
Circuit Breaker Panel and Fuse Box
These elements keep the RV electrical system safe through circuit protection against overloads and short circuits, and the whole system operates safely.
Shore Power Connection
This is an external plug-in point that gets 120-volt AC power from a campground or home outlet directly into the RV’s electrical system.
Generator
A built-in or portable generator can give an independent power source in the case that there is no shore power, thus giving more flexibility and making energy access better.
When RV owners know about these components, they can do so with power management and electrical system maintenance for performance to be consistent.
Understanding Breakers and Circuit Breakers
In an RV’s electrical system, breakers and circuit breakers play a crucial role in safeguarding the system by not allowing it to experience electrical overloads or short circuits. A breaker is a kind of switch that operates automatically and cuts off the electricity when the current exceeds the predetermined safe limit. The latter is prevented by fusing appliances, overheating, and fire hazards. Circuit breakers usually identify the condition of excessive current by either electromagnetic or thermal means and then trip the circuit.
In a motorhome with breaker installation, the individual circuits are guaranteed they operate safely, and among these circuits are the ones powering the outlets, appliances, or the air conditioning unit. Take, for example, the situation where one circuit has a defect; the breaker will then cut that circuit off from the main supply while the other circuits continue to work normally. It is always important to check the breakers regularly so that the ones that are not working and need replacement can be quickly identified. If they are working perfectly, it will boost the efficiency and safety of the electrical system in the motorhome.
Role of Electrical Wires in RV Wiring
Without wires, it would be impossible to have an electrical system in the RV, for they are the main paths for the electrical current to flow through and thus, to power all the different devices and appliances. The wrong wire gauge may lead not only to inefficiency but also to unsafe situations. Inadequate wires may be heated beyond their limits, which would result in either a fire or a breakdown of the whole system. RVs usually have stranded copper wires as the main type of wiring, as they are flexible and able to withstand the vibrations caused by travel, thus reducing the chance of breaking over time.
One more important thing to consider when wiring up an RV is to make sure that the wires have the right insulation. The electrical wires are usually placed in areas where they will be subject to changing temperatures, water, and possible cuts, so insulating them with the best quality material that is very durable would be the only way to ensure that there are no short circuits or electric leaks. The guidelines that have been set by ANSI, NFPA, and FEMA translate particularly for RV wiring systems so as to keep the consistency and safety benchmarks of the whole industry through their control.
Likewise, color-coding of the wires is a common practice to make the positive, negative, and grounding connections visible, which makes troubleshooting and maintenance much easier. Since the wires are put in conduits or looms, this not only saves them from damage but also increases the overall life of the system. By grasping these technicalities, we can be sure that the power system of an RV is quite dependable, thus making the operation efficient according to industry standards.
Importance of Amp Ratings in RV Electrical Systems
The amp rating is a key parameter of the electrical system of an RV since it indicates the maximum current that can be safely drawn through the wire or circuit, or component. The following are some of the ways that adhering to the correct amp ratings prevents overheating, reduces the risk of electrical fires, and keeps vital equipment from being damaged. For instance, the most common electrical hookups for RVs are 30-amp and 50-amp, which are set up according to their power demand and limitations. RV owners have to be careful to limit the consumption of the onboard appliances and devices within the amperage rating of the system, so they don’t overload the circuits. Properly matching the amp ratings with the circuits and components not only assures safety but also improves the reliability and efficiency of the entire electrical system. The selection of the right amp rating can be best done by referring to the manufacturer’s specifications or industry-standard guidelines, ensuring that the safety codes are followed.
RV Wiring for Different Power Sources
The RV wiring for the various power sources should be set up according to the exact specifications of the power source in use. For 30-amp systems, make sure the RV electrical system is capable of carrying a 120-volt circuit with a single hot wire plus neutral and ground configuration. The wiring of the 50-amp systems must come up with a “hot-hot-neutral-ground” wiring for a 240-volt split-phase. Suitable connectors and cables must be employed throughout the system in keeping with its amperage and voltage ratings. Check power compatibility before plugging in, and surge protectors should be used as a safeguard against voltage fluctuations. Inspect and maintain all components regularly to ensure safe and efficient operation.
Wiring for Solar Panels in RVs
The proper installation of solar panels in RVs guarantees maximum energy efficiency and safety. First, choose the right gauge wire according to the system’s voltage and amperage, getting the NEC guidelines as reference. For the connection between the panels, use MC4 connectors with a guarantee of both reliability and resistance to weather conditions. Depending on your energy demand and the compatibility of your solar charge controller, either series or parallel wiring for the solar panels can be adopted: series for higher voltage systems or parallel for power consistency in low-light conditions. A good MPPT (Maximum Power Point Tracking) charge controller is indispensable for managing the energy flow and avoiding battery bank overcharging.
A fuse or circuit breaker should be installed between the charge controller and the battery bank to help safeguard against short circuits. In addition, grounding the system properly will minimize the chances of electric faults occurring. Moreover, all connections ought to be firmly held and frequently inspected so that energy loss or system failure is avoided. In the end, make sure that the inverter is properly wired for conversion of the DC power stored in the battery bank into AC power for RV use while keeping to the amperage and voltage specifications for safety and efficiency.
Connecting Lithium Batteries to RV Electrical Systems
1. What are the reasons for the preference of lithium batteries in RV electrical systems?
Among the current types of batteries, lithium ones like lithium iron phosphate (LiFePO4) take the lead because of their exceptional energy density, very long life span, light weight, and power output that remains stable. Their lifetime is longer than that of traditional lead-acid batteries, and they can be drained to 80-100% without being damaged, thus enabling the utilization of more capacity.
2. What is the correct procedure for charging time for lithium batteries?
For safe and proper lithium battery charging, a charging system that is compatible and can control the voltage and current within the safe limit of about 14.4-14.6V for full charging is required. The use of a lithium-specific charger or the adjustment of RV solar charge controllers and converters to lithium-compatible settings is important to avoid overcharging or undercharging.
3. What is the procedure for integrating lithium batteries into an RV setup?
The best way to integrate is to first check the proper functioning of the battery management system (BMS), as it allows safe and controlled charging and discharging. Depending on the voltage and capacity requirements, connect lithium batteries in series or parallel with the use of wires and connectors rated for the system’s amperage. Install a fuse or breaker between the battery bank and the system to protect against damage in case of a fault.
4. Is the upgrading to lithium batteries going to require more equipment?
Yes, you will likely have to upgrade the charge controller, inverter, and monitoring systems to make them compatible with lithium technology. A lead-acid system that has been replaced with lithium will need precise voltage regulation, so the use of old components may waste power or even cause damage.
5. What are the main wiring and safety factors to consider?
All wiring must be of an adequate size so that the system’s maximum current can flow without causing trouble, as insufficiently sized wires will produce resistance and heat. Be sure to make all connections tight and to avoid having loose terminals. Ground the system so that there are no electrical faults coming from the system, and also, install disconnect switches for cutting off the battery bank during maintenance work or in case of emergencies.
By adopting the guidelines and utilizing good-quality components, lithium batteries can power an RV’s electrical system to be reliable and perform significantly better.
Integrating a 50 Amp Power Supply in RVs
The inclusion of a 50-amp power supply in an RV electrical system significantly boosts the overall electrical system’s capacity to deal with the modern energy demands. A 50-amp service gives a total power capacity of up to 12,000 watts, which is twice as much as the capacity of a 30-amp service. The higher power output is necessary for the simultaneous operation of several high-demand appliances, such as air conditioning, refrigerators, microwaves, and all other electric devices onboard.
A four-wire connection is used in the case of 50-amp service: two 120-volt hot wires, one neutral, and one ground. Each hot wire supplies 120 volts, interfacing circuits in such a way that the load is split across two. This arrangement decreases the chances of overloading and provides a good state of operation for devices that require a lot of power.
It is very important to check first if the RV’s electrical parts are rated for 50 amps before switching to a 50-amp power supply. This includes checking the power cord, breaker panel, and distribution system. Confirm also that the shore power pedestal at the RV parks supports 50-amp service because compatibility is key to preventing equipment damage.
Moreover, the right wire sizes and cable quality are indispensable when it comes to safety and performance. The National Electrical Code (NEC) stipulates the minimum wire gauge for 50-amp circuits, usually recommending 6-gauge wire. Using undersized wires or low-quality connectors may result in overheating, voltage drops, and fire risks. Utilizing a UL-listed 50-amp conversion kit is strongly recommended to guarantee that safety rules are followed.
Lastly, RV owners must ensure their surge protectors work with 50-amp systems so that they can avoid damage due to either voltage spikes or electrical surges. A 50-amp power supply correctly integrated, not only provides reliable energy distribution but also prolongs the RV’s electrical infrastructure’s durability and efficiency.
Common RV Wiring Issues and Solutions
Loose Connections
Loose or poorly connected wires can cause occasional electrical problems or overheating. Check all wiring connections regularly and tighten screws or terminals whenever necessary. Applying dielectric grease on connections will help avoid oxidation.
Overloaded Circuits
When a circuit is overloaded, it means the circuit has been drawn up to or over its maximum amperage capacity, which results in circuit breaker tripping or worst-case scenario-damage. This can be managed by adding up the total amperage of appliances connected to that circuit and distributing them to other circuits accordingly. Sometimes, upgrading the circuit breakers or circuits to a higher capacity may also be an option.
Voltage Drops
Voltage drops are caused by either long cable runs or undersized wiring, resulting in faulty operation of appliances. Make it a point to check that wires conform to the proper gauge for the distance and load, as per the NEC (National Electrical Code) standards.
Faulty Grounding
Inadequate grounding kills, literally, as it is a major safety problem and may end in electrical shock. Check the grounding system with a multi-meter and immediately strengthen or repair the faulty grounding connections.
Worn or Damaged Wiring
Heat, friction, or pests can be the reason for insulation being worn out or damaged, and this is where the temptation to make a short circuit increases. Make it a habit to check and replace old wiring with properly insulated cable monthly to keep the system healthy.
Identifying and fixing these issues will help keep RV wiring systems safe, efficient, and reliable.
Identifying Electrical Problems in RVs
RVs can have electrical issues for different reasons, and it may take a while to identify and fix these problems if one does not follow a systematic approach. But there are some ways to go over the most common RV electrical issues:
- Inspect the Power Source: First, confirm the availability of an external power supply, such as shore power connections or generator outputs. Use a multimeter to check if the voltage levels are okay (about 120V AC for RVs) and look at plugs, outlets, and breakers for any signs of damage or circuits that have been tripped.
- Verify Battery Performance: One of the most common reasons for electrical problems in RVs is weak or dead batteries. With a multimeter, measure the voltage (12.6V DC or higher for fully charged batteries) and check the connections for any corrosion. Recharge or replace batteries as needed.
- Test Fuses and Circuit Breakers: Power may be cut off by blown fuses or tripped breakers. If there is any indication of damage, check the fuse box and breaker panel for loose components and replace defective fuses or reset breakers that have tripped.
- Assess Converter and Inverter Functionality: The power converter and inverter should be functioning properly, as these devices control the flow of electricity by converting AC to DC, then back to AC. Poor performance is commonly noticed through unstable voltage levels or complete power loss of certain appliances.
- Diagnose Faulty Appliances: Sometimes, defective appliances can consume more power than normal or even short circuit. One way to internal the issue is to unplug all the appliances and see which of them is the problem. Do the testing on different circuits or power sources.
A structured way of troubleshooting will soon reveal the actual reason for electrical problems, thus allowing faster resolution and less downtime. Safety is the first thing to consider always, so when inspecting internal systems, disconnect power sources and consider hiring a licensed electrician for complicated issues.
Troubleshooting RV Wiring Diagrams
In troubleshooting RV wiring diagrams, my initial step is to look for differences between the diagram and the actual wiring in the RV. My first action is to examine all connections for any signs of wear, corrosion, or loose fittings since these are the most common causes. After that, I perform continuity and voltage tests using a multimeter at each connection point to confirm that the circuit is working properly. In case of a complete failure, I will carefully follow each wire, step by step, and disconnect components one at a time to isolate the faulty circuit. I always prioritize safety and therefore, turn off the power supply before performing any wiring work. If the issue still cannot be fixed, or the systems are too complicated, I always go for the help of a licensed electrician to avoid further complications.
Preventive Maintenance for RV Electrical Systems
For an RV’s electrical system, it is important to practice preventive maintenance to the fullest. Regularly checked up on, the system will be able to detect faults that could have been less damaging by then. Amongst the first areas to be inspected is the battery since power plants are the most crucial parts of any dual system. Besides the voltage checking, the terminal connectors and lead-acid batteries should be looked into for the presence of sulfation. Proper sulfation prevention is achieved by cleaning and tightening battery terminals to avoid corrosion and, as a result, by keeping the battery properly charged.
Regular Inspection Guidelines
Check each wire for fracture, damage, or loose connection. Give special attention to the frequently used zones like the converter, inverters, and fuse panels. Fix or change any worn-out and uncovered wires as they can easily cause shorts and/or ignite electrical fires. Also, test the outlets and switches and replace damaged components as necessary.
The use of a surge protector is very important when it comes to the safety of the costly electronics in the RV. Check whether there is a surge protector or an electrical management system (EMS) connected to the RV, and it is functioning. The RV’s grounding system connection should be tested regularly, since proper grounding is necessary for safety and performance.
Professional Maintenance Schedule
Finally, set up a yearly check-up with an expert to examine not only the alternator, generator, and solar panels (if installed) but also the shore power connections. When doing maintenance, always adhere to the manufacturer’s recommendations, and maintain a record of all inspections and repairs so that the system’s health can be monitored over time. These active measures will not only reduce the chances of electrical faults but also make RV trips safe and pleasant.
| Maintenance Task | Frequency | Key Actions |
|---|---|---|
| Battery Inspection | Monthly | Check voltage, clean terminals, test for corrosion, and ensure proper charge levels |
| Wire and Connection Check | Quarterly | Inspect for damage, loose connections, wear, and proper insulation |
| Surge Protector Test | Before Each Trip | Verify the functionality of the surge protector or the EMS system |
| Circuit Breaker Inspection | Quarterly | Test all breakers, check for proper operation, and replace faulty units |
| Grounding System Test | Semi-Annually | Verify proper ground connections with a multimeter |
| Professional Inspection | Annually | Comprehensive system check, including alternator, generator, solar panels, and shore power connections |
Safety & Compliance: Understanding your RV’s electrical system is essential for safe and enjoyable travels. Always follow manufacturer guidelines, adhere to electrical codes, and consult with certified technicians when dealing with complex electrical issues. Regular maintenance and proper knowledge will ensure your RV’s electrical system serves you reliably for years to come.
Reference Sources
Underwater Electrical Wire Explosion
Dynamic Wireless Power Transfer System for Electric Vehicles
Analysis of the Design Calculations for Electrical Earthing Systems
Frequently Asked Questions (FAQs)
What is RV Electrical Wiring and How Does it Work?
The RV electrical wiring system is composed of a vast array of electrical cables and connections that provide power to the different devices and systems in a recreational vehicle. The complex network is made up of both AC and DC power parts, which guarantee the proper functioning of the equipment from lighting to cooling. The understanding of the RV electrical system is of prime importance for the Rvers as it will aid them in maintaining and troubleshooting their RVs.
What Are the Key Components of an RV Electrical System?
Batteries, an inverter, a converter, wiring, circuit breakers, and electrical outlets are among the major parts that make up the RV electrical system. Having the batteries, which are usually deep-cycle or lithium batteries, is to store energy; then the inverter comes in to do the reverse, changing the stored DC power into AC for the household appliances. Circuit breakers act as the main line of defense against overloads while draining the power levels safely through the electrical system.
How Do I Connect Shore Power to My RV?
The first step to connect shore power to your RV is to get an RV power cord that fits perfectly into the electrical pedestal at the campground. Always check that the power source corresponds with your RV’s necessities, either 30 amp or 50 amp. After the connection is made, the RV’s electrical system will pull power from the site, thus giving the opportunity to run appliances like the RV air conditioner and vent fans.
What Is the Role of a Circuit Breaker in RV Wiring?
The presence of a circuit breaker in RV wiring contributes a lot as it not only secures the system but also cuts the current flow during short-circuit as well as overloading situations. Whenever there is an influx of current, the circuit breaker pops and halts the power supply in order to protect the electrical parts from burning out. You need to be well-informed about the role of circuit breakers to keep your RV’s electrical power management safe.
Can I Use Solar Power to Charge My RV Batteries?
Absolutely, solar energy is a good source of power for recharging the batteries of your RV. You can either have a solar installation on your RV or set up some solar panels on the ground and connect them to your batteries. Such a setup works great to keep your RV powered up without human intervention, particularly in such hard-to-reach places where power from the shore is not available.
How Do I Read an RV Wiring Diagram?
To read an RV wiring diagram means to know the various symbols representing the different electrical components, such as batteries, inverters, and sockets. It is like a roadmap for these components through the interconnections, showing how you could wire them. A basic understanding of RV electrical basics helps interpret these diagrams effectively.
What Are the Benefits of Upgrading to Lithium Batteries in My RV?
There are a lot of advantages associated with upgrading to lithium batteries, such as they are lightweight, they charge faster, and they have a longer lifespan compared to lead-acid batteries. These batteries can withstand deeper discharges, which makes them suitable for RVers who depend on 12V DC power for long periods. Besides, they act as an efficient power source for the various appliances in your RV.
How Do I Troubleshoot an Electrical Problem in My RV?
Finding out the cause of an electrical problem in an RV requires checking the power source, looking at the circuit breakers, and trying the electrical outlets. First, make certain the RV is hooked up to a good-quality power source like shore power or a generator. If the problems continue, use a multimeter to test for continuity in the wiring and check that all the electrical connections are tight.
What Appliances Can I Run on My RV’s Electrical System?
The electrical systems of many RVs can easily run a variety of appliances such as fridges, microwaves, coffee makers, and air conditioners. The ability to use these devices is based on the power capacity of your RV, whether it is coming from shore power, a generator, or solar panels. Be wise in determining your RV’s power consumption so as not to cause an electrical overload.