At first, wiring a toggle switch might look like a difficult job, but it can be a simple and pleasing project if you follow the correct instructions. No matter if you are upgrading the electrical system of your car, you want to add a new feature to a DIY project, or you are just replacing a faulty switch, knowing the basics of toggle switch wiring is a must. This article will be your guide — step by step — answering all your questions, starting from getting to know the parts of a toggle switch to properly wiring it for maximum performance and safety. In the end, you will be able to do your next electrical project effortlessly and with confidence.
Understanding Toggle Switches
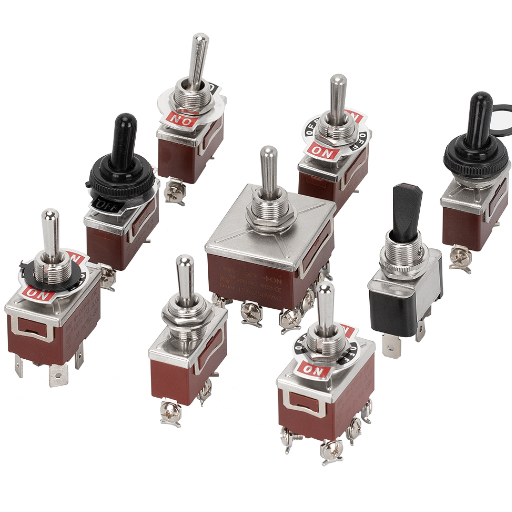
The toggle switch is considered a universal electrical component that controls the flow of current in an electrical circuit. Its operation consists of turning around a lever or knob to open or shut the circuit, thereby switching on or off the device or system. Because of their sturdiness and user-friendliness, toggle switches are found in cars, domestic appliances, and even in electronic projects made by people. The switches can have different configurations, for example, single-pole single-throw (SPST) or double-pole double-throw (DPDT), according to the circuit’s demands. Their simple design is the reason why they are trusted and also widely used for power control.
Types of Toggle Switches
Toggle switches come in different types to meet the needs of various applications. The most frequently used types are:
Single-Pole Single-Throw (SPST)
This switch is the most basic type of toggle switch, which serves as an on/off switch for one circuit only. The connections between two terminals are either made or broken.
Single-Pole Double-Throw (SPDT)
An SPDT switch can connect one input to one of two outputs, thus allowing a simple choice between two circuits.
Double-Pole Single-Throw (DPST)
This switch type operates two independent circuits at once with a single toggle action, hence it is suitable for devices that require multiple circuits to be turned on or off together.
Double-Pole Double-Throw (DPDT)
A DPDT switch represents a combination of two SPDT switches; hence, it allows the control of four different circuits or the changing of circuit polarity.
Momentary Toggle Switches
These switches are made to go back to their original position after being pressed or toggled and can be found in applications such as resetting devices or activating temporary controls.
Key Insight: All the different types of toggle switches are characterized by their unique applications, thus making switchers very versatile in both electronic and mechanical systems.
Common Applications of Toggle Switches
Toggle switches are a very common type of switch used in different industries because they are easy to use and very reliable. Some of their main uses are:
Automobile Systems
Toggle switches are often installed in cars for controlling lights, power windows, and other auxiliary functions. Their capacity to manage different currents and strong construction excellently suits vehicle environments.
Heavy Machinery
Toggle switches are incorporated in many electrical devices and heavy-duty machinery to perform on/off functions or to initiate the process. Their capacity to withstand wear assures performance even in the most extreme conditions.
Power Control of Appliance
Toggle switches are widely used to control power, select modes, or reset in consumer electronics. They offer a no-frills user interface for circuit interaction.
Aerospace and Marine Applications
The high-grade toggle switches are used in aircraft and vessels for the control of lifeblood systems due to their accuracy and resistance to harsh conditions.
Domestic and Lighting
Toggle switches are the most common electrical device employed in houses and offices for light on/off and fan control.
Summary: These adaptable elements are very important to many different devices and systems because they give a long life, high performance, and ease of use in many different applications.
Wiring Basics for Toggle Switches
Wiring up a toggle switch requires great care to be taken so that it can work safely and perfectly. The following are the simple steps to be used:
- Power Off: First off, turn the power off to the circuit and thus prevent any accidents.
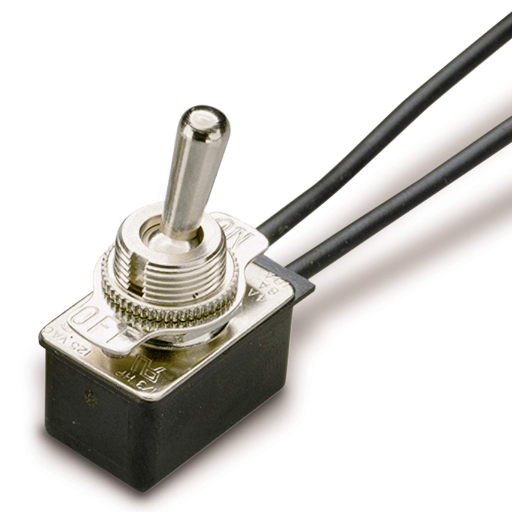
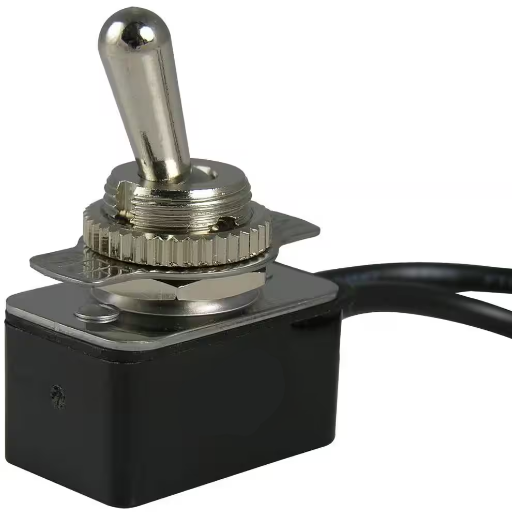
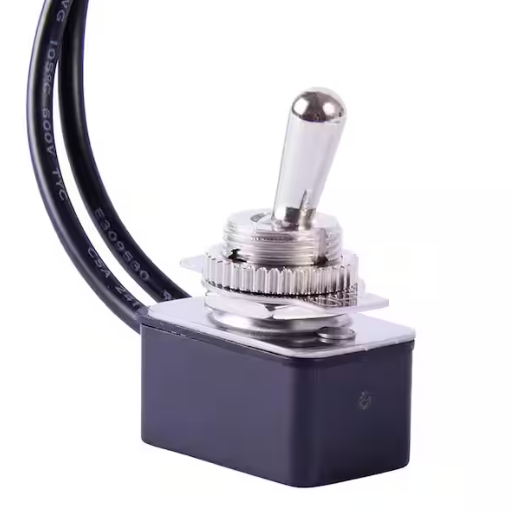
- Identify the Terminals: Switches usually have three terminals—one for the current supplier (source), one for the load, and a ground (in case it is needed). Check the manufacturer’s diagram for the correct identification.
- Wire: Connect the hot wire to the power terminal, while the load wire goes to the load terminal. In case the switch has a ground terminal, connect the ground wire there too.
- Tighten the Connections: A screwdriver will be required to make sure that the terminal screws or connectors are tightened firmly so as to provide stable connections.
- Switch Testing: After installation, power up the circuit and test the switch to ensure that the circuit is working properly.
Important Note: When in doubt about wiring or specific configurations, it is always best to refer to the product manual or consult a professional.
How to Wire a Toggle Switch
A toggle switch that is wired properly not only works but also lives up to standards for electrical safety. Here, we provide you with a comprehensive guide that is current and easy to follow:
- Know the Different Types of Toggle Switches: Toggle switches are available in many different ways, such as SPST (Single Pole Single Throw), SPDT (Single Pole Double Throw), and DPDT (Double Pole Double Throw). A switch’s type must first be identified because the wiring process will be different for each. To avoid confusion, refer to the manufacturer’s diagram that comes with the switch.
- Gather the Required tools and Materials: Get necessary tools like a wire stripper, a screwdriver, a multimeter, and wires of proper gauge. The wires you buy should be compatible with the electrical current rating of the circuit. For instance, 14 or 12 AWG wires are usually employed in residential circuits with corresponding 15-amp or 20-amp ratings, respectively.
- Cut Off Power Supply Safely: Always cut off the power supply at the circuit breaker before you start doing any wiring. Then use a multimeter to check that any current that could cause electrical shock has been eliminated by confirming that the wires are not live.
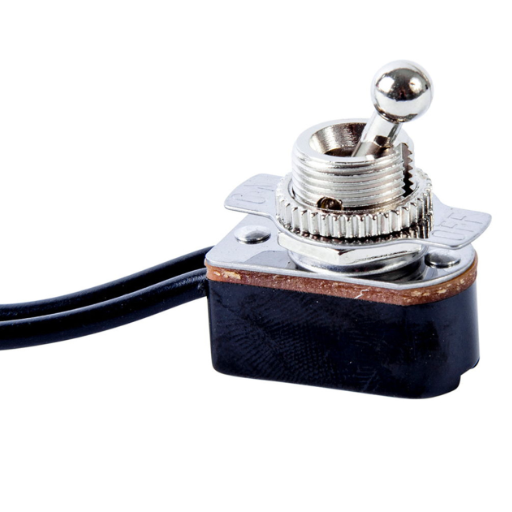
- Recognize the Switch Terminals: Predominantly, toggle switches come with three terminals:
- Power Input Terminal (Common): This is where you connect the live wire from the power source.
- Load Terminal: This connects the device you are controlling, like a light or a motor.
- Ground Terminal: Connect to the earth wire in order to be safe. In some cases, the switch may have a metal case that requires grounding for effective operation.
- Connect Wires to the Toggle Switch: Remove about ¾ inch of insulation from each wire. Join the live wire with the power input terminal and the load wire with the load terminal. Fix the ground wire on the ground terminal or grounding screw. Complete all connections tightly in order not to have loose contact, which may lead to arcing or overheating.
- Testing with a Multimeter: A multimeter will help you check the continuity and polarity of your connections. For SPST switches, toggle the switch to ensure it opens and closes the circuit as it should. For SPDT or DPDT switches, make sure the right terminals are connected for the toggle position according to the switch’s functionality.
- Put the Circuit to Test: After you have wired, switch back on the power and test the switch’s function very carefully. Turn it on and off several times to check if it operates smoothly and to guarantee that the device attached responds well.
- Observe Building Codes and Safety Standards: The wiring task must be in line with the local building rules and safety standards, like the National Electric Code (NEC) in the USA. When you are not sure of any part of the process, it’s best to consult with a licensed electrician.
Success Tip: By performing these actions, you will have a toggle switch installed that not only is safe and reliable but also conforms to modern standards. Proper wiring doesn’t just prevent the system from malfunctioning but also increases the lifespan of your electrical components.
On-Off Toggle Switch Wiring Diagram
An on-off toggle switch is a very simple device that is used to open and close the electrical circuit. The wiring of such a switch is done through a standard and very simple procedure consisting of a few components:
Identifying the Terminals
The majority of toggle switches possess three terminals:
- Common terminal (COM): The main input terminal for electrical power.
- Normally Open terminal (NO): Here, the circuit is connected when the switch is toggled “on.”
- Ground or Negative terminal (optional for LEDs or powered switches): This terminal is for grounding or powering the light inside the switch if it is a powered switch.
Wiring Steps
- The power source (e.g., positive from a battery or supply) is to be connected to the COM terminal.
- The device or load (like a light or motor) is to be attached to the NO terminal.
- If the switch has illumination (LED-lit), the ground wire is to be connected to the ground or negative terminal, depending on the design of the switch.
Best Safety Practices
- Before you start working, always make sure that the power supply is switched off.
- If necessary, use a multimeter to check the connections.
- Secure the wires by soldering or using crimp connectors, and then cover them with heat-shrink tubing to prevent short circuits.
Key Takeaway: By using the above-stated principles, one can wire a toggle switch on and off effectively and make sure that the circuit is operating with reliability. Always refer to the specific product instructions or consult professional resources whenever necessary for additional clarity.
Single Pole vs. Double Pole Wiring
A single-pole switch controls one circuit and commonly has two terminals for connection—one for incoming power and the other for the load. These switches are very often used for just the simple on-off functions, e.g., controlling a light or fan. A double-pole switch, meanwhile, can control two circuits at the same time. It has four terminals for connection—two of them providing current flow in two separate paths. Double-pole switches are usually found in applications that demand higher power levels or when you want to isolate two different circuits, like the case of 240V appliances.
The main difference is in the functionality and application—single pole switches are appropriate for standard, lower-demand loads, while double pole switches allow greater power and more diverse applications for higher-demand or dual-circuit situations. When dealing with either type of switch, it is best to check the wiring diagram and follow the safety requirements.
Installing a Toggle Switch
- Power Off: Find the circuit breaker that controls the power going to the switch and then turn it off for safety reasons.
- Take Out the Old Switch (if needed): Take off the cover plate by removing the screws, and then take off the switch by removing the screws. Disconnect the wires with lots of care.
- Wires Preparation: Make certain that the wires are completely exposed and their condition is good. If it’s necessary, strip half an inch of insulation off.
- Wires Connection To The New Toggle Switch: Connect the wires according to the toggle switch’s wiring diagram. In general, the black or red wires go to the terminals, and the green or naked wire goes to the ground terminal.
- Switch Tightening: Push the wires back into the electrical box, place the switch, and then secure it with screws.
- Cover Plate Reattachment: Put the cover plate over the switch, and then screw it into place.
- Power On and Switch Test: Switch on the circuit breaker to restore the power and check the switch for proper operation.
Important Reminder: Always follow local electrical regulations and call a professional if you have any doubts about the installation process.
Tools Needed for Installation
Screwdrivers
A flathead and Phillips screwdriver are necessary tools for removing and attaching screws.
Wire Strippers
They are also used for cutting and stripping the insulation off the electrical wires.
Voltage Tester
A voltage tester guarantees that there is no current in the wires before the working process starts.
Pliers
These are the tools that can be used for wire bending and making connections tight.
Electrical Tape
Electrical tape is the tool for insulating wires and ensuring safety.
Utility Knife
Estimated for cutting or trimming wires, insulation, or the cover plate as per requirement.
Drill (Optional)
A drill might be used for modifications if the wall box or cover plate needs to be changed.
Pro Tip: The availability of these tools will not only speed up the process but also increase the safety and precision of the installation.
Step-by-Step Installation Guide
- Turn off the power: Before beginning the installation process, switch off the circuit breaker at the source to avoid any hazard. After that, with the help of a voltage tester, check the wires for no voltage.
- Remove the old device: Take off the cover plate by loosening its screws, and release the device from the wall box by unscrewing it. Very carefully pull it out so that the wires are accessible for inspection.
- Inspect the wiring: Assess the wiring that is present already; look for any signs of damage or old age. Also, check if the wires are properly stripped and clean enough for connection; if not, then re-stripping and cleaning will be the first step.
- Connect the wires: The wires from your new device should be connected to the same color wires in the wall box—routine black (live), white (neutral), and green or bare (ground). The use of wire connectors to secure the connections is recommended.
- Attach the device: Carefully push the wires back into the wall box and mount the new device, then screw it in place. It should be very secure after this step.
- Install the cover plate: Position and screw the cover plate onto the mounted device,making sure that it is level with the wall.
- Restore power and test: Power up the circuit breaker again and check the new device to see if it operates correctly, thus confirming proper installation.
Success Note: If these steps are followed, the device can be installed securely and in a timely manner while the risk of problems is greatly reduced.
Safety Precautions During Installation
Critical Safety Measures
Electrical devices must always be handled considering their safety aspect primarily. There are some necessary safety measures to stick to:
- Power Off: Electrical work should never be started without the power being turned off from the circuit breaker. Use a voltage tester to confirm that the circuit is not live.
- Proper Tools and Equipment: Using insulated tools that are specifically designed for electrical work will minimize the chance of electric shock.
- Protective Gear: Wearing rubber gloves and safety goggles will protect you from shocks or debris in case of accidents.
- Check for Damaged Wires: Look for damaged wires and, upon finding any, replace them, and thus avoid the fires or shocks.
- Wet Conditions: Reducing the risk of electrocution, work with no electricity in wet or moist areas.
- Manufacturer Instructions: Follow the manufacturer’s directions to the letter in order to avoid mistakes in the handling or malfunction of the device.
- Know When to Call a Professional: If the electrical connections or troubleshooting confuse you, consult an expert electrician to avoid accidents.
Bottom Line: The adoption of these safety measures guarantees not only a safer installation process but also the safety of the installer against the sources of danger.
Advanced Toggle Switch Configurations
With advanced toggle switch configurations, it is possible to exercise more control and have more flexibility over the electrical circuits. Some of the most common arrangements are as follows:
Three-Way Switch Configuration
This arrangement allows adjusting a light or a device from two different places. It is perfect for large rooms or corridors.
Four-Way Switch Configuration
Along with three-way switches, a four-way switch can be used to control a single device from three or more places, thus adding convenience in intricate layouts.
Double Pole Switch
This setup is for circuits that need to operate two independent loads or systems with higher voltage. The switch provides isolation while at the same time ensuring safety.
Dimmer Switch Integration
A dimmer can be added to a toggle switch for varying light intensity. Make sure that the dimmer is compatible with the type of bulb that you are using.
Important Note: When planning or carrying out the installation of complex configurations, it is important to follow the wiring diagrams to the letter and to adhere to the standards of electrical safety practices. Call a professional if necessary.
3 Way Toggle Switch Wiring
A 3-way toggle switch provides the convenience of controlling one light or device from two different places, which is the main reason it is found in areas such as hallways or staircases. The major components necessary to set up this type of system are two 3-way switches, traveller cables, and the light fitting.
Comprehend the Parts
- A typical 3-way switch features three terminals: one common (usually colored darker) and two travelers.
- The light bulb is linked to the common of the second switch, while the main power is connected to the common of the first switch.
Process of Wiring
- Power source (live wire) goes to the common of the first switch.
- Install two traveler wires across the traveler terminals of both switches.
- The second switch’s common terminal is linked to the lamp.
- The power source’s neutral wire connects straight to the lamp, and the ground wires are attached to all parts.
Safety Precautions
- Before you start, switch off the power supply at the circuit breaker.
- Only use tools and materials that are designed for the respective electrical load.
- Adhere to the local electrical codes and standards.
Final Advice: Though it may seem intricate, the practice is made easier through the use of a wiring diagram. For questioning, seek an electric technician or refer to the manufacturer’s instructions for your switches and fixtures. Safe and proper installation is the key to achieving the operation of the toggle 3-way switch system.
LED Toggle Switch Wiring
Wiring an LED toggle switch needs to be done with great care so as not to endanger safety or the switch’s proper working condition. Here is how to wire an LED toggle switch step by step:
Understand the Terminals
Generally, there are three terminals in an LED toggle switch – power (input), accessory (output), and ground. The power terminal is connected to the battery or power source. The accessory terminal is connected to the device you want to operate. The ground terminal guarantees proper circuit grounding.
Prepare the Wires
- The wires should be of the same voltage and current rating as those of your switch and the device connected to it.
- The ends of the wires should be stripped correctly to guarantee a strong connection.
Connect the Power Source
The positive wire from the power source (e.g., vehicle battery) should be connected to the power input terminal of the switch. An inline fuse should be included for circuit protection.
Connect the Load/Accessory
The positive wire from the accessory (e.g., LED lights or another device) should be attached to the output terminal of the switch.
Ground the Circuit
The ground terminal of the LED toggle switch should be connected to a proper ground point (e.g., vehicle chassis or negative battery terminal). This will make certain that the LED light in the switch works correctly.
Test the Setup
Before final installation, switch test to know if everything works as expected. If the LED does not light up or the accessory does not work, check your connections again.
Tips for Success
- Always remove the power source before you start the wiring of the switch so as to prevent electric shocks or damage.
- Proper connectors and heat shrink tubing should be used to make the connections secure and insulated.
- Refer to the wiring diagram that comes with the LED toggle switch for specific instructions from the manufacturer.
Professional Insight: The proper installation of an LED toggle switch improves the system not only by its functionality but also by its professional look. In cases of uncertainty, hire professional electricians or technicians to set up the installation safely and efficiently.
Choosing the Right Type of Toggle Switch
Choosing a toggle switch is all about your particular application and its associated needs. To start off, you need to take electrical specifications like the voltage and current ratings into account to make sure that the switch is compatible with your system. After that, you should identify the switch type: momentary, maintained, or a combination to correspond to the intended use. Material and build quality are necessary, with metal switches being the most durable for heavy-duty applications, while plastic options are the least expensive and are the most widely used for general use. Besides that, you should check the environmental conditions that the toggle switch is going to be exposed to; if it is going to be placed outdoors or in a moisture-prone location, then go for weatherproof or sealed switches. At last, however, aesthetic and lighting features like illuminated switches can make a difference in the functionality and design of applications like automotive, marine, or household. Giving priority to these things will make sure that you will get a toggle switch that is reliable, efficient, and specially tailored to your needs.
Purchasing a Toggle Switch
The first thing you should do is to determine your specific requirements, such as the type of circuit it will control and the necessary voltage or current ratings, when buying a toggle switch. Then, look for trustworthy brands or manufacturers that are recognized for their quality and longevity to ensure that you will be purchasing a switch that lasts long and is of high quality. Make sure the toggle switch matches your setup and is suitable for the environment where it is going to be used, for example, indoor or outdoor. Also, consider any extra features that might be needed, such as illuminated switches for visibility. It is always a good practice to compare options to get the best combination of features, durability, and price.
Factors to Consider When Buying
When you buy a toggle switch, first and foremost, you must recognize the exact application it will be controlling. This will enable you to find out the right voltage, current ratings, and the type of switch you need, e.g., single-pole or double-pole. If you want, a reliable brand or manufacturer that produces durable and high-quality switches so that the performance will be long-term. Further, the environment where the toggle switch will be used should also be taken into account. For example, select weatherproof or waterproof models if the application is outdoor.
Besides, illuminated switches for better visibility in low-light conditions or locking switches for added safety could be considered as additional features that might improve functionality. Also, it is necessary to check product specifications with the requirements of your equipment so as not to encounter compatibility issues. Then, make a comparison of the options in terms of price, durability, and customer reviews, which will subsequently guide you towards making a well-informed decision. This will guarantee that you will get a toggle switch that perfectly fits your requirements without sacrificing quality or reliability.
Top Brands and Where to Buy
Recommended Brands
For toggle switches, the best brands that I can suggest are Honeywell, Eaton, and Carling Technologies, all of which are reliable. These companies are recognized for their high standards, longevity, and modern design.
Where to Purchase
As far as buying is concerned, I usually find it easy to buy online through sites like Amazon, Digi-Key, and Mouser Electronics, since they have a variety of products and customer reviews. Furthermore, local hardware stores or specialized electronics suppliers may also be good options if you want to examine the product physically before making a purchase.
Key Takeaways: Mastering Toggle Switch Wiring
- Understanding Toggle Switches: Toggle switches are versatile electrical components that control current flow through simple lever or knob operation, making them ideal for automotive, household, and electronic applications.
- Switch Type Selection: Different types (SPST, SPDT, DPST, DPDT, and momentary) serve specific purposes, so choosing the right configuration is essential for your circuit requirements.
- Safety First: Always turn off power at the circuit breaker, use a voltage tester to confirm no current, and wear protective gear before beginning any electrical work.
- Proper Wiring Technique: Identify terminals correctly (power input, load, and ground), strip wires properly (about ¾ inch), and ensure tight connections to prevent arcing or overheating.
- Essential Tools: Equip yourself with screwdrivers, wire strippers, voltage tester, pliers, electrical tape, and a multimeter for safe and efficient installation.
- Testing is Critical: Use a multimeter to verify continuity and polarity before final installation, and test the switch multiple times after installation to ensure smooth operation.
- Advanced Configurations: Three-way and four-way switch setups allow control from multiple locations, while double-pole switches handle higher voltage applications safely.
- LED Toggle Switches: Require proper grounding and inline fuse protection, with special attention to power input, accessory output, and ground terminal connections.
- Building Code Compliance: All wiring must conform to local electrical codes and safety standards such as the National Electric Code (NEC) in the USA.
- Quality Matters: Choose reputable brands like Honeywell, Eaton, or Carling Technologies, and consider environmental factors, voltage ratings, and additional features when purchasing.
- Professional Consultation: When in doubt about wiring configurations, complex setups, or troubleshooting, always consult a licensed electrician to ensure safety and compliance.
- Regular Maintenance: Inspect toggle switches periodically for wear, loose connections, or damage to maintain optimal performance and prevent electrical hazards.
Final Recommendations
Wiring a toggle switch is a manageable project that combines technical knowledge with careful attention to safety protocols. Whether you’re working on a simple on-off switch or a complex three-way configuration, the fundamental principles remain the same: understand your switch type, use proper tools, follow safety precautions, and test thoroughly before final installation. The key to success lies in patient preparation, methodical execution, and never compromising on safety standards.
Remember that electrical work demands respect and caution. While this guide provides comprehensive instructions for toggle switch wiring, there’s no substitute for hands-on experience and professional training. Start with simpler projects to build confidence, and don’t hesitate to seek professional assistance for complex installations or when working with high-voltage systems. By following the guidelines outlined in this article and maintaining a safety-first approach, you’ll be well-equipped to handle your toggle switch wiring projects with confidence and competence. Your commitment to proper technique and safety will ensure reliable, long-lasting electrical installations that serve your needs for years to come.
Reference Sources
Frequently Asked Questions (FAQs)
What types of online retail pallets are there for sale?
Online retail pallets come in a variety of forms, like liquidation ones, wholesale liquidation ones, and overstock ones. Each kind has different goods that vary from luxurious to simply surplus. Buyers can select what suits them the best, be it for themselves or for resale purposes.
How do I buy liquidation inventory online?
Liquidation inventory can be purchased online by going to the websites of auction houses that sell pallets and truckloads of merchandise. Several platforms offer manifests where you can see the items that are in each pallet, so you can decide wisely before making a purchase. Trustworthy sellers are the best place to go for ensuring the items are of good quality.
What is the usual delivery choice for pallets purchased?
Palets’ delivery choices mostly depend on the vendor and the receiver’s location. Shipping straight away to your warehouse or business location is the most common delivery method offered by online retailers. A few of them might provide buyers with a range of delivery options, such as local pickup or scheduled delivery, which would make it more convenient for the buyers to get their pallets.
Are there any high-value items in wholesale liquidation pallets?
Certainly, wholesale liquidation pallets can have high-value items such as electronics, famous-brand products, and other attractive ones. The buyers are always on the lookout for these pallets because of the possibility of selling them at a better price. It would be wise to look at the manifest to get a rough idea of the value of the items included before you buy.
What does the term manifest mean in relation to online retail pallets?
Manifest is a term meaning the list of items that are part of a pallet or truckload. It gives detailed information on each product, including quantities and sometimes the retail price. The buyers must review the manifest as it is a very important step in deciding the profitability of the liquidation inventory they are considering buying.
What should I take into account while buying pallets for resale?
When buying pallets for resale, it is recommended that you consider such things as what kind of inventory, the state of the goods, possible resale price, and the vendor’s credibility. It is always good to be aware of the market trends and demand for particular products to make the most of your investments.
Where can I locate online auctions for liquidation pallets?
Liquidation pallets online auctioning can be found on different sites that cater to wholesale and liquidation sales. Websites like Liquidation.com, B-Stock, and other auction sites frequently have pallets that are accompanied by a lot of information, thus making it possible for buyers to place bids on those lots that meet their business needs.
What are the advantages of purchasing excess inventory pallets?
The main advantages of buying excess inventory pallets are, first, that you would be able to get hold of a new range of products at fairly lower prices; second, that when reselling, you will make such a huge profit margin that it would feel like you were selling without any cost; and the third, simply the ability to add more variety to your product lines. For the resellers, this can be a really good opportunity since they will be able to get a wider range of products without incurring a lot of money.