








Installing an electric dryer cable is what most would consider a challenging task, but with the right knowledge and fitting help, it is a simple one that anyone can accomplish. Whether replacing an old appliance, moving into a new home, or setting up a laundry room for the first time, knowing how to properly install your dryer cord is a must for safety and performance. This article will explain all the steps required in great detail but in straightforward, easy-to-understand language, building your confidence every step of the way. By the time you are done reading this article, you will possess the tools and know-how required to make sure your dryer cord is hooked up tight so your appliance can run smoothly. So, let’s begin!
Understanding Dryer Cords
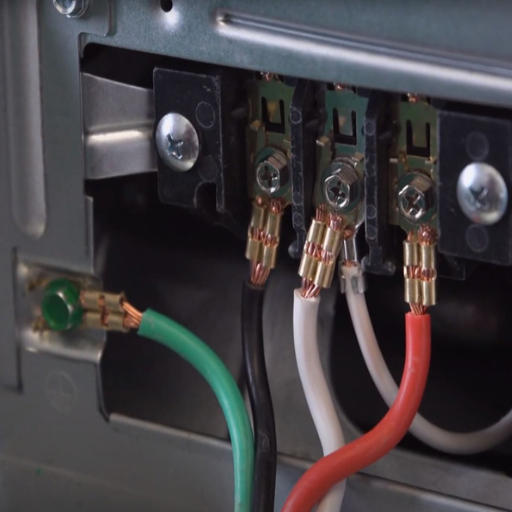
A dryer cord is the line that feeds power for the operation of your dryer from your home’s electrical circuit. There are two main types of dryer cords-wall and floor. The difference here lies in the grounding: 4-prong dryer cords are the latest and safest, containing a separate ground wire to reduce shock hazards. Before buying a cord, check whether your dryer and the wall outlet will accept a 3-prong or 4-prong connection for compatibility and safety reasons. It would help if you always took care of dryer cords and ensured their good connection, lest electrical problems arise.
Types of Dryer Cords: 3-Prong vs 4-Prong
| Feature | 3-Prong Cord | 4-Prong Cord |
|---|---|---|
| Wire Configuration | Two hot wires + one neutral wire | Two hot wires + one neutral + one ground wire |
| Grounding Method | Neutral wire doubles as ground | Separate dedicated ground wire |
| Safety Level | Older standard with shared pathway | Safer with separate ground pathway |
| Code Compliance | Pre-1996 installations | Standard since 1996 |
| Shock Risk | Higher due to shared neutral/ground | Lower due to separate ground wire |
Regarding dryer cords, the main charging factor that everyone often questions is: What about grounding? The reason is interesting. A 3-prong cord has two hot wires and one neutral wire, wherein the neutral is also the ground. Being older, it inherently offers the threat of electrical shock since the pathway for ground and neutral is shared. A 4-pronged cord, on the other hand, has two hot wires, one neutral, and a separate ground wire design for reduced shock hazard, which became the standard design from 1996 onward for better safety.
Important: Start by checking what kind of outlet your home has and what kind of socket fits the dryer. If you have a 3-prong outlet, use a 3-prong cord; if you have a 4-prong outlet, use a 4-prong cord. If your setup supports the safety upgrade, consider converting the 3-prong outlet to a 4-prong outlet and getting a matching cord. Always follow the manufacturer’s instructions when installing dryer cords or seek the help of a licensed electrician to ensure code compliance in your location.
Components of a Dryer Cord
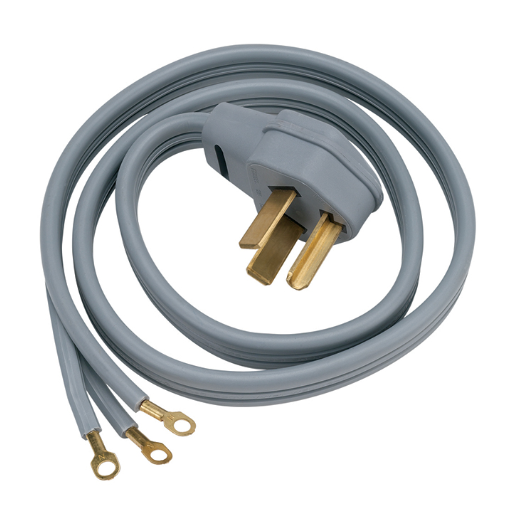
A drying-machine cord normally contains three or four principal constituents, depending on the outlet kind. The Three-Prong cords, comprised of two hot wires and one neutral wire. The Four-Prong cords contain one additional wire, which is the ground wire for safety purposes. The prongs on a cord are deliberately designed to fit their corresponding outlet type and allow electrical flow of the correct sort. The other end of the cord will terminate with either ring terminals or bare wire ends that will connect to the dryer’s terminal block. When selecting a dryer cord, one must keep in mind the outlet type and dryer compatibility. All instructions for installation must be adhered to for safety.
Importance of Proper Cord Installation
A drying unit needs to have cords installed safely for the very functions of drying. Thus, if the cord is improperly installed, it would become an electrical hazard due to a short circuit, overheating, or fire. High resistance or loose connections at the terminal block might cause arcing, leading to intermittent flow of current, and would severely damage the dryer or anything around. Choosing a cord that matches your dryer and outlet by either a 3-prong or 4-prong configuration is the currently accepted method in the modern electrical code and minimizes the risk associated with a hazardous older connection. Always observe the manufacturer’s installation instructions; if unsure, consult an electrician so that your appliance will be safe and last a lifetime.
Preparing for Installation

The parameters of the space must be ascertained before installing the dryer. Check if the place is level, well-ventilated, and located close to the electrical outlet and the vent connection. Check the configuration of the dryer power cord with respect to the outlet type used in the house (either 3-prong or 4-prong). Ensure that the vent system is cleaned of any obstruction and is correctly sized to down the path of airflow while maximizing its efficiency. All tools and equipment for installation should be gathered before installation; these might include screwdrivers, wrenches, leveling tools, etc. Next, get the instruction manual of the manufacturer to refer to in the process.
Tools and Materials Needed
Diagnostically, to properly install a dryer, you will need the following tools and materials.
Tools Required
- Screwdriver (both Phillips and flathead)
- Adjustable wrench
- Pliers
- Level
- Utility knife
- Drill bits (if vent installation required)
Materials Required
- Power cord (3-prong or 4-prong)
- Dryer vent kit (including vent hose and clamps)
- Duct tape or aluminum foil tape
- Vent hood
- Screws or wall anchors
- Cleaning supplies for vent system
Be sure to consult the manufacturer’s installation manual for any special requirements for that specific dryer, and double-check that these tools and materials match your particular model.
Safety Precautions Before You Start
Critical Safety Requirements
Prioritize safety before commencing with installation work: prevent hazards and accidents, or damage. Start by unplugging the dryer and turning off the circuit breaker to ensure no electrical current runs through the machine. For gas-powered dryers, turn off the gas supply valve to lessen the chances of getting leaks.
Pre-Installation Safety Checklist
- Clear off the floor so that there are no obstacles in your work area
- Make sure that the vent path is free of lint and debris
- Use proper tools and wear protective gloves when dealing with sharp ducts
- Use a stud finder to check for hidden electrical wires or pipes before drilling
- Ensure vent system guarantees a straight and unobstructed way leading outside
- Verify air-tight sealing of conjoined duct parts
- Conform to all local building codes and regulations
Fire Safety Note: According to recent figures produced by fire safety experts, lint accumulation stands as an eminent cause of fires associated with dryers within thousands of those reports made every year. Proper cleaning of the venting system reduces those hazards and gives the dryer the potential to dry faster.
Assessing Your Dryer’s Electrical Requirements
Your best bet would be to understand all dryers’ electrical requirements for correct installation and smooth operation. Most of the electric dryers in the U. S. are installed on a 240-volt circuit, while gas dryers may require a standard 120-volt outlet. Verify from the specifications recommended by the manufacturer, as provided in the product manual.
Electrical Requirements Assessment
- Installation for electric dryers usually calls for a dedicated 30-amp circuit breaker
- Electrical outlets must conform to the disposition of the dryer’s power cord plugs, generally either of 3-prong or 4-prong varieties
- Since newer building codes require the safer 4-prong outlet, verify compatibility or hire an electrician to do the upgrade if necessary
- Besides the 120-volt outlet, a gas dryer requires the installation of a suitable gas connection
- Make sure that there is a secure gas shut-off valve directly beside the dryer location for safety and maintenance
- Flexible stainless steel gas lines are ideal for installation since they provide durability and ease of alignment
Grounding Safety: Also, checking if your connections are grounded is important. If not grounded properly, it may cause hazards, so ensure that it follows safety standards according to the National Electrical Code (NEC). This attention to detail protects your appliances, yet also reduces the risks for your family.
Step-by-Step Installation Process
Prepare the Site
1Make sure that the location is clean and level, with no impediments. The electrical outlet and gas line (if any) should be accessible, placed, and within specifications.
Connect the Vent Hose
2Make sure that the vent hose is attached to the dryer exhaust outlet securely with a hose clamp. The other end of the vent hose should be vented outside to prevent the accumulation of lint inside.
Secure the Electrical Connection
3Plug in the power cord for the electric dryers. If there is a specific power cord needed (3-prong or 4-prong), install it properly as per the instructions given in the manual.
Connect the Gas Line (For Gas Dryers Only)
4If a gas dryer is being installed, then connect the gas line to the dryer’s gas input. Tighten the connection using a wrench, and test for leaks using a solution of soapy water.
Level the Dryer
5Level the dryer. This will give it a bit of stability on its feet, keeping vibrations down. Use a spirit level if necessary.
Dryer Test
6Once after power supply is connected, run a test cycle to confirm the perfect operation of the dryer. Check if the drum rotates, the venting works well, and does not emit any peculiar and unwanted sounds.
Ensure the dryer is installed safely and correctly by following these steps so that it can operate efficiently. Always check with the manufacturer’s manual for technical guidance pertaining to your model.
Detailed Cord Installation Instructions
Removing the Old Cord
Steps for Safely Removing the Older Dryer Cord:
- Power Off: Make sure the dryer is unplugged or the power is turned off from the circuit breaker to prevent any electrical hazards.
- Accessing the Terminal Block: On the rear side of the dryer, there is an access panel; it covers the terminal block. Unscrew and take out the panel, opening the way to the connections.
- Disconnect the Wire Connections: Use your screwdriver to loosen the screws of the wire connectors at the terminal block. Usually, there will be three wires (hot, neutral, and ground) if it is a 3-prong cord or four wires with a 4-prong cord. Observe their position before disconnecting them.
- Removal of the Cord: Search for a strain relief clamp holding the cord. Remove the clamp and gently pull out the old cord from the dryer.
Install the new cord once the old one is removed. Always take the necessary safety precautions and refer to your dryer user manual for any product-specific instructions.
Installing the New 4-Prong Dryer Cord
- Prepare the New Cord: Take the new 4-prong dryer cord out of the box, and get an overview of its wires. The general color coding for the wires is green for ground, two hots- black and red, and white for neutral.
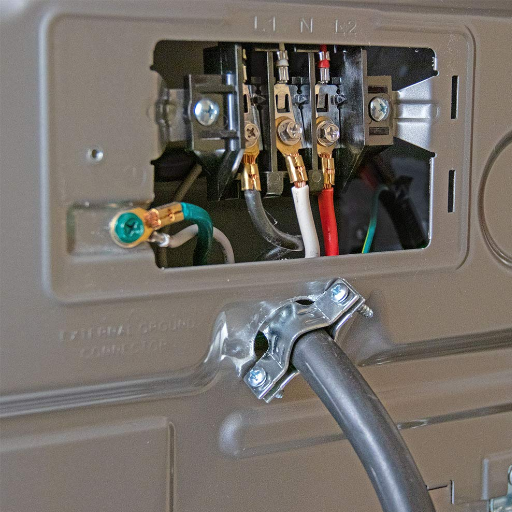
- Attach the Wires: Locate the terminal block on the dryer. Position the wires as follows: Green (Ground Wire): Attach to the green grounding screw or grounding terminal, usually on the frame of the dryer. Black and Red (Hot Wires): Attach these to the outer terminals of the terminal block. White (Neutral Wire): Attach to the center terminal of the terminal block.
- Mount the Strain Relief Clamp: The strain relief clamp will be installed around the cord where it comes into the dryer chassis, in order to relieve stress from connections. It must be tightened firmly, but not so hard as to crush the cord.
- Double-Checking the Connections: Make sure that the wires are tightly fastened and that no wires are touching one another. The connections must be cross-checked with the manufacturer’s manual.
- Testing: Next, plug the dryer in and run a short cycle to ensure the cord is properly installed and that the dryer actually works. If there is an issue, unplug the dryer and make sure your connections are properly made.
Installation Safety Reminder
Always install the dryer with safety first. Use insulated tools and make sure the dryer is unplugged while installing. Use your appliance manual to check for specific model requirements.
Connecting the Dryer to the Electrical Outlet
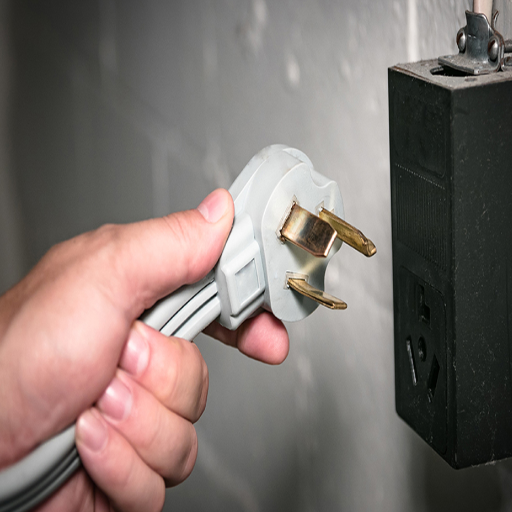
First things first, attach the dryer to the outlet after ensuring you are using the power cord that fits your dryer and power supply (3-prong versus 4-prong plug). Find the outlet in the vicinity of your installation area, and make sure it follows the voltage and amp specifications given in your dryer’s manual. Plug in one end of the power cord firmly into the outlet with a secure connection. Some mismatches may call for hiring an electrician.
To test for proper operations, turn on the dryer for a brief cycle. If the dryer fails to start or begins irregularly, unplug it immediately and check your power connections. In terms of safety, go through the manual, and to ensure installation suitability, stick to your local electrical codes.
Common Issues and Troubleshooting
Initial Troubleshooting Steps
Check the Power Supply
Make sure the dryer is hooked up properly and that the outlet is working. Plug in a different device to test the electrical socket.
Inspect the Door Switch
If the door is not fully closed or if the door switch malfunctions, the dryer will not initiate operation. Double-check that the door is firmly latched.
Examine the Circuit Breaker
Make sure the breaker hasn’t tripped. Reset it, if so.
Look at the User Manual
If all of the above fail, refer to the user manual for other ways of troubleshooting or seek services from a professional technician.
What to Do if Your Dryer Won’t Start
If the dryer does not start, follow these steps in order of diagnosis to possibly repair it:
- Power Supply Check: Confirm that the dryer is properly plugged into an outlet that is functioning. If you have another device available, try it with the same outlet to verify, or just use a multimeter. It may require resetting a circuit breaker or replacing a blown fuse.
- Door Switch Check: The dryer will simply not start if the door switch is damaged or otherwise misaligned. Usually, you should hear a click when closing the dryer door. If you don’t hear this clicking noise or the machine still will not start, then the switch is probably the one that needs to be replaced.
- Start Button Check: Press the start button firmly. If nothing happens on the dryer end, chances are a malfunctioning button. With a multimeter, you can check the continuity of the button to see if it still acts.
- Thermal Fuse Check: If the thermal fuse is blown, it will also prevent the dryer from starting. Locate it (it is usually found near the blower housing), and continuity test. If it is blown, replace the thermal fuse and investigate the cause of its failure to avoid recurrence.
- Checking the Drive Motor: Motor failure can occur, either due to wear or because of debris accumulating in it. I suppose a humming sound without the drum spinning could indicate a motor that might need fixing. Look for obstructions or have the motor replaced if necessary.
- Consult a Technician: If you still can’t solve the issue, check your dryer user manual for further troubleshooting advice, or call in a professional technician to conduct a thorough inspection.
Walking through such steps can really narrow the problem down quickly and help you decide on the next solution. Safety should always be number one; hence, the dryer should be unplugged from power before any repair work begins.
Identifying Wiring Issues
A wiring problem inside a dryer might cause it to act inconsistently: sometimes it will simply refuse to start, while other times it will come up with peculiar interruptions during the cycle. Check the power cord and plug for visible damage, such as fraying, burn marks, or split wires. Use the multimeter to determine if the outlet is giving the correct voltage; a lower voltage might be a sign of a faulty outlet or circuit breaker. Do note any damage to the connections inside the dryer, especially at the terminal block. Look for signs of burning, looseness, or corrosion. Loose or damaged connections prevent proper electrical continuity. If this occurs, the wiring must be rectified or changed immediately, paying attention to safety. Whenever in doubt, hire a certified electrician or technician to ascertain and rectify the issue while observing proper electrical precautions.
Reference Sources
Frequently Asked Questions (FAQs)
What are the differences between installing a dryer cord with 4 prongs as opposed to 3 prongs?
The major difference between installing a 4-prong dryer cord and a 3-prong dryer cord is the ground. The ground wire in the 4-prong cord is separately connected to the neutral terminal inside the dryer, thus allowing for a better safety ground. In contrast, the 3-prong cord uses the frame of the dryer as a protection path, which can be a hazard if the wiring is not done correctly. Some very modern houses recommend installing a 4-prong cord.
How do I safely install a new dryer cable?
Before installing a new dryer cable safely, make sure the power switch at the circuit breaker panel is off. Remove the back panel from the dryer to expose the terminal block. Connect the new cords’ wires to the left and right terminals and the neutral terminal. The center wire connects to the neutral terminal, while the other two (often red and black) connect to the left and right terminals. Strap the cord to the panel, and tighten all wire connections.
What tools do I need for electric dryer cord installation?
A few basic hand tools are required for dryer cord installation: screwdriver (both flathead and Phillips), wire cutters, wire strippers, and a multimeter may be useful to verify the voltage. Should you be fitting a 4-prong cord, double-check you have the model number of the cord that fits your dryer. It’s always a good idea to have a friend on hand to help.
Can I install a 4-prong dryer cord myself?
If you have the skills related to basic electronics and can safely handle electricity, then decorating your own 4-prong dryer cord is truly possible. Otherwise, precisely because of that uncertainty, it is in your utmost interest to hire an electrical contractor or an expert in home improvement to make sure it is installed safely and properly.
What are the common problems encountered when installing the dryer cord?
Some common problems during the dryer cord installation include improper wiring leading to an electrical problem, the cord not being the right one for the dryer model number, and also, not securing the cord with a strap, which can cause damage over time. Another important thing is to ensure that the green wires are connected properly for effective grounding.
How do I find expert advice and answers concerning dryer cable installation?
You can search for expert Q&A on dryer cable installation from home repair pros on YouTube, where many experts upload their original content. Alternatively, you may also go to electrical forums or hire someone locally for advice.
What should I do if my dryer has two wires instead of three?
Having two wires may mean that one needs to install a 3-prong cord. But again, it is best to check with your local electrical codes and talk to an electrical contractor to see if they recommend using a jumper, or if other changes need to be made to bring the installation up to safety standards.
Final Safety Reminder
Remember that electrical work can be dangerous if not done properly. When in doubt about any aspect of dryer cord installation, always consult with a qualified electrician. Your safety and the safety of your home are worth the investment in professional assistance.