Wiring a two-way switch can seem intimidating at first, but when followed with clear instructions, anyone should be able to learn how. This guide is here for you for upgrading your electrical house system, taking on just another DIY project, or simply wanting to know how two-way switches work. Two-way switches are a good solution for switching a light or appliance from two different points, offering the presence of convenience and functionality. This post will walk you through the wiring process step by step, explain various technical terminology in simpler terms, and share some important safety measures to ensure that your installation goes smoothly. By the time you have finished with this guide, a two-way switch wiring project will be in the bag for you!
IMPORTANT SAFETY NOTICE
Always turn off the power at the main breaker before beginning any electrical work. Use a voltage tester to confirm the power is completely off. If you’re unsure about any aspect of electrical work, consult a licensed electrician. Safety should never be compromised.
Understanding the Basics of Two-Way Switch Wiring
A two-way switch wiring system makes it possible to control one light or appliance from two locations- at a far end in the hallway. The system includes two switches with wiring to the light fixture. The traveler wires are key in this setting since they carry current from one switch to the other. Flipping the switch will open and close the circuit, turning the light on or off. Following a wiring diagram properly with the right tools will make installation relatively easy and safe. Always ensure the power is switched off before starting any electrical work.
What is a Two-Way Switch?
An alternative name for a two-way switch is also a double-pole switch; this switch, on the other hand, is used to control a light or other electrical device from two points; a setup most commonly found in staircases, hallways, or rooms of large dimensions so that light can be accessed conveniently from two places. The two-way switch connects two switches with traveler wires to complete the circuit. A change-of-state inversion occurs in the circuit when one of the switches is toggled, allowing the connected device to be either turned on or turned off. Such a setup is practical and efficient and finds wide use in both residential and commercial areas.
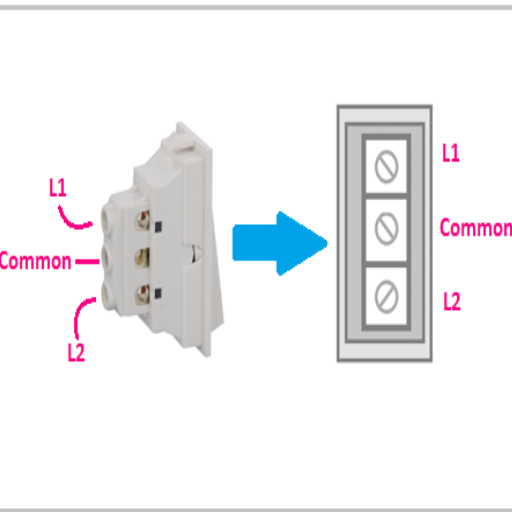
How Does a 2 Way Switch Work?
Two-switch systems are peculiar fixtures that allow one light or electrical device to be controlled from two different switches. Traveler wires are installed to link the two switches. Each switch will have three terminals: one common and two travelers. Flipping one switch alters the circuit path, either completing it for the light to come on or breaking it for the light to go off. The light is either on or off, depending on the position of either switch, which gives the convenience of operating the light from more than one place.
Common Applications of Two-Way Switches
In its everyday use, a two-way switches are used to enhance convenience and ergonomic functionality. One very popular place where we find this type of application is staircases, where the lights would be controlled both from the top and bottom of the stairs. These switches are also used in long corridors, enabling a user to switch the lights on or off from either end. Another common usage of two-way switches is in big rooms with various entries, such as living rooms or offices, to provide controlled lighting from multiple points. These applications make the two-way switches a very practical solution for efficiently and flexibly lighting residential and commercial interior spaces.
Essential Tools and Materials for Wiring a Two-Way Switch
Types of wires to carry a two-way switch are the materials and tools you’ll require for the job:
Required Tools
- Screwdrivers (flathead and Phillips)
- Wire stripper
- Voltage tester
- Electrical tape
- Drills and screws (if needed)
Essential Materials
- Two-way switches (2 units)
- Electrical wire (appropriate gauge)
- Mounting box (if installing new switch)
- Faceplate (to cover the switch)
- Wire connectors
Be sure all tools and materials are in compliance with safety regulations and local electrical codes before starting with any wiring work.
Required Tools
| Tool | Purpose | Safety Notes |
|---|---|---|
| Two-way switches (2 units) | Allow control of one light from two different places | Ensure high-quality switches rated for proper voltage and current |
| Electrical wires (proper gauge) | Carry current between switches and devices | 14-gauge for lighting, 12-gauge or heavier for appliances |
| Screwdrivers (flathead and Phillips) | Loosen and tighten screws during installation | Use insulated screwdrivers to prevent electrical shock |
| Wire strippers | Strip insulation from wires without damage | Get adjustable strippers for different wire gauges |
| Voltage tester | Confirm no power supply before starting work | Non-contact testers are safer as they don’t require direct contact |
| Electrical tape | Insulate and secure wire connections | Use flame-retardant tape that meets safety standards |
| Mounting box | House switches and wires securely | Choose appropriate size and material for your wall type |
| Faceplate | Provide clean, protective covering for switch | Available in various styles to match home décor |
To start installation smoothly and for better safety and efficacy of the project, all tools and materials, along with proper safety elements, must be ensured. Checking the compatibility of gears or items with the company’s standards and local electrical provisions is always good before you integrate them into your project.
Safety Precautions
Critical Safety Guidelines
When working with electrical systems, safety must be kept at the top as a priority to mitigate potential risks associated with the field. Before working on any circuit, make sure the power has been cut from the main breaker, and check with a voltage tester to ascertain that no voltage is left in the circuit. Always put on thick gloves and use properly insulated tools to prevent electrical shocks. Prepare your working area, ensuring it is dry and clutter-free so that there are no accidents caused by slipping or coming in contact with water. Secure all the connections properly and insulate the exposed wires well. Another set of suggestions is to adhere to local electrical codes and standards, and, if unsure, consult an electrician. There is never a trade-off allowed when it comes to safety-wiring.
Step-by-Step Guide to Wire a 2 Way Switch
First, turn off the power
Begin by shutting off the power to the circuit you’ll be working on inside the main breaker panel. Confirm that the power is off, preferably with a voltage tester, for additional safety.
Get Tools and Materials in Order
Have on hand the necessary tools: a screwdriver, wire stripper, voltage tester, and the correct wiring, a two-way switch, and electrical tape.
Identify the Wires
First, identify the line wire, the load wire, and the traveler wires. You will usually be dealing with three wires: a black wire, a red wire, or a different color for a traveler, and a ground.
Wire the First Switch
- Attach the line wire to the common terminal of the first switch.
- Connect the traveler wires to the 2 other terminals on the switch.
- Attach the ground wire to the grounding screw of the switch.
Wire the Second Switch
- Then, connect the other ends of the traveler wires to the two terminals on the second switch.
- Attach the load wire to this switch’s common terminal.
- Secure the ground wire to its grounding screw.
Installing the Switches into the Wall Box
Carefully place the switch into the electrical box. Using screws, fasten the switch and put on the faceplate.
Restore power to the circuit and test it
Turn on the power at the breaker panel. Test the two-way switch to check if it works correctly, allowing the light or load to be controlled from either position.
Safety Reminder
Throughout the entire process, remember to take safety precautions. In any case of doubt, consult with a licensed electrician.
Preparing the Wiring Setup
The wiring procedure for a two-way switch setup begins with shutting off the power supply to prevent mishaps. Verify this using a voltage tester. Recognize and mark the cables that run between the two switching locations and the load (say, a light fixture). Generally, you’ll have a black (hot) wire, a white (neutral) wire, and a ground wire, alongside traveler wires that traverse between the two switches. Cut the insulation, leaving enough copper to make proper connections to the terminals. Twist wire connectors or terminals to the wires, along neat bundles ready for insertion into the switch terminals. Refer to the manufacturer’s instructions for the specific wiring diagrams. Make sure to double-check all the connections. Never hesitate to consult with an electrician if unsure.
Connecting the Two Switches
To actually wire the two switches, the first thing to do is to determine the kind of switches that one is dealing with: single-pole, three-way, or four-way; this is crucial because it determines how the wiring is done. In the typical case of an installation involving a three-way switch, first locate the traveler wires connecting the two switches, in addition to the common terminal where one would place the power source or the load. Linking the switches must be done with properly rated wires, with the traveler wires fixed in the traveler terminals of both switches; this is important for safety and functionality on the part of the wire actually being installed.
Always keep it safe by switching off the circuit power at the breaker panel within the house. Join the ground wires to the green screw on each switch; after that, connect the traveler wires to their respective terminals. Lastly, connect the common wire to the dark-colored terminal. Throughout the installation process, adhere to the manufacturer’s instructions or wiring diagram carefully to avoid any errors, and check all connections to ensure that there are no loose wires or exposed conductors. After the wiring is done, turn on the power and test the switches for correct operation. Safety first! When in doubt, consult a licensed electrician.
Testing Your Two-Way Switch Wiring
To check the installation of your two-way switch, you need to consider the following:
- Turn the Power Back On. Upon completion of the wiring, find the correct circuit breaker and put power back on.
- Test the Switch One at a Time. Put it in the “on” position, test if it really switches on the light or device, then put the second switch to “off.” You should repeat this to test that the light or device really reacts to whichever switch comes first.
- Test for Consistency. Test that no glitches or flickering are experienced as the light or device comes on and goes off from either of the two switches.
- Troubleshoot: If your switches do not operate, turn off the power to check the wiring again. Make sure that all wires have been firmly tightened to their respective terminals. Use the wiring diagram to assist you if necessary.
Following those steps will ensure that everything is in correct order, or identify where the wiring errors lie in need of correction. Should you still face problems, call a professional electrician for help.
Wiring Diagrams for Two-Way Switches
Basic Two-Way Switch Wiring Configuration
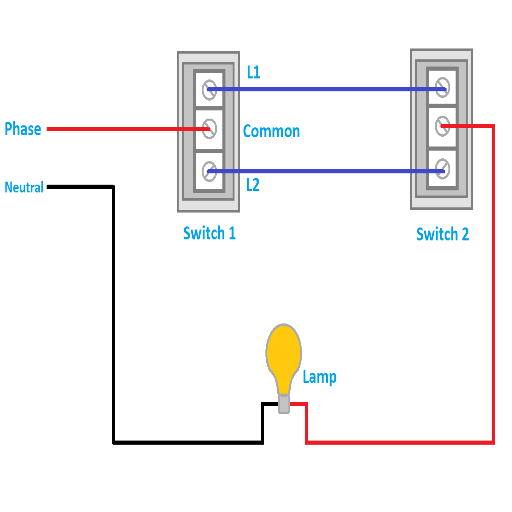
Here is a generic two-way switch wiring diagram:
Common terminal of first switch
Traveler terminals of both switches
Common terminal of second switch to light/load
Directly from power source to load/lamp
These are the working principles of controlling a particular lamp or load from two locations. Always disconnect the supply voltage and make sure it stays off while doing any wiring work, and if not confident, then seek help from a licensed electrician.
Basic Wiring Diagram for a 2 Way Switch
Generally, two-way switch wiring methods come into play when a single light or device is controlled from two separate locations. Below is a very brief explanation of all the above information:
- Power Source to First Switch: The live wire (hot) from the power source connects to the common terminal of the first switch.
- Traveler Wires: Two traveler wires connect the traveler terminals of the first switch to the traveler terminals of the second switch.
- Second Switch to Load: The common terminal of the second switch connects to the load (light or device), thereby completing the circuit.
- Neutral Wire: The neutral wire goes right past the switches and connects directly to the device or light.
Additional Notes:
- The ground wires from both of the switches, as well as the device/light, should be tied together for safety.
- Make sure all wire connections are made with wire connectors, and never leave any bare wire exposed.
This configuration offers the needs of flexibility and convenience of controlling one electrical load from two different locations, providing better efficiency and functionality. Always turn off the power supply before working on any electrical circuit and seek the advice of a licensed electrician if you are unsure of anything along the way.
Complex Wiring Schemes for Multiple Switches
When the wiring system gets complicated and multiple switches are employed, it means the control over a single load is dispersed over several locations. Two switches are installed if there is supposed to be a three-way type of setup, while the traveler wire welds both sets of switches together. Adding one or more unmotorized four-way switches between the two three-way switches creates a very versatile control setup for use in things like long hallways or large rooms.
The main items are hot wire (bringing power to the switches), traveler wires providing the interconnection between switches, and the neutral wire, which completes the circuit, usually going back to the main. The additional switches of a four-way configuration complete the switching path alternation, and of course, the basis will be the existing three-way setup. All wires must be marked during installation, and an electrical diagram should be followed to eliminate any form of confusion.
Remember to always turn off the power supply at the breaker before installation or modification. For safety, it is advised to use electrical tape, wire nuts, and grounding. If you have any doubts about advanced installations, hire a licensed electrician to dodge all hazards.
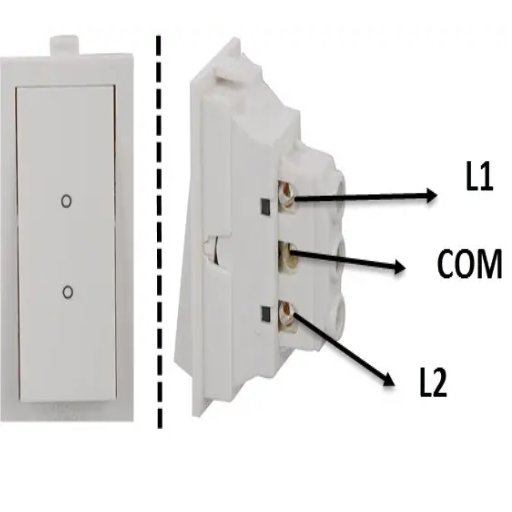
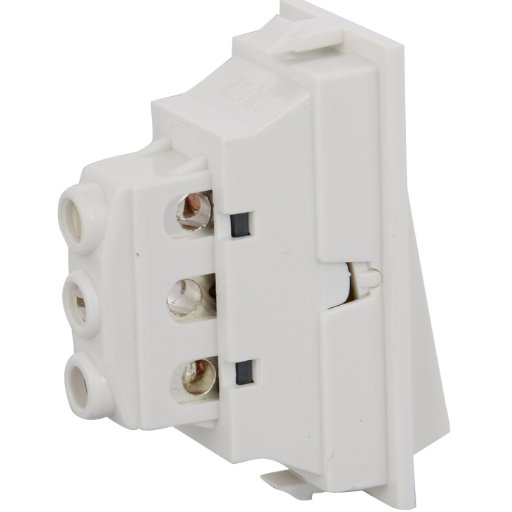
Understanding SPDT Switch Configuration
Picture a Single Pole Double Throw (SPDT) switch as one extremely versatile electrical component, generally used for controlling a circuit from two different locations. It consists of three terminals: one common terminal (COM) and two output terminals (usually called NO for Normally Open and NC for Normally Closed). The switch connects either one NC or NO terminal to the common terminal, depending on its position.
SPDT switches find applications in a variety of scenarios, including when working with three-way lighting systems, where two switches control a single light. Power from the light can be controlled locally via this SPDT switch and another SPDT or compatible switch, capable of turning the light on/off from different locations. It is best to use an electrical wiring diagram to confirm all connections have been properly made and will work as anticipated.
Another notable feature shall be the manifestation of good wire installation and secure connections for safety and performance. The power supply should be disconnected at the breaker, and all wires shall be labeled correctly before installation starts; using good tools and materials like insulated connectors shall be mandatory. An experienced electrician should always be hired to perform complicated installations.
Troubleshooting Common Issues with Two-Way Switch Wiring
Common Problems and Solutions
Switch Not Controlling the Light Properly
Possible Cause: Miswired connections.
Solution: Verify that the common terminal is connected correctly. Check that the traveler wires are secured to the proper terminals on both switches.
Lights Flickering Or Not Turning On
Possible Cause: Loose connections or faulty switch.
Solution: Ensure that all wire connections are tightened. In case the problem persists, test the switch by temporarily installing a new one.
Switches Are Not Working As a Two-Way Circuit
Possible Cause: Incorrect traveler wire placement.
Solution: Check the traveler wires on both sides of the switch and confirm they are consistent without any crossed connections.
Overheating Switch
Possible Cause: Faulty or incompatible switch.
Solution: Replace the switch having a capacity matching that of the circuit. Look out for any damaged wires that may require fixing.
Here goes the 14: make sure the common terminals are on opposite switches; if there is any doubt, simply switch wires until it works properly, since some switches get common terminals in different positions. One or several common terminals may be loose on the terminal block and may not be providing good contact with the conductor; the multimeter can test for this. Loose connections may be present in the earth wiring or inside the light fixture. The loose earth wiring may not be dangerous, but the loose live connection will definitely cause the circuits not to work correctly. By carefully checking a few connections and resolving these typical issues, you can be sure of your two-way switch wiring setup functioning correctly. If you are not able to fix the problem, it might be time to call in an electrician.
Identifying Wiring Problems
When working with two-way switches, it is best to maintain a disciplined process when troubleshooting wiring problems. Answers to common questions of wiring issues in brief are now given:
Switch Not Working Properly
Possible Cause: Loose or disconnected connection, or wrong wiring.
Solution: Check all wires carefully, making sure they are tight and connected in accordance with a diagram for wiring. If connections are loose, tighten them. If wires appear damaged, replace them.
When Lights Do Not Turn On or Off
Possible Cause: Switch is defective; light bulb may be faulty; the power supply may be disrupted.
Solution: Check the switch with a multimeter to verify if it is working. Replace faulty switches if needed. Also, replace faulty light bulbs and check if any fuses in the circuit have blown.
Lights Flicker or Glow Dimly
Possible Cause: Loose connections, dimmer switches not compatible, or voltage fluctuations.
Solution: Secure all wire connections and verify that the dimmer switch is compatible with the light fixtures. If it still does not work, contact an electrician to check the voltage condition.
Having an eye toward these sources of trouble and working toward the solutions given will often overcome most wiring problems in short order. Safety first, however, and it may be worth calling in a professional for the more complicated jobs.
Fixing Common Wiring Mistakes
When fixing common wiring faults, I consider safety first. Flickering lights also indicate security; loose connections are there-and-wrong components-everyone gets back and checks the wire-are incompatible with the equipment. If after this, the problem freckles otherwise due to something voltage instability, I don’t hesitate to have a professional electrician assist in the resolution. Remember that expert opinions are better than risking hazards.
When to Call a Professional Electrician
Countless situations require calling an electrician to ensure safety and compliance with electrical codes. If frequent breaker trips, lights flickering on and off, or odor from outlets are common occurrences around the house, that can be symptomatic of a serious electrical problem that needs the intervention of an expert. Similarly, if big electrical changes are being planned, such as rewiring, panel upgrading, or new appliances needing extra circuits, it should be ensured by a licensed electrician that the work will be done correctly and safely. Any of such things as electrical shocks from outlets or switches, old wiring, and systems not grounded should be inspected and repaired by an expert to avoid hazards. Remembering that whatever the complexities of your electrical problem might be, any attempt to fix that problem yourself can either risk your life or endanger your home in danger; therefore, it is always much safer to rely on the expertise of a professional.
Conclusion
Wiring a two-way switch is a manageable DIY project when approached with proper preparation, the right tools, and strict adherence to safety protocols. This comprehensive guide has walked you through every aspect of the process, from understanding the basic principles to troubleshooting common issues.
Remember that electrical work requires respect and caution. Always turn off power at the breaker, use a voltage tester to confirm circuits are dead, and don’t hesitate to consult a licensed electrician when in doubt. The convenience of controlling lights from multiple locations makes two-way switches a valuable addition to any home, enhancing both functionality and energy efficiency.
Whether you’re upgrading existing switches or installing new ones, following proper wiring diagrams and safety procedures ensures a successful project. Take your time, double-check all connections, and prioritize safety over speed. With careful attention to detail and proper execution, your two-way switch installation will provide reliable service for years to come.
Reference Sources
Frequently Asked Questions (FAQs)
What actually is a 2-way switch, and what are its workings?
A 2-way switch (or two-way switch) switches a single light fixture from two different locations. It essentially has two switches connected to the same light fixture, and each switch can turn the light on or off.
How do you wire a 2-way switch?
For wiring a 2-way switch, you will have to first connect the incoming hot wire to the common terminal of the first switch. Next, run two wires from the first switch to the second switch, connecting them to the traveler terminals. After that, connect the common terminal of the second switch to the light fixture, while the white wire is joined back to the neutral wire at the fixture.
What is the difference between a 2-way and a 3-way switch?
A 2-way switch operates to control a particular light fixture from two points, whereas a 3-way switch offers control from three or more locations. Wiring is more complex for a 3-way switch and requires more wires than a simple 2-way setup.
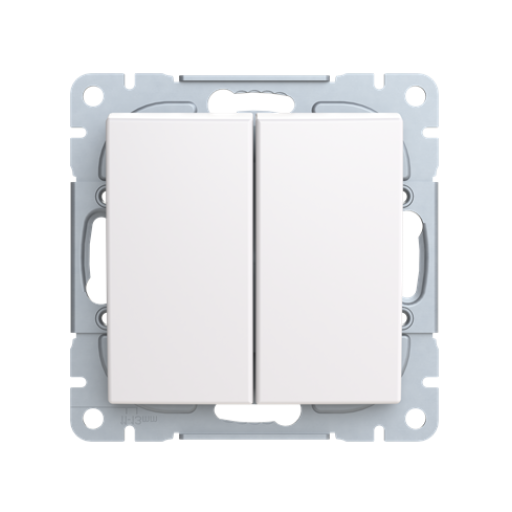
Can I use a double switch for a 2-way light switch configuration?
Yes, double switches can be used in a 2-way light switch installation, provided it is wired properly. This will allow control of two different light fixtures from one place if the wiring for the different switches is in order.
What wires do I need to connect for a two-way light switch?
Three wires are usually needed in a two-way switch setup: the live wire (sometimes incoming hot), neutral, and ground. The two traveler wires give communication between the two switches to control the light fixture.
How does 2-way switch wiring work for controlling a light from two different locations?
The way the 2 way switch wiring works is that there are two switches, each connected by traveler wires. When a switch is toggled, it moves the electrical contacts into a position that either allows or prevents the flow of electricity through the light fixture, thereby turning the lights on or off at either of the two locations.
What is the wiring diagram for a way light switch?
A wiring diagram for a way light switch generally consists of the basic parts, such as the power source, two switches, and the light fixture, indicating how the wires connect to each other so the installer can follow it easily. It shows the hot wire, both the neutral wires, and the traveler wires.
Is the grounding wire needed in wiring for a 2-way switch?
Yes, the ground wire is essential to be connected when wiring a 2-way switch. It provides safety by ensuring that any stray electrical current is safely directed to the ground, thereby avoiding possible electrical shocks and ensuring compliance with electrical codes.