Understanding Light Fixtures
Light fixtures hold and protect light bulbs while they are emitting light. They are available in a wide range of styles, shapes, and sizes, making it possible for them to serve both functional and decorative purposes. A light fixture usually has a base for mounting, housing, and sometimes a cover or shade to soften light. The four main types are ceiling-mounted fixtures, wall-mounted fixtures, hanging fixtures, and portable options such as lamps. The right fixture choice will not only add to the lighting quality but will also positively affect the space’s visual appeal.
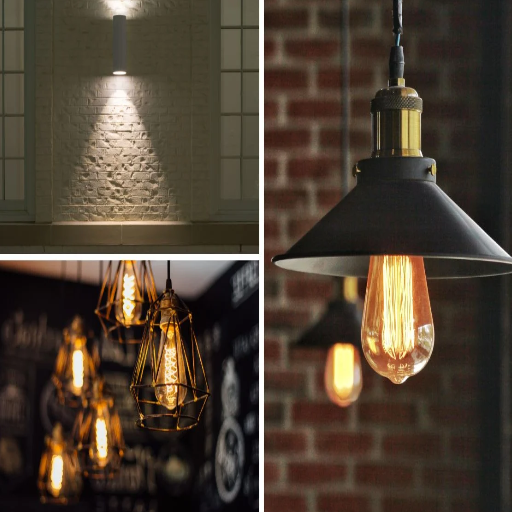
Types of Light Fixtures
Ceiling-Mounted Fixtures
Light fixtures mounted on the ceiling are diverse and are generally used in both residential and commercial areas. They consist of flush mounts and semi-flush mounts. Flush mounts are perfect for rooms with low ceilings as they provide general illumination, while semi-flush mounts light up a little below the ceiling, and at the same time, they are more of a decorative element.
Wall-Mounted Fixtures
Wall mounts, such as sconces or wall-mounted lamps, are usually employed as accent lighting or to bring the lighting of a room to the requisite level. They can be installed in the hallway, bathroom, or bedroom to draw attention to architectural features or to provide focused illumination. Wall-mounted lamps are not only modern but also style creators in terms of the functional aspect of lighting.
Hanging Fixtures
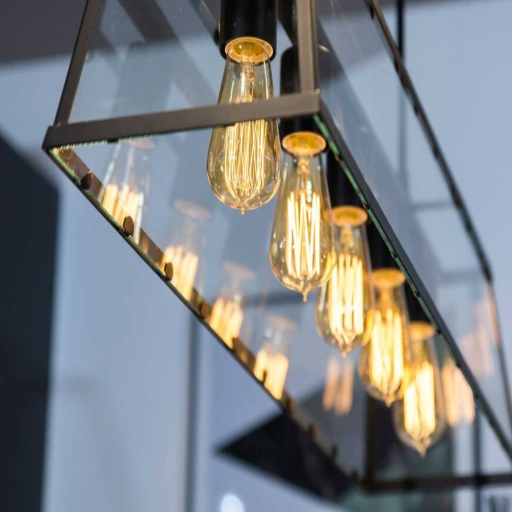
Light fixtures that are hung like chandeliers and pendants are suitable for areas with higher ceilings. Chandeliers, in this case, are often used as eye-catching installations in dining rooms or entrances, whereas pendant lights are widely used in the kitchen and above the dining table for directed lighting. Contemporary works point out the rising demand for chic and drawn-out minimalist pendant lighting in modern spaces because of its aesthetics and versatility.
Recessed Lighting
Recessed lighting means that the fixtures are mounted flush with the ceiling or wall, thus giving a neat and unobtrusive appearance. These lights can serve the dual purpose of being general illumination sources or highlighting specific areas like countertops or pieces of art. The use of energy-efficient LED recessed lights is gaining momentum, as sustainability and energy cost savings are the core reasons. The reports from the industry state that it is possible to dim the energy consumption of LED recessed lighting by as much as 75% compared to traditional bulbs.
Portable Fixtures
Portable light sources like table lamps, standing lamps, and desk lamps provide versatility and ease. They are lights that can be moved without much hassle and are also available in diverse styles that go well with different home decor. Nowadays, the use of smart technology in portable lamps is becoming more common, which gives them features like dimming and voice control, thus making them more popular.
These types of light fixtures, with their functionality and style combined, are constantly evolving, enabling the use of energy-saving materials and the application of innovative designs to meet the demands of the contemporary world. There are numerous options to choose from, but the right fixture selection not only guarantees perfect lighting but also the overall improvement of the attractiveness of any area.
Choosing the Right Fixture for Your Space
Choosing the perfect light fixture for your area requires careful consideration of its three main aspects, and those are not only functionality but also the design and energy consumption. Begin by determining the role that the lighting will play in the room, that is, whether it will be ambient, task, or accent lighting. For instance, in most living rooms, a mixture of ceiling lights and side lamps would be the most appropriate solution, whereas in kitchens, concentrated lighting would be necessary for working surfaces like countertops. The size and scale of the fixture should also be considered relative to your space; large fixtures may take over a room, while small ones can become unnoticeable in a large area.
Energy consumption is likewise an important consideration—LED lights should be selected whenever it is possible because they use much less energy and their lifespan is markedly longer than that of conventional bulbs. In addition, make sure that the design of the fixture goes well with the interior decor of your house. The modern style of living usually goes hand-in-hand with the sleek and minimalist designs, while the classic or rustic style of decoration is always compatible with the elaborate or vintage-inspired light fixtures. The proper positioning of the fixtures and the usage of different light sources will improve the overall mood and utility of the room, thus turning your space into a more inviting and comfortable one.
Benefits of Installing New Light Fixtures
The act of installing new light fixtures can do wonders, not only technologically speaking but also instantaneously turning the space into an aesthetically pleasing one. The modern fixtures, besides being beautiful, are generally the ones that keep the light efficiency, that is, energy-efficient, such as LED bulbs, which are the main ones that consume very little energy and, at the same time, lower the monthly cost of electricity. The right lighting not only makes the room more comfortable but also more usable since it creates a warm and inviting atmosphere and uplifts the mood of the room. Moreover, changing the light fixtures can make the house more attractive to the buyer, especially if the house’s style is modern or the entire house maintains a certain design that is easily liked by the potential buyer. In addition, placing the fixtures smartly can lead to better lighting, which might also help with safety in case of any emergency since a well-lit area is always safer. Therefore, the mix of style, energy efficiency, and practicality makes this upgrading of light fixtures a very good investment.
Preparing to Install a New Light Fixture

1Turn Off the Power
To eliminate any electrical hazards, it is best to switch off the power to the light fixture at the circuit breaker before you start working on it.
2Gather Tools and Materials
Gather the tools needed for the task, such as a screwdriver, wire connectors, and the new light fixture. The manufacturer’s guidance should be consulted for specific requirements.
3Remove the Existing Fixture
Loosen the old fixture, then remove it gently. By untwisting the wire connectors, disconnect the wires.
4Prepare the Wiring
Check the current wires to see if they are damaged or frayed. If so, cut the wire ends and strip them to make a clean connection.
5Install the New Fixture
Mount the new fixture’s bracket to the electrical box. Connect the wires using the same colors (black for black, white for white, and green or copper for ground). Use wire connectors to secure them.
6Secure and Test
Fasten the new fixture to the bracket, and tighten the screws. Power up the circuit breaker and check the light to make sure it is working correctly.
Gathering Tools and Materials
In order to successfully install a new light fixture, it is necessary to have all the required tools and materials ready. Here’s a brief list of what you will need:
Tools:
- Screwdrivers (both flathead and Phillips)
- Voltage tester
- Wire stripper/cutter
- Pliers
- Drill (if there is a need for mounting holes)
Materials:
- New light fixture and mounting hardware that comes with it
- Wire connectors (wire nuts)
- Electrical tape
- A few screws for replacement (if necessary)
- Ladder (in case the fixture is installed high)
To avoid any accidents, make sure that the power is off first at the circuit breaker. For safety precautions, check the voltage with a tester again, and have all the tools at hand so that you can work faster during the installation.
Safety First: Turning Off the Power
Before commencing any electrical task, it is very important to turn off the power supply to the area where you will be working in order to ensure your safety first. Find the electrical breaker panel in your house and look for the circuit breaker that operates the light fixture. Move the breaker to the “off” position. If there are no labels on the breakers, just turn off the main power switch as a precaution to cut the electricity to the whole house.
After the power has been turned off, a non-contact voltage tester should be used to verify that there is no electricity present in the wires. Check all the wires that you will be dealing with to make sure there is no voltage. This precaution is very important in avoiding electrical shocks and injuries. Have tools with insulated handles within reach at all times, and make sure that the work area is dry and safe.
Using a Ladder Safely for Installation
The use of ladders in installation work has to be treated with utmost care in order to achieve safety. Then, pick the right ladder for the job, that is, if it is a step ladder, extension ladder, or multi-use ladder, making sure that it is authorized to carry your weight plus the weight of any tools that you will be using. The ladder should be rated according to the standards set by OSHA or similar, which guarantees stability and non-deterioration.
Place the ladder on a flat, firm, and dry surface, free from any debris or moist spots, to avoid the risk of sliding or tipping. The correct angle of the ladder is one of four ratios—one foot distance from the wall for every four feet of height. Moreover, the top of an extension ladder should be at least three feet higher than the roof or working surface for safety when ascending or descending.
Never let go of more than one point of contact when going up and down the ladder: two feet plus one hand or one foot plus two hands. Do not lean to the side because that can easily tip the ladder; rather, move it to your new place. Studies point out that most ladder accidents are caused by wrong positioning or overreaching, so simply being aware of these factors can greatly reduce the risk. Moreover, it is wise to have your shoes on, which have a good grip, and not carry more than you can handle when climbing—have a tool belt or pull your tools up if that is what it takes.
To further secure the ladder, you can attach ladder stabilizers or safety devices, especially when you are working on higher elevations or on uneven surfaces. Sticking to the above-mentioned precautionary measures and safety regulations, installation will be both secure and efficient.
Removing the Old Fixture
1Turn Off the Power
To prevent electrical hazards, make sure the power is completely off at the circuit breaker. A voltage tester should be used to confirm once again that there is no current flowing.
2Disconnect the Fixture
Remove the screws or bolts holding the old fixture to the wall or ceiling very carefully. As you disconnect the wires, support the fixture with one hand.
3Label the Wires
Before detaching the wires, make sure to label them or take a photo to easily identify them for reattachment later. Remove the wire connectors by unscrewing them, and then cap the exposed wires safely.
4Remove the Mounting Hardware
Dismantle any brackets or mounting hardware still left on the surface and get it ready for the new fixture.
By adhering to these procedures, you are going to be able to safely and successfully take off the old fixture, thus making everything prepared for the new installation.
Steps to Remove the Old Fixture
Turn Off the Power
The first step is to cut off the power to the light fixture at the circuit breaker. After that, make sure to test the light switch in order to check that there is indeed no power running to the fixture. Improper handling of electrical fixtures turns the hands of safety statistics to thousands of accidents yearly, so make sure this step is done before moving on.
Prepare Your Tools
Make your tools ready, like a screwdriver, voltage tester, wire caps, and possibly a step ladder if the fixture is very high. A voltage tester is especially necessary as it will let you know if any current is coming through the wires after you have turned off the power.
Remove the Light Bulb and Cover
Start by taking off the light bulb(s) and the coverings or shades that are present on the fixture. This lighting of the fixture protects the bulb and the fixture from breaking during the removal process.
Label the Wires
Prior to separating the wires, label each wire with tape or take a picture that clearly shows their position. Typically, the wiring includes the black (hot) wire, white (neutral) wire, and green or uninsulated (ground) wire—make sure you label them properly. As per electrical guidelines, proper wire labeling can avoid mistakes during reinstallation.
Disconnect the Wires
A screwdriver will help you to unscrew the wire connectors. With great care, remove the wires and immediately place wire nuts on the free ends to prevent accidental touching.
Remove the Mounting Hardware
A screwdriver or drill will help you to unscrew and take out the mounting hardware, for example, brackets or plates, that hold the fixture in position. Be extra careful at this stage, since older hardware might be brittle or rusty.
Check for Additional Issues
Check the electrical box for any kinds of damage—faded wiring, or loose screws, for instance. Fixing these issues now could save you trouble later with the new installation.
The removal of the old fixture can be safe and thorough if the described steps are followed. So, it will be another step towards a successful new installation. Make sure to prioritize safety measures at all times and be slow around electrical parts.
Inspecting Wiring Before Installation
Prior to the installation of a new fixture, it is essential to closely inspect the old wiring in order to be sure that it is safe and in line with the current standards. It has been found that one of the main reasons for electrical fires is the use of old and/or damaged wiring; thus, this step is very necessary not only for safety but also for the good functioning of the equipment.
Inspect the Insulation
Pay attention to the condition of the insulation surrounding the wires. Look for any signs of deterioration, like cracking or becoming brittle. Wires laid before the 1960s might have used cloth insulation, which gets worse with time and should be replaced for safety’s sake.
Grounding Check
Grounding makes sure your electrical system is safe by sending the excess current down the ground wire safely. A voltage tester can be employed to check whether the wiring consists of a good ground connection. Usually, modern systems have either an uninsulated copper or green grounding wire.
Wiring Size and Load Assessment
Make certain that the wire size is adequate for the new fixture’s current consumption. For instance, 14-gauge wire is the most common wire for lighting fixtures, as it can take a load of up to 15 amps, while heavier residential appliances might need wiring of a larger gauge.
Check for Corrosion and Damage
Make a thorough inspection of all the visible wiring and look closely for any signs of physical damage, such as cuts, nicks, and corrosion. Wires that have corroded can result in poor electrical connections; thus, they should be replaced to ensure conductivity.
Compatibility with New Fixture Validation
Analyze the current wiring layout against the installation guidelines of the new fixture. This involves checking if extra wires, like those for dimmers or smart controls, are required.
Measure Voltage and Continuity with a Multimeter
With a multimeter, check the wires for the presence of voltage and continuity to confirm that they are powered where needed and no breaks exist in the circuit. This procedure guarantees a dependable electrical connection for the new installation.
Professional advice should always be sought in case of difficult problems or when there are doubts regarding the safety of the electrical system.
Disposing of the Old Fixture Responsibly
The old fixture should be properly disposed of, as it is a very important step in the sustainability and safety issues. First, you should contact your local waste facility and find out the proper method of disposal, since many places have set specific rules on electrical items. If the fixture contains hazardous materials such as mercury (common in fluorescent lights), it must be disposed of in a hazardous waste facility or an authorized recycling center. On the other hand, some retailers or manufacturers may have recycling programs for old fixtures, which means you can drop them off with no hassle at all. If the fixture is still working, consider giving it away to local charities, community groups, or thrift stores, as this way the fixture will have another life. Always choose the eco-friendly way for disposal, as that will help the environment considerably.
Wiring a New Light Fixture

Carefully approach the installation of a new light fixture, and it will be a simple process with a few easy steps. The first thing to do is to make sure the electricity for the circuit is turned off at the breaker box. After that, the wires from the new fixture can be connected to the wires in the electrical box, which are usually black to black (hot wire), white to white (neutral wire), and green or copper (ground wire) to the fixture’s ground screw. Make the connections secure with wire nuts and gingerly lay the wires down into the box. Then, according to the instructions provided by the manufacturer, mount the fixture and turn the power back on to check if the installation works. It could be that some neighbors need help, so do not hesitate to seek advice from a professional electrician if you doubt your skills.
Understanding the Wiring Process
The wiring process has a number of important steps that, if done right, will secure both safety and function. Firstly, the power should always be turned off at the circuit breaker before any electrical components are handled. Next, the three wires that come out of the electrical box should be identified—usually the black one (hot), white one (neutral), and green or bare one (ground). After that, these wires should be matched with the corresponding wires in the fixture according to their colors. It is important that the wires are secured with wire nuts and that the connections are tight and completely covered. The wires should then be very gently pushed back into the box without crimping or damaging them. Lastly, the fixture should be firmly mounted following the manufacturer’s instructions, the power should be restored, and the installation should be tested to confirm proper operation. In case of doubt at any stage of the process, a licensed electrician should always be consulted to prevent any risks.
Common Wiring Connections Explained
When it comes to wiring in the house, there are several basic connections that one must be aware of:
| Wire Color | Function | Description |
|---|---|---|
| Black | Hot Wire | The black wire, nicknamed the “hot” wire, is the one that carries the electricity from the breaker panel to the light or socket. This wire should always be treated with extra care since it is conductive when the circuit is on. |
| White | Neutral Wire | The white wire, which is also referred to as the “neutral” wire, is the one that completes the circuit by returning the electricity to the breaker panel. The current must return safely, which is why this wire is very crucial. |
| Green / Bare Copper | Ground Wire | The green or copper wire without insulation is the ground wire. It facilitates the earth to absorb the excess electric current safely during a fault, thereby minimizing the chances of shocks or electrical fires. |
| Red | Secondary Hot | The red wire, which is also capable of carrying current, is mostly seen in configurations with more than one switch or a series of fixtures that are interlinked. Always refer to the manufacturer’s guide or wiring diagrams when dealing with a red wire. |
| Blue | Traveler/Fan Wire | The blue wire is mainly for ceiling fans or three-way switches, and it either serves as a traveler or supplies current for the light when used with a fan motor. |
Always ensure to cut off power from the breaker box before starting on any wiring project. First, check the wires with a voltage tester to ascertain that there is no live electricity. Adherence to safety measures and use of trustworthy resources can make your wiring project both safe and successful. If you are ever in doubt, do not hesitate to seek the help of a licensed electrician.
Using a Canopy with Your New Fixture
A canopy can be considered the main part of the installation of a light fixture; it brings in functionality and aesthetics at the same time. The electrical junction box is usually covered by it, and the fixture is to be mounted either on the ceiling or the wall. To be able to make the most use of the canopy in the right way, you must first line it up with the mounting hardware given along with the fixture. Securing the canopy to the mounting bracket with screws is the next step, making sure that it is leveled and locked tightly to the surface.
Then, carefully weave the fixture wires through the center hole of the canopy, associatively link them by color (for example, connect black with black, white with white, whereas ground with green or bare copper), and finally lock the connections using wire nuts.
Before they are going to be involved, it is recommended to check twice all the connections that they are tight and also insulated correctly in order not to create electrical hazards. Verify that the canopy is the right one for your junction box and fixture, because if components do not match, problems can arise during and after the installation. Always refer to the fixture’s instruction manual for precise rules, and as a rule of thumb, safety and accuracy are the main things. In case you have trouble or doubts, asking for help from an electrician who is licensed is a smart thing to do, as it will guarantee both safety and a nice finish.
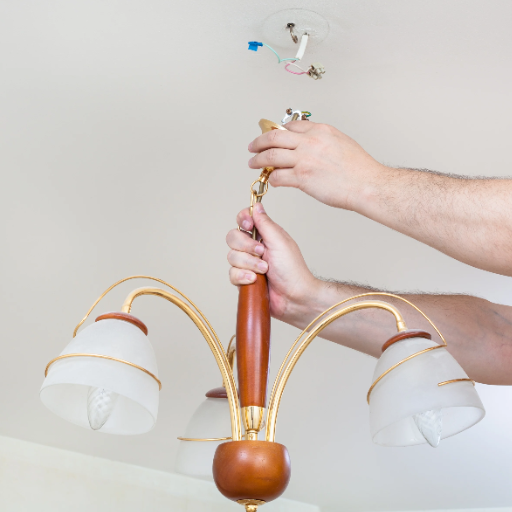
Installing the New Light Fixture
1Turn Off Power
For safety reasons, the first thing you should do is switch off the power at the circuit breaker before you start your work.
2Connect Wires
Attach each wire coming from the heater to the corresponding wire in the junction box, which is more or less black to black, white to white, and green or bare to the grounding wire. Take wire connectors to make them tight.
3Attach the Fixture
The fixture should be placed on the ceiling or wall, and the screws that come with it should be used to tighten it to the junction box securely.
4Install Light Bulbs
Put in the suitable light bulbs as directed in the manual for the fixture.
5Restore Power
The power is to be turned on again at the circuit breaker, and a test is to be carried out to confirm that the light is working well.
Safety and accuracy should always be ensured by double-checking all connections.
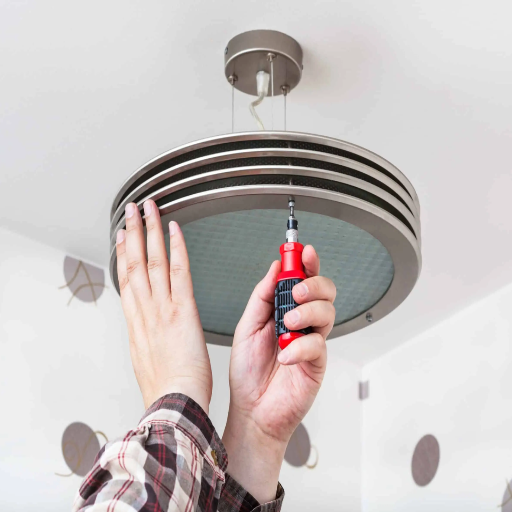
Attaching the Mounting Bracket
The correct and secure fitting of the mounting bracket is a very important installation step for the light fixture. First, determine the right bracket that comes with your fixture. Position the bracket over the junction box so that the screw holes are in line with each other. To make sure that the bracket does not move or create any instability, tightly attach it to the junction box using the screws that come with the fixture.
While performing installation, it is very important to check the load-bearing capacity of the mounting bracket and the ceiling junction box. Generally, standard junction boxes can support the weight of the fixtures of around 50 pounds. If the fixture’s weight exceeds 50 pounds, then ensure the use of a heavy-duty junction box so that it does not fail.
Moreover, all screws and bolts should be securely tightened and evenly to properly distribute the weight across the bracket. Even a small misalignment might put stress on the fixture with time and increase the risk of it being damaged or detaching from the ceiling. If necessary, use a level to confirm that the bracket is in the right position for an installation with even weight distribution. The measures taken ensure the durability and safety of your fixture for long periods.
Securing the Fixture in Place
The proper securing of the fixture is a major step that guarantees both safety and functionality. First, make sure the fixture is perfectly aligned with the pre-installed bracket. The use of the screws of high quality and those that are properly rated according to the fixture’s weight and material type is recommended. For instance, it is usually the case that fixtures of more than 50 pounds require either heavy-duty anchors or toggle bolts to be placed for their steadiness. The tightening of the screws should be done in a cross pattern so that the pressure is distributed evenly, hence reducing the risk of warping or loosening over time.
The latest trends in building codes come to the conclusion that it is better to use the fixtures with built-in stability features, like anti-vibration pads or locking systems, particularly in places where there is a possibility of seismic disturbances. According to studies, the use of anti-vibration pads can lead to up to 30% more fixture movement, thereby significantly improving the longevity of the fixture. The last step is to check and recheck every connection, such as wiring and fasteners, to make sure they are tight and according to the manufacturer’s instructions. It is this meticulousness that will not only prolong the life of the installation but also reduce the necessity for maintenance over time.
Testing the Installation Before Use
The safety, functionality, and dependability of the installation can only be guaranteed through rigorous testing before it is put into operation. As a first step, a thorough visual inspection of all components should be performed to make sure that there are no visible defects or damage suffered during the installation process. After that, conduct a preliminary functionality test to ensure that the electrical systems and mechanical parts work as they should. Today’s industry standards recommend that diagnostic tools, like insulation resistance testers and thermal imaging cameras, should be used to detect possible problems, such as overheating or electrical faults.
Recent studies have proven load testing to be a major factor in ensuring that the system lasts long; thus, it is very important. For instance, structural supports may sometimes be loaded by applying a controlled load to them, which will help in finding out weaknesses that may not show during a normal inspection. Dynamic testing is a must for mechanical systems with vibration or rotation, as they should be evaluated under real-world conditions.
Simulate the possible operational scenarios at all times and keep a detailed record of all test results. A systematic method of testing not only ensures that any faults are fixed before the commissioning but also minimizes the chances of expensive downtimes or accidents caused by the installation being active.
Final Touches and Maintenance
The long-term reliability and safety of a system are ensured if these are the main priorities during the last steps of installation and regular maintenance. Start by doing a thorough inspection of all parts to make sure they are properly put together and positioned. Make sure all connections are firm and check that none of the fasteners are loose. After that, do a final test run to ensure that the system is functioning normally and there are no irregularities.
For maintenance, follow the manufacturer’s suggested schedule for checks, lubrication, and parts replacements. Keep an accurate record of all services done and take care of any problems that arise immediately so that large outages do not happen. System upkeep should include cleaning as well as monitoring, through which performance at best levels can be sustained over a longer period.
Adjusting Light Settings and Features
For the effective adjustment of light settings and features, consulting the user manual for your specific lighting system is the first step to understanding its functionalities. The majority of the systems allow controlling the brightness, the color temperature, and even the scheduling of the automated adjustments.
Then, the system lighting should be connected to its control interface regardless of whether it is a remote, a smartphone app, or a smart home assistant.
When it comes to the brightness, the dimmer settings should be adjusted according to the desired ambiance created, which can be reading, relaxation, or productivity. Many systems have preset modes, such as “night” or “focus,” which differentiate and combine the brightness and color adjustments for the specific tasks. When changing the color temperature, always go for warmer tones for relaxation, as in the evening, and cooler tones to increase focus during the day.
Usually, sophisticated features such as motion-sensing, timers, or syncing lights with music or videos can be set in the app or control interface. Make sure all devices have the latest firmware update for accessing new functions. However, if there are any issues in setup, resetting the system or checking the connectivity settings can often solve the problem. By following these steps, the lighting can be personalized to the maximum comfort and efficiency.
Regular Maintenance Tips for Longevity
I emphasize regular maintenance to keep my smart lighting system in good condition for a long time. I always keep the fixtures and bulbs clean to avoid dust that can cause light quality to diminish. I also make it a habit to check for firmware updates and apply them to ensure that the system works efficiently. I’ll conduct connection checks and replace any faulty parts now and then to make sure that all the equipment is in the best working condition. Turning off lights when they are not needed is another way of extending their lifespan by managing power consumption.
When to Call a Professional Electrician
Need Expert Help?
Knowing when to summon an expert electrician can be a time and money saver while assuring safety. If you frequently run into circuit breaker trips, buzzing noises, or light flickering, these might be signs of deeper electrical problems that need a professional’s help. Also, old wiring, flaming outlets, and a burning smell are serious risks that need professional help immediately. When it comes to major electrical projects, such as adding new wiring, panel upgrading, or outdoor lighting setup, you will need an electrician with a license to make sure the whole system complies with safety codes and regulations. Taking a chance on doing it yourself for complex or dangerous electrical work can result in high-priced mistakes or deadly situations—calling an expert is the most secure way.
Reference Sources
Frequently Asked Questions (FAQs)
How can I safely disconnect the power supply before replacing a light fixture?
To change a light fixture, it is necessary, if not mandatory, to switch off the electric power at the main panel to eliminate any possibility of shock hazard. Find the circuit breaker linked to the light and simply turn it off. In addition, confirm that wires are not live with the help of a voltage tester before moving forward with your DIY project.
Which installation tools would I require for a new light fixture?
When it comes to the installation of a new light fixture, a remodeling set is a must that would include a stripper, a cutter, a screwdriver, and maybe even a ladder to reach the higher points if necessary. Besides, wire nuts and pliers are additional helpers for safely and soundly connecting and holding the wires.
How do I take the old light fixture off?
First of all, powering off is the first thing to do before removing the old light fixture. After that, try to unscrew those mounting screws and slowly but surely lower the fixture down. After that, very carefully separate the wires by untying the wire nuts and separating them. Make sure you push the wires back into the electrical box very safely so that contact will be avoided.
What does it mean by the term wiring a light fixture?
Wiring a light fixture is a process of creating a connection between the light fixture and the wall socket wiring in your house. Normally, this involves connecting the black or red wires for supply, white wires for neutral, and green or bare wires for grounding. It is not a good practice to not twist on a wire nut to secure a connection, as it can lead to dead connections that are not readily visible.
How can I secure the light fixture while the mounting is being done?
Having someone hold the light fixture in position can be very helpful while the mounting bracket is being attached. If you’re on your own, think about using a temporary support, such as a durable wooden plank or a clamp, to press the fixture against the ceiling while you attach the mounting with the screw.
What to do if the old fixture’s weight is beyond the new fixture’s limit?
In case the old fixture’s weight is beyond the new fixture’s limit, you must ascertain whether the mounting hardware can still support the new light fixture. If needed, you may install a stronger mounting box, or a professional electrician’s assistance might be sought to ensure that the installation is safe and successful.
Is it possible to do chandelier light installation without help from professionals?
Absolutely, you can without difficulty install the chandelier light yourself if you are equipped with basic electrical skills and the right tools. Just follow the very simple steps, always be sure to turn off the power, and deal with the wiring attentively. Nevertheless, if any part of the process leaves you unsure, it is always advisable to reach out to a professional to prevent any risks.
How to make the new pendant light fixture length adjustable?
The only way to adjust the height of a new pendant light fixture should you not use chain pliers, is to either remove or add links to the chain. This modification makes it possible to control the altitude of the hanging fixture. Before turning the power back on, make sure that the fixture hangs properly and is firmly attached.
What are the new fixture’s mounting steps that I ought to follow in order to be certain of its security?
To be doubly sure that the new fixture is mounted securely, you should adhere to the following steps: first, the mounting bracket is to be fixed to the electrical box of the ceiling, and this must be done with the utmost care so that it is level. Then, the connecting of wires rolls out according to color designation. Finally, the fixture is to be screwed onto the mounting, and the tightness and stability of the fixture are to be checked before restoring power at the circuit breaker.