Wiring a circuit breaker may seem an intimidating job, but it really is not. Whether for a home improvement project or to maintain the safety and integrity of your electrical system, it’s truly a talent worthwhile knowing: wiring a circuit breaker properly. This guide aims to take you through the entire process one step at a time, so it can edify even a layman to an electrician’s pitch. From tools needed to important safety precautions, you will be familiarized with every single detail required to confidently and safely undertake this job at hand. By the end, you will be able to perform with precision, taking charge of this particular electrical project at your own behest. Shall we proceed?
Critical Safety Notice
WARNING: Working with electrical systems can be extremely dangerous and potentially fatal. This guide is for educational purposes. Always consult with a licensed electrician for any electrical work, especially if you have any doubts about your ability to perform the work safely. Local electrical codes must be followed, and permits may be required.
Understanding Circuit Breakers
Circuit breakers are protective devices that prevent electrical circuits from being damaged by excess current, usually as a result of an overload or short circuit. Interruptions are made automatically by the circuit breaker in the presence of a dangerous fault to shut off the flow of electricity, allowing the conductors to cool down and thus preventing a fire. Circuit breakers are important for the safety as well as the working of electrical installations in homes, businesses, and other locales. Modern circuit breakers are very reliable, easy to reset, and available in several sizes and types to meet particular electrical requirements.
What is a Circuit Breaker?
The circuit breaker is one of the most essential safety devices in an electrical system, which prevents the flow of electric current during an overload, or short circuit, or if any other fault occurs. In that process, an overcurrent may cause an electrical circuit to overheat, which may cause damage to the equipment or a fire. Unlike fuses, circuit breakers can be reset after tripping, rendering them a very handy and reusable option. These devices have variants by kinds and sizes, like standard breakers, ground fault circuit interrupters (GFCI), and arc fault circuit interrupters (AFCI). These were designed to address various safety issues in residential, commercial, and industrial setups.
Types of Circuit Breakers
The classification of circuit breakers depends upon their functions, construction, and applications. The principal types are:
| Breaker Type | Function | Common Applications | Key Features |
|---|---|---|---|
| Standard Circuit Breakers | Protect against overloads and short circuits | General electrical circuits | Most common type, automatic tripping |
| GFCI Breakers | Ground fault protection | Bathrooms, kitchens, outdoors | Prevents electrical shock in moisture areas |
| AFCI Breakers | Arc fault detection | Living rooms, bedrooms | Fire prevention through arc detection |
| MCB (Miniature) | Compact overload protection | Residential and light commercial | Space-saving design |
| MCCB (Molded Case) | High-capacity protection | Industrial environments | Adjustable trip settings, high capacity |
Standard Circuit Breakers
The most common type of breaker, designed to safeguard electrical circuits from overloads and short circuits. Under conditions when the current exceeds a set limit, these breakers are tripped automatically to protect from overheating and subsequent failure.
Ground Fault Circuit Interrupters (GFCIs)
These are special circuit breakers that give protection against ground faults that take place when electrical currents stray outside the designated path and can be a risk to life by way of electric shocks. GFCIs are generally used in places prone to moisture, such as in bathrooms, kitchens, and outdoors.
Arc Fault Circuit Interrupters (AFCIs)
The primary purpose of AFCIs is to detect harmful arc conditions in wiring that can result in a fire. They provide enhanced protection by interrupting the circuit before the occurrence of major damage and are mainly installed in living rooms, bedrooms, and other residential places.
Miniature Circuit Breakers (MCBs)
MCB is a very handy compact device that protects from overload and short circuit. These are usually applied in residential uses and light commercial purposes.
Molded Case Circuit Breakers (MCCBs)
Catering to higher energy demands, these breakers provide adjustable trip settings and accommodate large load capacities, ideally suited for industrial environments.
Each type of circuit breaker has been designed to fit a particular electrical safety need so that appropriate protection is given in varying scenarios and environments.
Importance of Circuit Breakers in Electrical Circuits
Circuit breakers play a paramount role in guaranteeing safety and functionality in electrical systems. These act to avert possible electrical fires and destruction of equipment and property during fault conditions such as overloading, short circuits, or grounding faults. In an automatic switching action, they ensure that wiring, devices, or contingencies do not result in overheating or electrical surges, thus reducing the likelihood of a mishap.
Furthermore, from a convenience and economic standpoint, circuit breakers prove superior to fuses as they can be reset and reused after tripping. Modern circuit breakers now come featured with adjustable trip settings and large interrupting capacities in order to suit residential, commercial, and industrial requirements alike. Being versatile and reliable is what allows them to maintain an electrical infrastructure while upholding safety standards in various applications.
Preparing for Breaker Installation
Pre-Installation Preparation Checklist
- Understand Your Electrical System – Confirm the type and capacity of your electrical panel to confirm that the circuit breaker you are about to install is compatible
- Choose the Right Breaker – Choose a breaker that matches the circuit amperage and panel specifications
- Turn Off the Power – Turn off the power to the electrical panel to allow for safe working conditions. Use the voltage tester to verify that the power is actually off
- Commence Installation by Assembling Tools – Use a screwdriver, wire stripper, and gloves to carry out a smooth installation
- Check Local Codes – Confirm that the installation meets the requirements specified by local electrical codes and regulations to ensure safety and reliability
With these steps, you can accomplish a safe and efficient installation process.
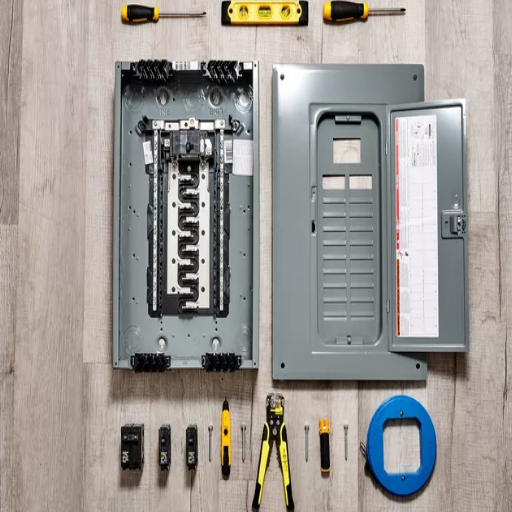
Tools Required for Wiring a Circuit Breaker
Some tools that should be used when wiring a breaker circuit are:
Essential Tools
- Screwdriver Set: Used to open panel covers and secure connections. Both flathead and Phillips must be in the set
- Wire Strippers: These strip the insulation from the wires in order to make a clean and precise connection
- Voltage Tester or Multimeter: Very necessary to check if the power is off and operate safely
- Needle-Nose Pliers: Useful to bend, shape, or hold wires from one side
Safety & Finishing
- Insulated Safety Gloves: For the protection of hands from electrical shocks
- Cable Clamp or Romex Connectors: These are used to fasten the electrical cable to the breaker panel
- Electrical Tape: Used to insulate wire connections and ensure further safety
- Flashlight: Very handy when one needs to work down at unlit electrical panels
- Labeling Materials: Label the circuits adequately so that it is easy to identify later
By having the tools ready beforehand, you can simplify wiring while maintaining safety and accuracy.
Safety Precautions Before Starting
Critical Safety Requirements
Before any work on the electrical wiring, take these precautions to avoid risking life:
- Turn Off Power: Always switch off the main power supply through the breaker panel. Use a voltage tester to check for any live current before you proceed
- Wear Protective Gear: Wear insulation gloves and goggles as a safeguard from electric shock and debris
- Work in Dry Environment: Check that the working environment stays dry, as the presence of water will drastically increase the risk of electrical shock
- Use Proper Tools: Use only tools with insulated grips designed for electrical work
- Know Your Wiring Diagrams: Get familiar with the breaker panel layout and wiring diagrams to avoid confusion and mistakes
- Never Work Alone: If at all possible, try to have someone close by for emergency response
Taking these precautions will keep you safe from all kinds of hazards and will improve performance while wiring. Safety always must be given prime consideration whenever electricity is dealt with.
Identifying the Right Circuit Breaker for Your Needs
Choosing the wrong breaker could compromise the very safety and functionality of an installed electrical system. Some of the parameters for choosing a breaker are:
Know the Type of Circuit Breaker
Types of breakers can be single-pole, double-pole, GFCI (Ground Fault Circuit Interrupters), and AFCI (Arc Fault Circuit Interrupters). Depending upon your circuit’s safety and application requirements determines which type should be installed there.
Know the Amperage Rating
Circuit breakers are rated by how many amps they are expected to handle. Residential circuit breakers usually range from 15 to 50 amps. The breaker chosen should have the correct amperage rating to fit the rating of the load in order to avoid overheating and premature tripping.
Check Compatibility with Your Panel
Not all breakers may be interchanged, as they must fit your electrical panel’s brand and model. Refer to your panel’s manufacturer’s guidelines to ensure you purchase a compatible breaker.
Amount to Voltage Requirements
Check whether your circuit requires a single-phase or three-phase breaker and confirm that its voltage rating meets the requirements for that circuit. This will ensure safety and avoid damaging equipment.
Ensure Proper Certification
Choose breakers that comply with safety specifications, e.g., have a UL (Underwriters Laboratories) certification, ensuring that they are reliable and conform to electrical codes.
By thoroughly and carefully considering type, amperage, compatibility, voltage, and certification, you can find the correct circuit breaker for the electrical load and a safe environment in your house or workspace.
Step-by-Step Installation Process
1. Power Off
Turn off the ain power and verify with a voltage tester
2. Remove Panel
Carefully remove the panel cover to access the breakers
3. Install Breaker
Position and snap the breaker into place
4. Wire Connections
Connect hot, neutral, and ground wires
5. Test & Finalize
Test connections and replace the cover
Steps to Wire a Circuit Breaker
- Turn Off the Main Power: Before commencing any work, you need to switch off the main power to guarantee safety and avoid any risk of electrical shock.
- Removing the Panel Cover: Unscrew carefully and remove the panel cover to gain access to the breaker slots within the electrical panel.
- Select the Proper Slot: Pick an open slot so that it will accept the new circuit breaker you have to fit.
- Connect the Circuit Wires: Fasten the circuit hot wire (usually black) to the breaker terminal, and tighten the screw. Connect the neutral wire (white) to the neutral bus bar and the earth wire (green or bare copper) to the earth bus bar.
- Snap the Breaker into Place: Push the breaker lightly into the selected slot, putting it correctly into place with a snap.
- Check and Secure: Check again to see that all the connections are tight and secure and that the breaker itself is seated properly in the panel.
- Reinstall the Panel Cover: After the wiring and connections have been completed, the panel cover can be restored and screwed back into position.
- Test the Circuit: Turn on the main power again, and push the new breaker switch into the “ON” position. Test the circuit to make sure it’s working correctly.
If one does everything carefully, these steps will guarantee an efficient and safe wiring of a circuit breaker; if you do have doubts, aim to consult an electrician, who will ensure that the installation is done properly.
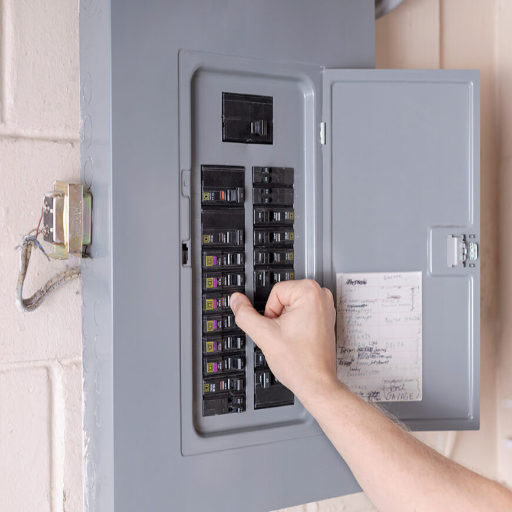
Locating the Breaker Panel
It is essential to locate your home’s breaker panel when managing the electricity system. Generally, breaker panels are found in utility areas in the basement, garage, or storage room. They can also be placed on an exterior wall for convenient outdoor access. Identify a flat or slightly recessed metal box on the wall. The exact location varies, depending on local building codes: it can also be near where power enters the house, such as near an electric meter. If you cannot locate the breaker panel, you may check your home’s blueprint or call an electrician for help.
Removing the Panel Cover
Following these instructions will ensure that the panel cover is removed safely:
- A Matter of Safety: One must ensure the main breaker is off, killing power to the entire panel. Always wear insulated gloves and stand on a dry, non-conductive surface for protection against shocks.
- Screw Location: Look for the screws or fasteners that hold the cover in place. Usually found at the corners or edges of the panel.
- Unscrew: Using your screwdriver, proceed to remove the screws while ensuring a firm grip on the cover to prevent it from falling.
- Remove the Cover: Position yourself so that you can carefully lift the cover, keeping it steady so as not to jar any internal components.
- Inspect the Inside-The-DE-Panel: With the cover off, it is possible to see the circuit breakers and wiring connections.
Warning: Potentially hazardous live electrical components may cause injury inside the panel. Unless you are qualified, do not enter into, touch, work in, or interact in any way with the panel, really. If you are not sure about any of these steps, always err on the side of caution and consult a licensed electrician.
Wiring the New Circuit Breaker
- Power Off the Entire Board: Keep in mind to switch off the main breaker, which cuts the power to the whole board. Check it once more with a voltage tester to make sure there’s no voltage.
- Select an Appropriate Slot: Find any free slots in the breaker panel that can accept a new circuit breaker of the size and type you are installing. Ensure the breaker fits the panel model.
- Insert the Breaker: Insert the new circuit breaker into the slot chosen, aligning with the mounting design of the panel. Press it firmly until it snaps securely into place.
- Wire the Breaker: Attach the circuit wires to the breaker terminals. Usually, the hot (black) wire goes to the breaker itself; the neutral (white) wire goes to the neutral bar. If a ground wire is available, connect it to the ground bus in the panel.
- Check Your Connections: Double-check that all wire connections are tight and secure. Loose connections can cause short circuits or overheating.
- Replace the Cover: Once every wiring and equipment installation inside the panel has been done securely and double-checked, carefully place the panel cover back and fasten it with the screws.
- Restore Power and Test: Turn the main switch back to the power position, and then switch the new circuit breaker on. Check whether your circuit is working fine without any overload.
Safety Note
There is always a high risk when working on electrical connections. If you can’t say with a full 100% confidence that you can do this work, then ask an electrician to do it. Always remember your safety comes first.
Connecting the Breaker to Your Electrical Panel
- Ensure Power is Off: Switch off the main breaker in the panel to cut power and ensure that there is safety to work on the panel. Check using a voltage tester to confirm whether there is no presence of power.
- Inspect the Panel: Check the breaker slot for compatibility and ensure that nothing is present to obstruct. Ensure the slot is correct for the breaker type.
- Trouble-fit the Breaker: Position the breaker in its slot within the panel, then give it a sufficient push until you hear a click, indicating it has locked.
- Attach the Wires: Connect the circuit hot wire to the breaker’s screw terminal and tighten it properly. Guarantee no strand of wire is left exposed beyond the terminal.
- Recheck All Connections: Verify that all connections are secure and that the breaker is fully engaged in its slot.
- Restore Power and Test: Turn on the main breaker. Next, switch on the newly installed breaker and test the circuit it controls with a voltage tester for proper operation.
Safety first. If unsure of any step, always hire a licensed electrician.
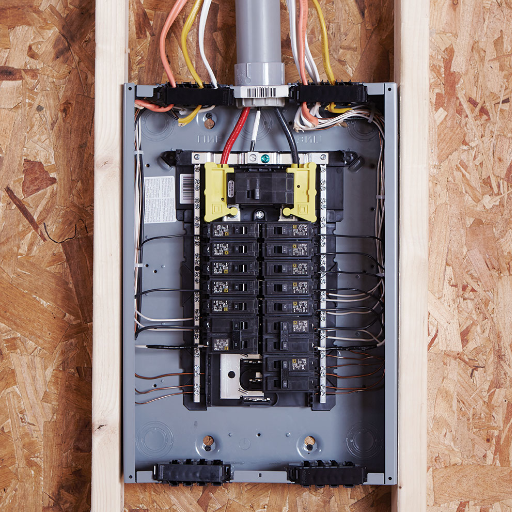
Understanding the Electrical Panel Layout
The main electric panel is the basic control for all power supplies to a building, with the intention of distributing electricity to various circuits throughout the home or on the property to promote safe and efficient operation. Circuit breakers are installed inside the panel, functioning as protective devices against overloading and electrical hazards. These breakers correspond to designated circuits on either the interior or exterior of a home in service to certain areas and/or devices.
In identifying circuits, look for labels around or near the breakers that identify rooms or appliances they control. Then comes the main breaker, usually found at the very top, and that serves to quickly shut off power to the entire panel during emergencies. An installation of sub-panels may also come in handy for even larger buildings or particular areas to offer further control and flexibility.
Understanding the layout is very important when working on the troubleshooting of electrical problems, installing new circuits, or even resetting tripped breakers. Always hire a licensed electrician to make any complex changes or repairs to guarantee safety and adherence to local electrical codes and standards.
Properly Connecting the Breaker
Depending on a few simple things, a breaker can be connected.
Preparation and Power Switch-Off
Start by switching off the main breaker. Be sure to double-check using a voltage tester to ensure that no power is supplied to the panel. Electrical hazards might result if this precautionary measure is overlooked. Always ensure that you use insulated tools and provide safety for yourself, such as with insulated gloves.
Pick the Appropriate Breaker
Make sure that the breaker you are about to install fits the panel in amperage, compatibility, and type. Wrong breakers will either function improperly or represent potential danger.
Locate and Position the Breaker
Locate the slot into which the breaker will be inserted. Snap it into place by aligning it with the mounting track. Give the breaker a good push to be sure that it is well seated.
Attach Wiring
Stripping wire insulation (if necessary) and attaching it to the terminal on the breaker. Then tighten the screw tightly, but do not over-tighten and break the wire. Double-check the wire to ensure it is sitting correctly.
Checking and Restoring Power
Ensure all work is clear of the panel once the breaker has been firmly installed and connected. Turn on the main breaker and check that the circuit is functioning correctly.
If you lack experience or become uncertain at any stage, it is strongly recommended to consult or hire a licensed electrician to ensure that your electrical system is safe and functioning.
Testing and Final Steps
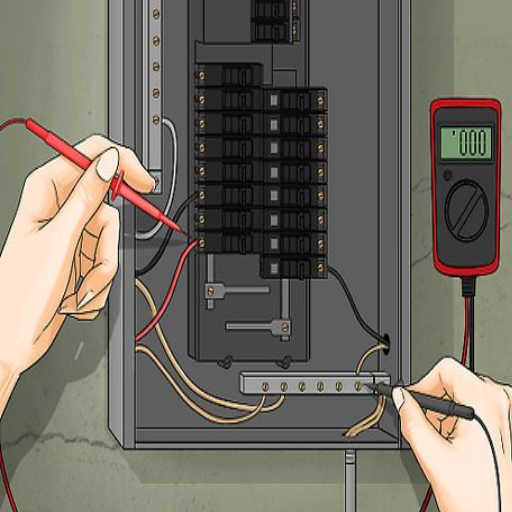
Testing Your Connections
Once all the connections have been completed, their effectiveness must be ensured to ascertain safety and working order.
- Test the voltage of the circuit using a multimeter and check that it corresponds to the expected voltage output
- Switch on all the connected appliances or other devices to see whether they function correctly
- Any odd behavior, such as flickering lights or a buzzing sound, may be a clue to faulty connections or some other problem
- Should problems still arise, look over the wiring and connections again or call in a licensed electrician
Safety first: keep all tools and hands away from live wires while testing.
Finalizing the Installation

Now, to finish the installation, make sure all devices and appliances work correctly and through any tests performed. Immediately treat abnormalities such as flickering lights or odd sounds by checking the connections or consulting the professionals. Secure wiring and components, and be sure that all safety regulations are met. After the confirmation, tidy up the workplace, dispose of debris conscientiously, and keep installation records for future reference. Ensure safety is absolute during installation.
Replacing the Panel Cover
Replacement of the panel cover necessitates the area being secured and the removal of all tools and materials that might pose hazards or simply be inconvenient around the panel. After the cover has been set into proper alignment with the panel box, it must be verified that no breaker switches or components are left protruding loosely beneath it. The panel cover should then be secured with screws, ensuring an even tightening so no gaps are formed. Check again to ensure the cover lies flush with the panel box, does not obstruct the breakers, nor the access points. These areas should then be checked for loose debris or suspended items, and the panel should be firmly labeled for future ease of use. Care should always be taken when handling the cover and screws so as not to cause damage, while all safety procedures should be observed.
Testing the Circuit Breaker Functionality
For verifying the operation of breakers, I first ensure that all connected load devices are completely switched off to prevent any damage in case testing is carried out. Then each circuit breaker is turned off and back on to test the smoothness of operation. Using a voltage tester, I would check the voltage at the output terminals of the breakers. Any inconsistencies are duly noted, requiring further inspection or replacement. This procedure guarantees the correct operation of the breakers and the electrical system’s safety.
Final Safety Reminder
Remember: Electrical work is inherently dangerous and can result in serious injury, death, or property damage if performed incorrectly. This guide is for educational purposes only. Always:
- Consult with a licensed electrician for any electrical work
- Obtain proper permits as required by local codes
- Follow all local electrical codes and regulations
- Never attempt work beyond your skill level
- When in doubt, hire a professional
Reference Sources
Design and Development of an Automated Electrical Circuit Fault Protector with an Alarm System
Optimization of Adaptive Control Technique for Grid-Integrated PV-DSTATCOM
Frequently Asked Questions (FAQs)
How to wire a new circuit breaker?
Wiring for a new circuit breaker shall always include shutting off the main power, putting away the panel cover, connecting the black hot wire into the circuit breaker terminal, wiring of white neutral to the neutral bus, and securing both the black and white wires. At this point, the panel cover can be put back on, and the power can be turned on.
How do I put a circuit breaker in the breaker box?
Begin by turning off the main breaker. Remove the panel cover, then select an available slot in the electrical panel. Connect the branch circuit’s black hot wire to the breaker terminal, and connect the white neutral wire to the neutral bus. Secure the breaker to the electrical panel, replace the panel cover, and restore power.
What’s the purpose of a circuit breaker?
A breaker is a safety device that helps protect electrical circuits from overload damage and short circuits. Inability to interrupt electricity once a fault is detected can cause hazards like fires or damage to equipment.
How do I go about adding one more circuit to an electrical panel?
You first select the type of circuit breaker that is appropriate, switch off the main power, and insert the breaker into an available slot in the breaker panel. Afterward, attach the circuit wires to the breaker and check if proper securing has taken place before switching the power back on.
What else should I really know about wiring circuit breakers?
When wiring circuit breakers, one should make sure the wires used correspond with the gauge required for the amperage of the breaker. Connect the black (hot) wire to the breaker terminal, and the white (neutral) wire to the neutral bus. Always keep safety procedures in mind and seek help from an electrician if unsure.
Can the main circuit breaker be replaced in the breaker panel?
Yes, the main circuit breaker can be replaced in a breaker panel. Usually, all power is turned off, the cover is removed, the old breaker is taken out, and then the new breaker is installed and secured in the box. The connections must be checked to ensure tightness and no movement before placing the panel cover back on.
What is a ground-fault circuit interrupter?
Ground-fault circuit interrupters protect against electrical shock by running a check on the current balance. If any imbalance is detected in any fraction of a second, the power is turned off. This protection is essential in areas where water is present.
How do I wire a new branch circuit?
Before wiring new branch circuits, first turn off the power. Run the correct wires from the breaker box to the outlet location. Connect the black hot wire to the circuit breaker, the white neutral wire to the neutral bus, and ground the bare wire to the grounding bar in the panel.
What is the difference between individual and branch circuits?
In an individual circuit, there might be one outlet or appliance; conversely, a branch circuit has outlets or controls loads. A house electrician needs to keep this distinction in consideration, so a built-up circuit will never have an overload issue.