Correct marine electrical wiring installation is crucial for the safety of life and property on every vessel, whether it’s a small recreational boat or a large commercial ship. Given the excellent marine conditions, disposal into saltwater, continuous vibration, and adverse weather, components must meet higher-grade standards and employ special techniques to ensure reliability and extended service life. First of all, learn about standardizing marine electrical equipment, wiring techniques, and procedures that every boat owner/technician should recognize. This guide will help you maintain your marine wiring safely and efficiently, whether you’re upgrading the vessel’s electrical system, troubleshooting faults, or learning the basics.
Understanding Marine Electrical Systems
In the design of marine electrical systems, the primary consideration is to supply power to the vessel’s equipment while ensuring the system meets safety, functionality, and withstands harsh environmental conditions. Typically, such systems include batteries, cables, circuit protection, switches, and distribution panels. The basic principles of marine electrical installation involve using materials that are marine-grade and resistant to corrosion. They also require the correct circuit protection against overloads and must be implemented by accepted standards, such as those of the American Boat and Yacht Council (ABYC). Marine electrical systems must undergo regular maintenance and inspections to identify potential problems, such as loose connections or damaged components, thereby ensuring the system’s working reliability with safety.
Components of a Marine Electrical System
A marine electrical system comprises several significant components that work together to ensure usability and safety on a ship. They include:
Batteries and Battery Banks – They serve as the primary power source for starting engines, operating onboard electronics, and powering auxiliary systems. They are typically marine-grade deep cycle batteries, made with materials suitable for use in marine environments, known for their durability and capacity.
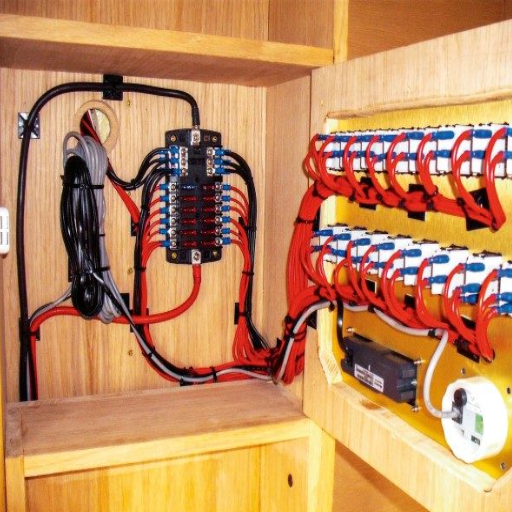
Wiring and Connectors – Through marine-grade wires and connectors, originality and durability are created amidst the corrosive weather of the marine environment. The wire gauge used must be proper to handle electrical loads safely.
Circuit Protection – To prevent the system from being overloaded or experiencing short circuits, fuses, breakers, or terminal blocks are necessary to avoid system damage or fire hazards.
Switches and Panels – These distribution panels, toggle switches, and selector switches control and manipulate the flow of current into different compartments of the vessel.
Alternators and Charging Systems – The alternator charges the batteries while the engine is running, thus providing a constant power supply to the onboard systems.
Shore Power Connections – Shore power inlets and cables enable a ship to connect to an external power source located at docks, supplying AC power to onboard systems.
Inverters and Converters – These devices convert between AC and DC power, enabling them to power the equipment.
Integrating the above set of components while adhering to marine electrical standards ensures the vessel’s electrical system is reliable, efficient, and safe for operation. One must reserve the rear for occasions requiring maintenance and upgrades, as well as the extension of onboard powers that are ever evolving.
Importance of Marine Grade Wiring
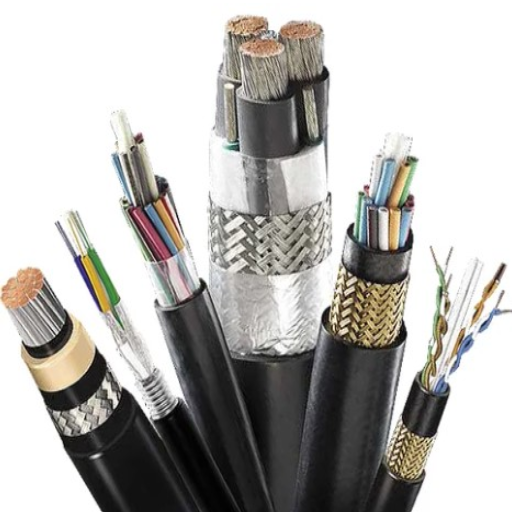
Marine-grade wiring has been designed for the harsh conditions of aquatic environments, including high humidity, saltwater, and temperature variations. Unlike regular household wires, marine wires are made with tinned copper, which offers superior corrosion resistance and a longer lifespan, even in corrosive environments. The insulation materials are manufactured to be abrasion-resistant, UV-resistant, and resistant to chemical exposure, making them comparatively very tough and safe for underwater use.
Improper wiring or the use of non-marine-rated electrical devices can significantly increase the incidence of fires and failures aboard vessels. For example, electrical failures account for approximately 20% of all boat accidents each year; however, high-quality marine wire can reduce these incidents by maintaining a stable flow of electricity, limiting voltage drops, and distributing power reliably.
These marine wires are tested against the stringent criteria established by the American Boat and Yacht Council (ABYC) or its counterparts in other countries, which require the wiring to withstand both vibration and mechanical stress caused by the working environment of a moving boat. From a safety standpoint, an investment in marine-grade wiring can take you far down the road; from a maintenance standpoint, marine wire will reduce maintenance costs along the way, as issues such as corrosion-induced failure or poor connections are minimized.
Marine-grade wiring provides operators of vessels with safety and efficiency, meeting the expectations of reliability.
Common Electrical Standards for Boats
Several widely accepted standards work collaboratively to ensure the safety and reliability of marine electrical systems. These standards outline the parameters for designing, installing, and maintaining electrical equipment used on boats, aiming to minimize the risk of failures in harsh marine environments.
1. ABYC Standards: The American Boat and Yacht Council has set forth a comprehensive set of standards for boating electrical systems. For example, they cover wire sizes, load currents, and distances. Grounding systems must be securely connected, and the insulation should be capable of withstanding high temperatures and exposure to moisture. ABYC Standard E-11 covers AC and DC power, wiring protection, and protection against overload and short circuit using circuit breakers.
2. ISO Standards: The International Organization for Standardization issues international regulations such as ISO 13297 on AC and DC electrical installations on small boats. It describes specifications about cable routing, arrangements for earthing, and protection against overcurrent. Compliance ensures that electrical systems comply with new environmental and performance standards under varying conditions.
3. UL Marine Standards: Underwriters Laboratories (UL) certifies marine electrical products. Regarding UL listing for marine components, it means that they have been tested and meet specific safety, reliability, and durability criteria. For instance, UL 1426 covers wiring for boats that require cables to resist oil, water, salt, and UV radiation corrosion.
4. NFPA 302: The National Fire Protection Association brings in fire safety standards that are crucial; for instance, one applicable to pleasure and commercial motor craft is NFPA 302. It specifies ignition-protection requirements and the design of fuel systems and electrical installations to promote fire safety aboard.
5. SOLAS Regulations: The Safety of Life at Sea (SOLAS) treaty dictates electrical safety regulations for commercial vessels. These regulations are primarily applicable to larger ships; however, some of the requirements are also similar to those for smaller vessels, such as emergency power systems and fireproof cables.
By adhering to these standards, boat operators and manufacturers minimize various risks posed by the marine environment, including corrosion, electrical shorts, and fire hazards. Adequate maintenance and periodic auditing of electrical systems ensure that they comply with these statutory measures, ultimately benefiting the smooth functioning and operational safety of all types of vessels.
Wiring Techniques for Boats

One of the main aspects considered for boating safety and efficiency is the wiring process. Use marine-grade wire made of tinned copper, which is corrosion-resistant and highly durable in a harsh marine atmosphere. Route wires carefully away from areas where moisture, heat, or abrasion could cause issues. It is essential to use the correct connectors with heat-shrink tubing instead of electrical tape, as these are designed to provide a watertight and secure connection that does not degrade over time. Label all wires clearly for identification and organization during maintenance. Lastly, all electrical circuits should be protected by circuit breakers or fuse-cans to prevent overloading or short circuits. Adhering to these basic wiring principles helps reduce risk and extend the lifetime of the boat’s electrical system.
Choosing the Right Marine Electrical Wire
Selecting the correct electrical wire for marine use is essential for ensuring safety, reliability, and longevity. The marine environment subjects wires to moisture, salts, vibrations, and temperature fluctuations, while the wiring solutions are designed to withstand these harsh conditions.
Marine-grade wiring typically utilizes tinned copper conductors, as they resist corrosion more effectively than bare copper wire. Corrosion-resistant materials maintain the wire’s conductivity over time, even in salty or damp environments. The American Boat and Yacht Council recommends using stranded wire instead of solid conductor because stranded wire is easier to flex, thus minimizing the risk of fatigue and breakage caused by vibrations and movements on the water.
Another essential aspect of a wire is its insulation. Look for rated insulation for high heat and abrasion resistance. Cross-linked polyethylene (XLPE) is highly favored for this application due to its ruggedness and ability to perform over a wide temperature range, typically spanning from -40°F to 257°F (-40°C to 125°C). It enables wiring to withstand various operational conditions without compromising functionality.
Consider wire gauge as well. Using the correct gauge size prevents voltage drops and overheating. Put simply, a higher current draw requires thicker wire, and heavier wire is needed for larger winch operations or air conditioners. In layman’s terms, 12V wiring at 30 amps over 10 feet would require approximately 10 AWG wire to minimize voltage drop to below 3%. Always consult a voltage drop calculator or wiring chart to ensure a proper choice.
Finally, ensure that all your marine wires adhere to industry standards, such as UL1426 or ABYC standards, as these standards guarantee that all wiring is tested and quality-checked for marine use requirements. Proper marine electrical wire selection is a prerequisite for improving your vessel’s safety, electrical performance, and developmental resistance to marine environmental challenges.
Step-by-Step Guide to Wiring a Boat
Plan Your Electrical System: Begin by creating a system design that meets your boat’s specific electrical requirements. List every detail, such as the lights, navigation keepers, pumps, and chargers. Making a wire diagram will keep everything more precise and organized in the layout.
Choose Wires: Select marine wires rated for the proper working voltage by accepted standards, such as UL1426 or ABYC, to ensure safety and durability. Select wire gauges relative to the length of the run and its amperage requirements, using wire gauge charts for precision.
Install the Battery and Fuse Panel: The battery should be installed in a well-ventilated, secure location, with the fuse panel fitted to provide circuit protection. Proper grounding will help prevent faults and corrosion issues.
Wire Routing: During wire routing, avoid sharp edges, areas prone to abrasion, and locations with excessive heat. Secure wires using cable ties or clamps, and keep them neat. Use wire conduits or looms if extra protection is needed.
Connect the Components: Crimp-on connectors or terminal lugs can be used to connect wires to components, ensuring that insulation is not compromised. Make neat, secure connections and protect exposed terminals with heat-shrink tubing to prevent moisture from entering.
Put Switches and Breakers: Every circuit must have a breaker or fuse for protection. Install switches that allow for switching the power on or off to individual components, and clearly label each one.
Test the System: After verifying connections and switches, test every circuit in operation. Resolve any issues immediately before proceeding.
Seal the System: Waterproof any connection or exposed wire found vulnerable to water intrusion using appropriate sealants or waterproof connectors. Regularly check their levels of wear and tear.
Following the above procedure will allow you to wire your boat with confidence, safely for work, efficiently, and ready for the rigors of the marine environment.
Using Heat Shrink Tubing for Connections
Heat shrink tubing is a crucial item for creating durable and waterproof electrical connections aboard your boat. It provides sound insulation, strain relief, protection against moisture, corrosion, and abrasion. For the practical application of heat shrink tubing, one should first select tubing that will shrink to the required amount. The most commonly available shrink ratios are 2:1 and 3:1. The shrink ratio indicates the level to which an object will be shrunk when heat is applied. For typical marine environments, one should use a dual-wall heat shrink tubing with an adhesive lining that, when heated, creates a truly waterproof bond.
When applying the tubing, ensure it is cut to the proper length, completely covering the area of the joint or splice underneath. Slide the tubing over the connection before heating. Using a heat gun or a suitable heat source, shrink the tubing evenly, being careful not to overheat it, as overheating can damage the material. When fully shrunk, the tubing will closely fit the position of the connection, thereby solidifying the protection.
According to the best available data from industry research, heat shrink tubing can extend the lifespan of electrical connections by up to 40% in high-moisture environments, making it a very cost-effective way to increase the working time of your marine wiring system. Always opt for high-quality materials rated for marine use to ensure optimal performance in harsh conditions.
Key Components of Marine Wiring
Setting Up Wiring: The marine-grade wire consists of tinned copper, resisting corrosion from moisture and salt. Wires should be rated for marine use to ensure durability and safety.
Heat Shrink Tubing: It is a protective covering that insulates and secures the connections against moisture, dirt, or corrosion, thereby offering the electrical components a very long life.
Connectors and Terminals: Use good-quality marine-grade connectors and crimp terminals to ensure reliable and lasting electrical connections. Avoid using plain automotive connectors as they are not built for marine conditions.
Circuit Protection Devices: Circuit breakers are vital, especially for protecting the electrical system from overloads, while fuses serve a similar purpose in preventing damage from short circuits.
Proper Cable Management: Cable ties, clamps, and conduits help usher wires in, preventing wear and accidental damage. A neatly arranged wire path also helps in future maintenance.
Ensuring that each component meets marine-grade quality standards provides a reliable, workable wiring system that can withstand the rigors of a marine environment.
Understanding Wire Gauge and Its Importance
Wire gauge refers to the physical size or diameter of the wire, which determines how much current the wire can carry; hence, resistance, current, and efficiency are closely related to wire size. The American Wire Gauge (AWG) system is most commonly used to denote these sizes, where a smaller gauge number represents a larger wire with more current capacity. For example, a 10 AWG wire carries more amperage than a 16 AWG wire, thereby corresponding to high-power circuits.
Selecting wire gauge is an essential aspect of marine installation. A wire with too small a gauge will overheat, destroy the insulation, and, in the worst case, cause a fire. For example, a marine environment typically requires a 14 AWG wire for a length of 10 feet with a maximum rating of 15 amps. Going beyond that length necessitates compensation for voltage drop, and a voltage drop exceeding 3% can impact equipment operation if not on a higher voltage.
Thicker wires are needed to cover a long distance. For instance, for a power supply line extending 20 feet, a 1 AWG wire may be warranted to ensure it can handle 100 amps without excessive voltage drop. Marine-grade wire should always be used, which typically means the copper is tinned for corrosion resistance in those saline and humid conditions. Proper wire gauge consideration and proper wire application form the basis of any safe and reliable electrical system.
Types of Connectors and Terminals Used in Marine Wiring
Connectors and terminals need to complement one another, designed to withstand harsh conditions experienced out at sea while working in marine wiring installations. The most commonly used types of connector configurations include crimp, heat shrink, and butt connectors. Crimp connectors are very popular because, when high-quality crimping tools are employed, they provide an excellent mechanical bond between the wire and terminal. Heat shrink connectors incorporate a layer of insulation, providing additional protection, which utilizes an adhesive-lined heat shrink sleeve that seals out moisture to prevent corrosion. Butt connectors serve extremely well and are simply used for splicing two wires together to assure durability and vibration resistance.
Terminal-wise, the most common are ring and spade terminals. Ring terminals are rugged and provide a secure connection, as the ring must be tightened fully around the stud or screw, making them suitable for heavy-duty applications. Spade terminals, conversely, are straightforward and fast to connect and disconnect, making them the best candidates for more temporary setups. Ensure, in any case, that marine-grade tinned copper connectors and terminals are used, as they offer the best corrosion resistance and long service life in the harsh marine environment. Therefore, the proper selection and installation of connectors and terminals are essential aspects of a safe and efficient marine electrical system.
How to Properly Use Crimp Connectors
When crimp connectors are correctly used, they provide secure and reliable electrical connections, especially in demanding applications such as marine environments. Stepwise optimization for crimping techniques includes the following:
Choose the Right Connector and Wire Gauge: Ensure the crimp connector fits the wire gauge you are using. An improperly sized connector can lead to loose connections, or even worse, damage the wire, posing a serious threat to the safety and performance of the electrical system. Most crimp connectors are either labeled or color-coded according to the wire size with which they are compatible.
Prepare the Wire: Strip the insulation from the wire using a wire stripper, exposing approximately 1/4 to 3/8 inch (6-10 mm) of copper strands. Avoid nicking or damaging the conductor during this operation, as it may weaken the connection.
Insert the Wire Correctly: Insert the stripped wire portions fully into the crimp connector, ensuring that all wire strands are entirely within the connector barrel. This ensures that there are no loose bits outside, thereby providing good electrical contact.
Use the Appropriate Crimping Tool: Employ a high-quality crimping tool specially made for the connector type you are using. Many tools exist, such as ratchet crimpers, which ensure a uniform application of pressure and a neat crimp. Do not use pliers or any other makeshift things, as they can make uneven and unreliable crimps. Industry data indicate that improperly crimped connections cause up to 70% of electrical failures in specific environments.
Use Correct Pressure While Crimping: Position the crimping tool over the connector barrel and squeeze with steady, even pressure until the connector is firmly crimped onto the wire. You should notice the typical deformation of the barrel, reflecting a mechanically and electrically sound bonding. Test your crimp by gently pulling on the wire; if it is firmly bonded, your crimp has passed.
Seal the Connection (Optional): For added protection, particularly in areas where exposure to moisture or vibration is likely, consider using heat-shrink connectors with an adhesive lining for enhanced security. Apply heat evenly post crimping and create a waterproof seal that increases longevity.
By following the steps mentioned above and investing in high-quality materials and tools, you can ensure that your crimp connectors provide reliable, long-lasting, and efficient connections. Properly crimped terminals help reduce resistance buildup, overheating, and premature electrical failure, thereby ensuring all your electrical systems remain functional.
Inspection and Troubleshooting of Marine Electrical Systems
Regular inspections and troubleshooting are crucial to the safety and proper functioning of marine electrical systems. First, do a visual inspection of all connections, wires, and terminals, checking for corrosion, fraying, or any damage. Measure voltage levels with a multimeter at various points in the system and equipment for adequate power. If a problem is detected, check for loose or bad crimps, which are frequent offenders. Also, verify that all fuses and circuit breakers are alright.
Try to isolate the problem by systematically testing the various components, beginning with the battery and working outward during troubleshooting. Damaged or faulty parts should be replaced immediately to prevent any potential damage. Always adhere to the manufacturer’s specifications and guidelines for each component. Regular care and maintenance will go a long way toward avoiding electrical failures and extending the lifespan of marine installations.
Common Electrical Issues in Boats
Since boats are often exposed to harsh environmental conditions, such as moisture, salt, and vibration, electrical problems may occur. One common problem is battery failure, which can occur due to overcharging or undercharging of the battery, corrosion on the battery terminals, or leaving the battery in a discharged state for an extended period. Regular maintenance and the use of corrosion-resistant terminals for connections will significantly mitigate this problem.
Loose wiring connections are yet another common problem. Saltwater corrosion is a fast-acting process that can lead to intermittent power or a devastating power failure. Using marine-grade wiring and sealed connectors that can stand these conditions is worth every penny.
Bad alternators and alternator charging systems are considered significant problems by boat owners. Having a defective alternator will deplete your batteries at the worst time and may disrupt essential systems, such as navigation and communication equipment. Regular intervals of in-the-field testing of the alternator output are the best way to detect trouble early.
Shorts in the electrical system are often another source of failure, usually caused by damaged insulation or wires that are not adequately secured and rub against surfaces. Such shorts blow fuses and can even cause an electrical fire. Hence, it is crucial to make sure all wiring is suitably secured and insulated.
Recent data suggest that nearly 70 percent of all electrical failures on a vessel are preventable if proper inspections are maintained, correct installation methods are used, and quality, marine-specific components are employed. Thus, if trouble areas are addressed beforehand, the boater reduces the chances of unexpected electrical problems almost to nil and consequently becomes safer on the water.
How to Inspect Your Marine Electrical Wiring
Start With a Visual Inspection: Inspect the visible wiring to detect any signs of wear or corrosion. Look for frayed wires, discoloration, or heat marks, as these may indicate potential hazards. Ensure that all cables are fastened and adequately supported to prevent chafing from rubbing or stress.
Test All Connections and Terminals: Check that all connections and terminals are tight and free from contamination. Loose or corroded terminals can cause a failure to occur or a temperature rise. Use a multimeter to check for continuity at these connection points to ensure a good, solid connection is present.
Examine the Battery and Charging System: Ensure that your battery and charging systems are clean, free from corrosion, and in complete working condition. Test the voltage output from the alternator and ensure that the battery can hold a charge within the recommended range.
Check Circuit Protection Devices: Verify that fuses, circuit breakers, and other protective devices are suitable in size and type for your system. Replace any blown fuses and investigate the cause to prevent it from happening again.
Check for Insulation and Waterproofing: Verify that marine wires have proper insulation and waterproofing, especially those exposed to moisture. Use marine-grade heat shrink tubing or cable ties to shield wiring from water exposure.
Follow ABYC Standards: Ensure all electrical installations comply with the standards set by the American Boat and Yacht Council (ABYC) or equivalent marine electrical codes. This includes gauges, connectors, and components specifically designed for use in the aquatic environment.
Regular inspections and periodic maintenance may help avert electrical failures, extend the life of your marine equipment, and keep you safe while on the water.
Troubleshooting Electrical Problems Step-by-Step
Identify Symptoms of the Issue: Begin to observe any oddities occurring in the electrical system. Common symptoms include flickering lights, erratic battery charging, malfunctioning gear, and a burning smell. If possible, take note of specific occurrences, such as when the problem began or under what conditions it occurred.
Inspect Connections and Wires: Corroded connectors, frayed wires, or loose terminals are among the causes of electrical problems. Unplug the energy source and review the connections and cables to ensure they are secure. Statistics show that corrosion-related issues account for 30% of marine electrical failures.
Test for Proper Voltage: Use a multimeter to check the voltage at key points in the system. The readings should fall within the ranges specified by the manufacturer; otherwise, it could be a warning of a failing battery, poor wiring, or alternator faults. Might experience consistent voltage leakage if charging occurs suddenly, which, depending on the consistency, may lead to significant performance loss.
Check Fuses and Circuit Breakers: Check if any fuses have blown or breakers have tripped. Approximately 20% of all marine electrical faults are attributed to faulty circuit breakers or incorrect fuse ratings. Replace the fuses with ones that are correctly rated.
Inspect the Battery: Check the battery’s charge using a voltmeter or battery tester. Reliable charging levels or visible signs of corrosion on the terminals may dictate whether they require cleaning, recharging, or replacement. It has been well stated that over 50% of onboard power failures are battery-related.
Evaluate Appliances and Equipment: Sometimes, the GPS units, radios, or lights may malfunction due to issues with the equipment itself. Isolate and test each appliance to rule out internal faults in these systems. Damaged equipment should be repaired or replaced to prevent draining the electrical system.
Document and Consult an Expert if Needed: After the initial diagnostic procedure, documenting the results, including voltage readings and identified damaged parts, is advised. Even after a thorough troubleshooting procedure, specific problems still require the intervention of a certified marine electrician. Reviews indicate that professional evaluation reduces long-term repair bills and the recurrence of failure by 65%.
By following this logical approach, safer and more effective resolution of electrical problems can be guaranteed, thus lessening risks and downtime. Continuous upkeep and periodic inspections remain crucial to preventing any future issues.
Best Practices for Maintaining Marine Electrical Systems
Regular Inspections: Conduct regular inspections of all marine electrical systems to identify loose connections, corrosion, and signs of wear and tear. Early detection prevents minor issues from escalating into major failures.
Use Quality Components: Always use quality-grade components that are marine-grade and comply with industry standards. This ensures longevity and performance in harsh marine conditions.
Protect Against Corrosion: Use anti-corrosion chemicals on exposed connections and ensure all wiring is sealed correctly. Clean the terminals and battery contacts regularly to extend their lifespan.
Monitor Battery Health: Regularly test your battery’s voltage levels and look for signs of leakage or swelling. Aged or weakened batteries should be replaced as soon as possible to maintain a reasonable degree of reliability.
Hire Certified Professionals: When in doubt, let certified marine electricians maintain or repair your system. They will also prevent costly mistakes and ensure that safety codes are followed.
Document Maintenance: Keep records of all inspections, repairs, and component replacements. This will help keep track of the system’s history and aid in diagnosing future problems.
Using Tinned Copper Wiring: Advantages and Applications
Tinned copper wiring is standard in marine and industrial settings, benefiting from its enhanced durability and corrosion resistance. Instead of being littered with bare copper, it is coated with tin. This coat prevents any oxidation or rust caused by moisture and harsh environments.
Among its advantages is the performance that can last for a long time, even in environments with high salt or humidity levels, making it suitable for boats, solar installations, and outdoor wiring systems. Tinned copper wires are more flexible and easier to manipulate, even to the extent that they reduce the risk of cracking during installation. Additionally, they offer better conductivity and longevity than regular copper wiring, ensuring reliable electrical connections for critical applications. Higher upfront costs are an unfortunate reality for tinned copper wiring; however, one can view it as a worthwhile investment due to its lower maintenance and superior performance throughout its lifetime.
Securing Wiring with Cable Ties and Tubing
These methods are simple and remarkably effective for maintaining organization and safety. I ensure that wires are bundled in an orderly fashion with sturdy cable ties to avoid them from tangling or obstructing other parts. I may then use tubing to further guard these wires from abrasion, moisture, and general environmental wear in more challenging conditions. The symbiotic relationship between these methods helps me craft something that is not only dependable but also visually appealing and professional.
Maintaining Bilge Pump and Electrical Connections
The proper maintenance of bilge pumps and their electrical connections ensures their reliable operation and prevents potential failures. Inspect the pump for any debris that may hinder its operation, and clean it regularly if possible. Float switches should be tested periodically to ensure they activate the pump when needed. Inspect all electrical connections for signs of corrosion and wear, as these can affect efficiency. Consider applying a suitable protective coating or inhibitor to prevent corrosion. Also, ensure the wiring is securely fastened to prevent exposure to water or other environmental elements. These steps will help keep the bilge pumping system in optimal condition, ensuring safety and reliability.
Reference Sources
Arkiduct Propulsion in Large Marine Vessels
Marine DC Resistivity and Self-Potential Survey
Maritime Figurative and Literal Multiword Terms in the ESP Classroom
Frequently Asked Questions (FAQs)
What is the importance of using high-quality marine electrical wire?
Using high-quality marine electrical wire is crucial because it provides better resistance to corrosion, UV exposure, and moisture, which are common in aquatic environments. This ensures the longevity and reliability of the electrical system on your boat.
How do I wire a boat switch panel correctly?
Wiring a boat switch panel correctly involves following a diagram that outlines the connections for each switch. It’s essential to use the appropriate wire gauge and to connect the wires to the battery terminal securely, ensuring that all connections are tight to prevent electrical issues.
What is the proper way to install heat-shrink tubing?
To install heat shrink tubing, first cut a piece that fits over the connection. Slide it onto the wire before making the connection. After crimping or soldering, use a heat gun to evenly shrink the tubing around the joint, protecting against moisture and abrasion.
How can I troubleshoot common electrical issues in marine applications?
To troubleshoot common electrical issues in marine applications, start by inspecting the wiring for any visible damage or corrosion. Use a multimeter to test for continuity and voltage at various points in the electrical system, helping identify potential issues efficiently.
What wire gauge should I use for my marine wiring projects?
The wire gauge you should use for marine wiring projects depends on the current load and the length of the run. Generally, a larger AWG (American Wire Gauge) is needed for longer distances to reduce voltage drop and ensure safety.
What is the benefit of using tinned copper conductors in boat wiring?
Tinned copper conductors are beneficial in boat wiring because they resist corrosion better than bare copper, especially in saltwater environments. This extends the life of the wiring and ensures better conductivity, reducing the risk of electrical failures.
How do I choose the right connectors for my marine electrical system?
Choosing the right connectors for your marine electrical system involves selecting those that are rated for marine use, such as ring terminals and multi-conductor connectors. Ensure they are compatible with your wire gauge and suitable for the specific application to maintain a safe and reliable connection.
What is a wiring diagram, and why is it essential for boat wiring?
A wiring diagram is a visual representation of the electrical connections and components in a boat’s electrical system. It is essential for boat wiring because it provides a clear guide for installing or troubleshooting the system, ensuring that each component is connected correctly.