








Installing a 4-way switch can appear intimidating to a newbie or someone doing household repairs. But once you’ve gotten the hang of it and have proper training, you can have no doubts that the task is within your grasp, so your home lighting system will work perfectly fine. This article aims to guide readers through the complex wiring of 4-way switches in a straightforward and easy-to-follow manner. From adding some easy convenience to your lighting controls to learning how electrical systems work, this will equip you with the know-how and tools to complete this task safely and correctly.
Understanding the 4-Way Switch
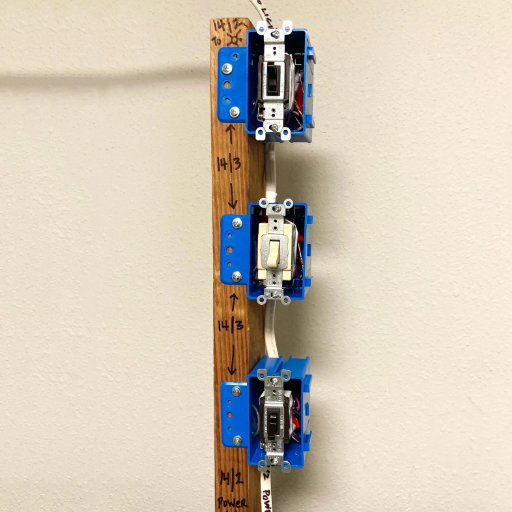
A 4-way switch controls a single light or set of lights from three or more locations. This switch is generally used between two 3-way switches. By itself, the 4-way switch does not turn the light on or off; instead, it diverts the current through two different paths, depending on the switch’s position. This provides numerous options and could be particularly helpful for large rooms, hallways, or staircases that require multiple control points. Understanding the function of each switch in the circuit is crucial if one expects the circuit to be wired correctly and function properly.
What is a 4-Way Switch?
The 4-way switch is essential in multi-location lighting control systems. A 4-way switch gets installed between two 3-way switches, allowing control of one light or set of lights from three or more locations. Internally, a 4-way switch reverses or interrupts the flow of electrical current between two pull wires or traveller wires. The switch comprises four terminals—two for the incoming cables and two for the outgoing wires—where the current changes its path depending on the toggle position.
A 4-way switch configuration proves helpful in long hallways, large living spaces, or staircases, where having multiple points to control lights will be more convenient and efficient. Safety aspects are now considered, according to standard installation practices, which include design compatibility with energy-efficient lighting arrangements, especially those based on LED fixtures. According to research, multiple points for light control can enable energy savings by switching off unnecessary lights from different points, thus giving ample opportunity for energy management. When 4-way switches are correctly wired, they function as expected, comply with electrical codes, and also prevent hazards for years to come.
How a 4-Way Switch Works
A 4-way switch is a key component in an advanced lighting system, especially in settings where controls need to be set up at multiple locations, such as large rooms, hallways, or stairwells. While simple single-pole switches control a light fixture from only one area, 4-way switches work in conjunction with 3-way switches to facilitate turning the light on or off from three or more places.
Basic functioning: Two traveler wires carry current between the 3-way switches and the 4-way switch. Internally, the 4-way switch contains a mechanism that changes the path that electricity takes along its circuits, either crossing or uncrossing the connections. When the switch is thrown, the current flows through one path in one switch position and through another path in the alternate switch position, allowing the light to respond regardless of which switch is operated.
For instance, in a standard 3-way switch wiring configuration with a single light fixture, the circuit originates from the power source, passes through the first 3-way switch, then the 4-way switch, to the second 3-way switch, and finally to the light fixture. The different positions of the switches ensure that the circuit is complete whenever the light is intended to be on.
Further modernizations have spurred alternate functional capabilities. Newer models engage ease of installation and come with color-coded or clearly labeled terminals, leaving almost no room for erroneous wiring. Studies reveal that easier switching systems, coupled with programmable or smart lighting systems that incorporate energy-saving practices, significantly enhance convenience and energy savings for households.
Proper wiring and regular maintenance of 4-way switches help guarantee a long-lasting service. Miswiring can cause a device to malfunction or pose an electrical hazard; therefore, it is essential always to follow manufacturer recommendations and seek professional advice when necessary.
Differences Between 3-Way and 4-Way Switches
A 3-way switch uses two switches to control a light from two locations, while a 4-way switch involves three or more switches to control a light from three or more locations.
|
Key Point |
3-Way Switch |
4-Way Switch |
|---|---|---|
|
Number of Poles |
2 |
1 |
|
Number of Terminals |
3 |
4 |
|
Wire Connections |
Line, Load, Traveler wires |
Line, Traveler wires |
|
Control Locations |
2 |
3+ |
|
Common Use |
Simple setups |
Complex setups |
|
Wiring Complexity |
Moderate |
High |
|
Cost |
Less |
More |
|
Application |
Small spaces |
Large spaces |
Wiring Basics for 4-Way Switches
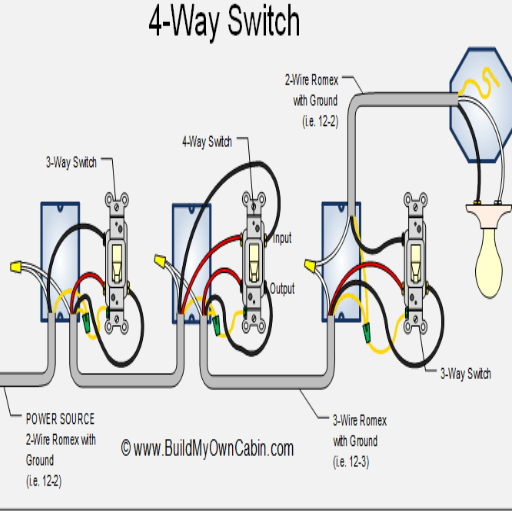
A 4-way switch executes three or more locations of one or more lights. Wiring usually involves one 4-way switch placed between two 3-way switches. Here’s the wiring process:
Power Source to First 3-Way Switch: The live (hot) wire from the power source is connected to the common terminal of the first 3-way switch.
Traveler Wires Between Switches: Two traveler wires run from the first 3-way switch to the 4-way switch. Two additional traveler wires then run from the 4-way switch to the second 3-way switch.
Light Connection: The common terminal of the second 3-way switch is attached to the wire running to the light or lighting fixture.
Neutral and Ground Wires: The neutral wire should run directly to the light fixture; all switches must be connected to ground.
Thus, these switches work together to provide uninterrupted control of the lighting from several locations. Always switch off the power first when wiring. Consulting local electrical codes or an expert is highly recommended.
Tools and materials required for a four-way switch
To wire a four-way switch, you will need screwdrivers, wire strippers, pliers, electrical tape, a voltage tester, wire nuts, appropriate four-way switches, and electrical cables.
|
Key Point |
Details |
|---|---|
|
Screwdrivers |
For screws |
|
Wire Strippers |
Stripping wires |
|
Pliers |
Cutting/bending |
|
Tape |
Insulates wires |
|
Tester |
Checks voltage |
|
Wire Nuts |
Secures wires |
|
Switches |
Four-way type |
|
Cables |
Electrical wiring |
Overview of Four-Way Switch Circuit
The four-way switch circuit controls a light fixture or cluster of lights from three or more different locations. These have applications in larger rooms, hallways, or staircases for convenience. It comes into play in an interconnected circuit along with two three-way switches at either end and one or more four-way switches in the middle.
Essentially, the four-way switch breaks or makes the connection between traveler wires to redirect current, depending on the position of the switches. When wired correctly, flipping any switch will alter the light state (on or off) of the circuit. Proper installation, from both a safety and functionality standpoint, requires attention to wiring placement and labeling.
Safety Precautions Before Starting
Before entering any electrical system involving switches, it is essential to prioritize safety to prevent accidents and damage. The following is a detailed set of precautions:
Turn Off Power at the Circuit Breaker: Always locate the proper circuit breaker and cut off the electricity to the area you wish to work in, thereby eliminating the risk of electrical shocks. Then, using a voltage tester or a noncontact voltage detector, verify that the wires are not energized.
Wear Protective Gear: Use insulated gloves and rubber-soled shoes to lessen the risk of conduction. Never undertake electrical work in damp environments, as water increases the risk of electrical hazards.
Know Wire Color Codes: Learn the electrical wiring color codes applicable in your region (e.g., in the U.S., black is typically used for hot wires, white is used for neutral, and green or bare copper is used for the ground). Identifying wires incorrectly can lead to a wrong connection and thus risk.
Use Proper Tools: For electrical work, always use insulated tools to prevent electrical shock. Keep tools in good shape so they do not slip accidentally and damage wires or cause shock.
Inspect for Damage: Observe all wires, switches, and electrical boxes for any signs of damage such as frayed insulation or burn marks. Replace any faulty components before proceeding.
Plan Your Work Area: Clear the workspace of unnecessary items and ensure there is good lighting to avoid mistakes. Also, let others in the house or workplace know about the electrical work being done so that they won’t accidentally interfere with the circuit.
Follow Local Building Codes and Regulations: This not only ensures safety but also guarantees that your work complies with local electrical codes. Improper installations pose a fire hazard and will otherwise fail inspection.
Test Continuously: Before installing the switches, thoroughly test the circuitry from start to finish, ensuring all wiring is complete and accurate. When done well, the circuit should turn the light on and off without flickers or delays.
When one does all these safety measures, at least the risks involved will be minimized, and thus one will have a considerably successful and hazard-free electrical job.
Components and Tools Needed for Wiring

These components and tools are supplied to work on the wiring satisfactorily:
Components: Electrical wires, light switches, circuit breakers, junction boxes, and the light itself. Ensure all components are compatible and conform to the electrical codes of your local area.
Tools: Screwdrivers, wire strippers, voltage testers, cable clamps, pliers, and electrical tape. A multimeter can be an option for more precise testing.
The availability of all these items would warrant a smooth wiring job.
Essential Tools for Wiring a 4-Way Switch
The following are the essential tools and materials to wire a 4-way switch:
Voltage Tester: Ensures that no live electricity is flowing before you start work.
Wire Strippers: For stripping insulation off the ends of electrical wires.
Screwdrivers: Usually Phillips and flathead for tightening screws and terminals.
Pliers: Useful for bending wires and ensuring good connections.
Electrical Tape: For insulating connections, plus an added layer of safety.
Cable Clamps: To securely hold wires and maintain a neat appearance.
Multimeter (optional): Helps check circuit continuity and track down problems.
Additionally, wiring accessories such as 4-way switches, junction boxes, and wiring of the appropriate gauge (typically 14 or 12 AWG, depending on your circuit setup) will be required. Typically, all wiring-related items must comply with local code standards.
Never work with electrical wiring without turning off the power at the circuit breaker for safety.
Wires Used in 4-Way Switch Wiring
A set of wires placed in a 4-way switch depends significantly on the number of cables combined; different wires perform specific functions in the circuit. Therefore, when determining their wiring, it is necessary to ensure both safety and optimal working performance.
Hot Wire (Line Wire): It is a black wire originating from the electrical panel and carrying power to the switch, typically connected to the common terminal on the first switch.
Neutral Wire: This white wire completes the circuit by carrying current back to the source. It is not considered helpful for switching purposes, but may be present in the same box, according to modern electrical codes.
Traveler Wires: Typically, there are two wires, often red and black, whose function is to allow current to flow between the terminals of the switches in a 3-way and 4-way setup.
Ground Wire: This green or bare copper conductor, once connected, grounds the circuit for safety. The green wire is connected to the green screw of the switches or another grounding point in the electrical box.
Common Wire (Load Wire): This wire supplies power to the controlled device, such as the light, from the last switch in the circuit.
Most of the time, 14- or 12-gauge wires are used when wiring a 4-way switch system, with the selection usually depending on the circuit’s amperage rating (15 amps for 14-gauge wire and 20 amps for 12-gauge wire). Additionally, according to modern electrical codes, a neutral wire must be present in switch boxes to accommodate new devices, such as smart switches.
Once the wires are correctly identified and connected, the 4-way switch system will work properly and comply with electrical safety regulations.
Understanding Circuit Breakers in 4-Way Switch Wiring
Circuit breakers are one of the primary safety components within any electrical system, including 4-way switch wiring. By design, these devices interrupt the flow of electricity whenever they detect an overload, short circuit, or any other fault condition, to prevent potential hazards such as fire or damage to the application.
In installing circuit breakers within a 4-way switch circuit, special attention should be given to the current rating and compatibility with the wiring. A 15-amp breaker should be used for circuits with 14-gauge wiring, and a 20-amp breaker should be used for circuits with 12-gauge wiring. Consequently, the circuit breaker will not be so miniature that it cannot handle the system’s current load demand, causing it to be constantly tripped due to overload. Additionally, arc fault circuit interrupters (AFCIs) are becoming a requirement in many modern electrical codes as a safety mechanism to interrupt circuit arcing that could develop into a fire due to damaged wiring.
Good labeling of the breakers inside the panel is another aspect of maintaining an orderly electrical system. It offers the quickest identification of the breakers, which control specific circuits, necessary when performing troubleshooting or maintenance related to a 4-way switch setup. The upgrading or installation of any electrical system must always comply with NEC standards for safety and legality. Investing in good-quality circuit breakers and ensuring the installation best suits your requirements will give you an extended life and reliability for your 4-way switch wiring system.
Step-by-Step Guide to Wire a 4-Way Switch
Turn Off the Power: Give yourself some time before you begin; it’s wise to switch off the power at the breaker panel to avoid the risk of electrical shock. Remove the voltage tester and check for the absence of voltage in the circuit you will be working with.
Prepare the Tools and Materials: Gather and bring all the necessary tools for the job, including screwdrivers, wire cutters, and voltage testers, as well as the required materials, such as a 4-way switch, two 3-way switches, electrical wires, and wire nuts.
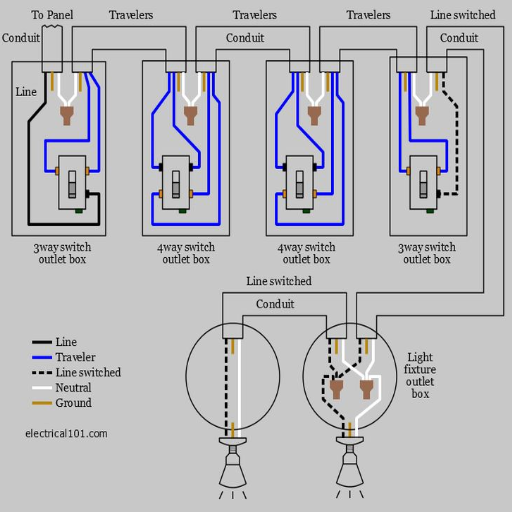
Confirm the Wiring Arrangement: Understand that a 4-way switch lies between two 3-way switches. All these switches work together to control a single light or group of lights from three or more locations.
Connect the First 3-Way Switch: Wire the first 3-way switch with the hot incoming wire to the common terminal, and the traveler wires to the remaining terminals.
Wire the 4-Way Switch: Connect two traveler wires from the first 3-way switch to one set of terminals in the 4-way switch, and the other two traveler wires connect to the second 3-way switch, going to the different set of terminals in the 4-way switch.
Install the Second 3-Way Switch: Connect the traveler wires from the 4-way switch to the terminals of the second 3-way switch. Then, connect the common terminal to the wire going to the light fixture.
Test the Connections: After confirming that all connections have been made correctly, restore power to the breaker. Test the switch by switching the light on and off from each location to ensure that everything is working correctly.
Secure and Cover: Once it works, set the switches into their boxes and secure them with screws. Cover with switch plates for a neat and safe finish.
By following these steps to wire a 4-way switch, you can keep it safe and functional.
Preparing the Wires
The wires must be prepared correctly for the successful installation of a 4-way switch system. It will be safer to work on it by turning off the circuit breaker. Three types of wires are needed in the setup: hot, neutral, and traveler wires. Usually, traveler wires are red and black, while the neutral wire is white. If your wires use a different color scheme, ensure you identify them correctly with a voltage tester.
Strip approximately 3/4 inch of insulation from the wire ends using a wire stripper. Ensure a clean and secure connection by checking the stripped end of the wires; trim if frayed or damaged. For further ease of installation, it is suggested to label the wires at this time. If any unused cables are present, they should be capped with wire nuts, as required by code, to prevent accidental contact.
When routing the wires, keep them neat, straight, unknotted, and free from twists. Attach the wires to the cable clamps without exerting excessive pressure, which could damage the insulation. Proper wire preparation not only facilitates the installation but also helps ensure a safe and durable electrical connection for your 4-way switch system.
Connecting the 4-Way Switch
A 4-way switch is added to a circuit between two 3-way switches, allowing for the operation of a single light or a group of lights from three or more locations. To wire the 4-way switch, one must first identify the traveler wires from the 3-way switches, typically marked with red and black colors, and ensure that the traveler terminals on the 4-way switch are connected directly to these wires. These are terminals usually marked on the 4-way switch or located on opposite sides. The ground wire, which is either green or bare copper, should be securely connected to the ground terminal on the 4-way switch to ensure the entire installation remains safe and secure.
In another standard configuration, the power source is supplied through the first 3-way switch, and the last 3-way switch is linked to the light fixture. The 4-way switch then interrupts the traveler wires in between, allowing the circuit to function flawlessly. When working on any electrical project, always verify that the wires are not live by using a reliable voltage tester. Then, for a 15 amp circuit, use 14-gauge wire, whereas for a 20 amp circuit, use 12-gauge wire, as the latter will be required to keep the load safe from current.
Ensuring every connection is made correctly is crucial; incorrect wiring can cause the circuit to malfunction or create a hazardous condition. Testing the light for all switch combinations confirms that the wiring is complete and functioning properly. Ultimately, a well-wired 4-way switch system significantly enhances the convenience and usability of your lighting setup, particularly in larger spaces. Always check your local electrical requirements to ensure compliance with and adherence to safety standards.
Testing the Circuit
Once the wiring of the 4-way switch system is complete, it is essential to systematically test the circuit to ensure that everything works as intended. First, turn the power back on through the circuit breaker, ensuring that there are no signs of a tripped breaker or a short circuit. Then, go to each switch in the circuit and test it by toggling it on and off in varying combinations. The fixture should respond every single time, turning off and on, depending on the position of the switches, regardless of which switch is operating it.
If, however, the light does not respond appropriately, check for loose connections or for travelers that have been swapped in any terminals. Use a multimeter to trace which section the voltage is not present in. For example, a normal multimeter reading at the fixture should be approximately 120 volts, assuming it has been connected to a standard residential circuit in the US. Ensure all connections are secure and the wires are properly capped and insulated.
If your light flickers inconsistently when the switches are toggled, then there is a severed or loose connection that needs to be fixed. Completing these steps in detail and systematically reduces the margin for errors and increases the time duration for which the system can be safely used. Always prioritize safety by wearing insulated gloves and tools whenever working around live electricity. If the system passes all tests and the light functions properly, you may then declare your 4-way switch installation complete and ready for operation.
A four-way switch identifies wiring errors.
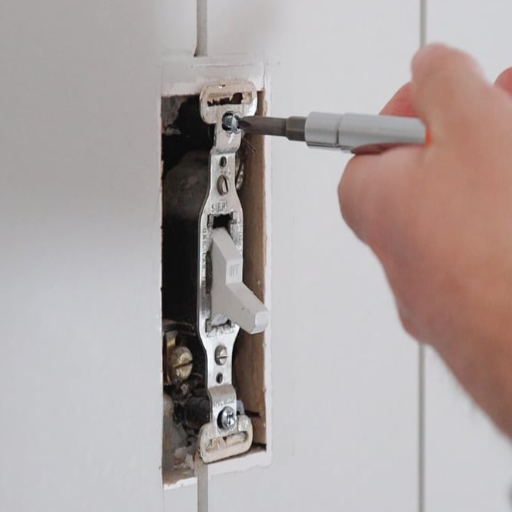
A four-way switch can indeed be used to isolate the problem area in the circuit and ascertain whether there is a wiring error. When the light refuses to work or operates inconsistently, the cause may arise from incorrect connections being made between these switches or from selecting the wrong terminals. Testing one switch at a time and ensuring the wires are attached to the correct terminals will resolve most errors. It is necessary to confirm the proper sequence of connections and then check for continuity. These are proven methods for finding and fixing wiring errors.
How to Fix a Malfunctioning 4-Way Switch
Turn Off Power to the Circuit: For safety, ensure the breaker is turned off and then double-check with a voltage tester that the wires no longer carry electricity.
Test the Switch Connections: The switch cover is removed to ensure that every wire is firmly attached to the correct terminal. A typical installation for a 4-way switch will have four terminals, plus a ground terminal. Ensure that traveler wires are connected to the proper terminals according to the wiring diagram.
Check for Loose or Damaged Wires: Check the wires for any fraying, corrosion, or loose connections. Repair or replace any damaged wires as necessary to restore proper functioning.
Test Adjacent Switches: A 4-way switch is a complementary system requiring 3-way switches to function correctly. Testing of these switches is warranted to eliminate any possible defects in those connections, which could affect the performance of the entire circuit.
Perform a Continuity Test: Select continuity mode on the multimeter and check all switch positions to determine if the 4-way switch has failed and requires replacement.
Replace the Faulty Switch if Necessary: If the 4-way switch is faulty, a new one that matches the old one should be installed, with wire connections made according to the wiring instructions.
Double-check the Wiring: With the help of a schematic or diagram for your particular setup, ensure that the traveler, load, and ground wires are all connected correctly.
Restore Power and Test: After repairs are completed, power up and test the entire circuit to verify that the 4-way switch and its connected switches are functioning correctly.
These instructions cover the majority of common problems related to a 4-way switch circuit and help you quickly restore the function. When the problem persists or becomes complicated, it may be wise to seek the advice of an electrician.
When to Call a Professional
If one is unsure of how to troubleshoot safely, lacks the necessary tools and knowledge to do so, or the problem persists even after attempting simple repairs, it is advisable to seek the services of a licensed electrician. I would highly recommend seeking the assistance of a professional to ensure the circuit is fixed correctly and to prevent any hazards from compromising one’s safety.
Reference Sources
Frequently Asked Questions (FAQs)
What is a 4-way switch, and how does it work?
A 4-way switch is a type of electrical switch that allows you to control a light from three different locations. It works in combination with 3-way switches, creating a circuit that enables the light to be powered from more than one location. The 4-way switch has four terminals: two brass-colored terminal screws and two additional terminals that connect to the 3-way switches, allowing for multiple toggle positions.
How do you wire a 4-way switch?
To wire a 4-way switch, start by connecting the two sets of toggle positions to the corresponding 3-way switches. You will typically use an NM cable that contains black, red, and white wires. Connect the black and red wires to the two terminals on the 4-way switch and ensure the white neutral wire is connected correctly. It’s essential to follow safety first by turning off the circuit breaker before starting any wiring work.
What is the purpose of the terminal screws on a 4-way switch?
The terminal screws on a 4-way switch are crucial for establishing connections between the switch and the electrical circuit. The 4-way switch has four terminals, two brass-colored terminal screws for incoming and outgoing power, and two other screws for connection to the 3-way switches. These terminal screws allow the flow of electricity through two terminals, enabling the switch to function correctly.
Can a 4-way switch be used in conjunction with multiple 3-way switches?
Yes, a 4-way switch is often used in conjunction with multiple 3-way switches to control a light from three locations. This setup is particularly useful in large rooms where you want the convenience of controlling lighting from multiple entry points. The combination allows for various ways to complete the circuit, enhancing functionality.
What are the key components needed to install a 4-way switch?
When installing a 4-way switch, you will need several key components, including a 4-way switch, two 3-way switches, an NM cable, and wires. The NM cable typically contains black, red, and white wires. Additionally, grounding wires, such as bare grounding wires or a green grounding screw, are necessary to ensure safety and proper grounding of the switch installation.
How do you ensure safety when wiring a 4-way switch?
To ensure safety when wiring a 4-way switch, always follow basic electrical safety guidelines. Start by turning off the power at the circuit breaker. Use an ohmmeter to test the circuit and ensure that no power is flowing through it. Use a pigtail to connect grounding wires to the green ground terminal, ensuring that all connections are secure and that grounding is established correctly. This will help prevent electrical hazards.
What are the common mistakes to avoid when wiring a 4-way switch?
Common mistakes when wiring a 4-way switch include failing to turn off the circuit breaker, miswiring the connections between the switches, and neglecting to use proper grounding techniques. Additionally, it’s essential to ensure that the terminals are connected correctly and that the wiring follows the appropriate configuration to prevent short circuits and ensure the switch operates as intended.
How can a DIYer learn about a 4-way switch?
A DIYer can learn about a 4-way switch by researching electrical wiring guides, watching instructional videos, or consulting with an electrician. Many resources explain how 4-way switches are used, their functionality in combination with 3-way switches, and provide step-by-step instructions for installation. Understanding the components, including the terminal screws and wiring configurations, is essential for a successful installation.